background image

34

Stage v266


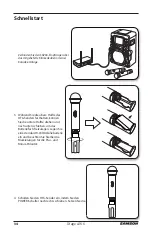
Verbinden Sie den SR266-Empfänger über 

das mitgelieferte Klinkenkabel mit einer 

Karaoke-Anlage.


3.  Während Sie die obere Hälfte des 

HT6-Senders festhalten, können 

Sie die untere Hälfte drehen und 

nach unten schieben, um das 

Batteriefach freizulegen. Legen Sie 

eine standard 9-Volt Alkaliebatterie 

ein und beachten Sie hierbei die 

Markierungen für die Plus- und 

Minus-Polarität.   


4.  Schalten Sie den HT6-Sender ein, indem Sie den 

POWER-Schalter nach rechts schieben. Setzen Sie die 

Schnellstart

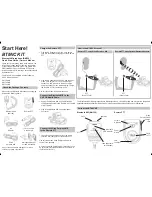
5. Installing a 9-volt battery into the receiver.

3. Plugging the receiver into a stereo using the 1/4" - RCA cable.

4. Plugging the receiver into a Karaoke machine using 1/4" - 1/4" cable.

1. Plugging the receiver into the wall.

2. Plugging the receiver into a mixer using 1/4" - 1/4" cable.

4. Plugging the receiver into a Karaoke machine using 1/4" - 1/4" cable.

Содержание Stage v266

Страница 1: ...Owner s Manual Stage v266 Dual Vocal Wireless System ...

Страница 2: ...Copyright 2013 Samson Technologies Corp v2 2 Samson Technologies Corp 45 Gilpin Avenue Hauppauge New York 11788 8816 Phone 1 800 3 SAMSON 1 800 372 6766 Fax 631 784 2201 www samsontech com ...

Страница 3: ...on system for used electronic products in accordance with legislation that requires proper treatment recovery and recycling Private household in the 25 member states of the EU in Switzerland and Norway may return their used electronic products free of charge to designated collection facilities or to a retailer if you purchase a similar new one For Countries not mentioned above please contact your ...

Страница 4: ...cessories specified by the manufacturer 12 Use only with the cart stand tripod bracket or table specified by the manufacturer or sold with the ap paratus When a cart is used use caution when moving the cart apparatus combina tion to avoid injury from tip over 13 Unplug the apparatus during light ening storms or when unused for long periods of time 14 Refer all servicing to qualified personnel Serv...

Страница 5: ...EUTSCHE ESPAÑOL ITALIANO 5 Stage v266 Dual Handheld Wireless Table of Contents Introduction 6 Receiver Controls and Features 7 Transmitter Controls and Features 8 Quick Start Guide 9 Specifications 12 Troubleshooting 13 ...

Страница 6: ...at you can receive online technical support and so that we can send you updated information about this and other Samson products Also be sure to check out our website www samsontech com for complete information about our full product line We recommend that you record your serial number in the space provided below for future refer ence Serial number _______________________________ Date of purchase ...

Страница 7: ...ge to the SR266 and will void your warranty 8 Channel 1 Output Use this unbalanced jack to connect the SR266 Channel 1 receiver to the line level input of a mixer amplifier or other audio equipment For a mixed signal of both receivers only plug into one output on the SR266 Otherwise Channel 1 and Channel 2 will output separate signals 9 Channel 2 Output Use this unbalanced jack to connect the SR26...

Страница 8: ...ur external mixer or amplifier before turning transmitter power on or off or an audible pop may result 3 Power Indicator LED lights green when the transmitter is powered on 4 Battery Compartment Insert a standard 9 volt alkaline battery here Be sure to observe the plus and minus polarity markings when installing the battery We recommend the Duracell MN 1604 type battery for use with this device Al...

Страница 9: ...ar panel DC input and then to an electrical outlet 2 Connect the receiver s appropriate output to the input of a mixer stereo karaoke machine or any other line level input see below Use the included to cable to connect the SR266 receiver to a mixer Use the included to dual RCA cable to connect the SR266 recevier to a stereo or other HI FI device Quick Start Guide 3 Plugging the receiver into a ste...

Страница 10: ...de down to expose the battery compartment Insert a standard 9 volt alkaline battery being sure to follow the plus and minus polarity markings 4 Turn on the HT6 transmitter by sliding the POWER switch to the right and replace the bottom section Quick Start Guide 4 Plugging the receiver into a Karaoke machine using 1 4 1 4 cable 1 Plugging the receiver into the wall cable ...

Страница 11: ...see the receiver Turn on the power of the SR266 receiver 6 Turn on the connected amplifier and or mixer but keep its volume all the way down Next make sure that your transmitter is un muted by setting its Audio switch to ON Then set the Volume Control knob on the SR266 fully clockwise this is unity gain Speak or sing into the mic at a normal performance level while slowly raising the volume of you...

Страница 12: ...e 95 5 dB Maximum Output 900mV Sensitivity 10 dBµV for 48 dB S N Output Connectors Two 1 4 TS mono phone jack Audio Output Levels 10dB unbalanced 1 4 phone connector Power Supply 100 240V AC 50 60 Hz to 12V DC 0 2A Dimensions 7 9 x 5 3 x 1 7 200 mm x 134 mm x 43 mm Net Weight 0 84 lbs 0 38 kg HT6 HANDHELD TRANSMITTER SPECIFICATIONS RF Power Output 10 mW Microphone Element H6 Dynamic unidirectional...

Страница 13: ...and HT6 transmitters are in line of sight with one another Check the receiver and audio input device level controls Distorted Audio Check the receiver output level and audio input device level Check the HT6 s batteries and replace if low Another transmitter may be broadcasting on the same channel Turn off transmitter that may be causing interference Audio Dropout The transmitter may be too far awa...

Страница 14: ...rference in a residential installation This equipment gener ates uses and can radiate radio frequency energy and if not installed and used in accordance with the instructions may cause harmful inter ference to radio communications However there is no guarantee that interference will not occur in a particular installation If this equipment does cause harmful interference to radio or television rece...

Страница 15: ...inistration locale pour connaître la méthode de mise au rebut appropriée En procédant ainsi vous êtes assuré que votre produit sera correctement traité récupéré et recyclé afin de prévenir les effets négatifs possibles sur l environnement et la santé Consignes de sécurité importantes ATTENTION POUR ÉVITER TOUT RISQUE D ÉLECTROCUTION NE RETIREZ PAS LES VIS TOUTE RÉPARATION DOIT ÊTRE CONFIÉE À UN PE...

Страница 16: ...ixations et accessoires spécifiés par le fabricant 12 Utilisez uniquement le support le pied ou la table spécifiés par le fabricant ou vendus avec l appareil Lorsque vous utilisez un chariot procédez avec vigilance lorsque vous vous déplacez pour éviter toute bles sure aux personnes et tout dommage aux équipements 13 Déconnectez l appa reil du secteur en présence d orage ou lors de périodes de non...

Страница 17: ...IANO Stage v266 Double micro main sans fil 17 Table des Matières Introduction 18 Récepteur SR266 Fonctions et réglages 19 Émetteur HT6 Fonctions et réglages 20 Guide de prise en main 21 Caractéristiques techniques 24 Assistance technique 25 ...

Страница 18: ...ous la retourner pour bénéficier de l assistance technique et pour recevoir des documentations sur les nouveaux produits Samson N oubliez pas de consulter notre site Internet à l adresse suivante www samsontech com Prenez le temps de noter le numéro de série et la date d achat ci dessous pour toute référence ultérieure Numéro de série _______________________________ Date d achat __________________...

Страница 19: ... 35 mm pour connecter le canal 1 du récepteur SR266 à l entrée ligne d une console de mixage d un amplificateur ou tout autre équipement audio Pour disposer du signal mélangé des deux récepteurs utilisez une seule des deux sorties du SR266 Dans le cas contraire les sorties des canaux 1 et 2 sont séparées et non mélangées 9 Sortie du canal 2 Utilisez ce Jack asymétrique 6 35 mm pour connecter le ca...

Страница 20: ... la console de mixage ou l ampli ficateur externe avant de placer l émetteur sous hors tension pour éviter tout bruit de pop violent 3 Témoin Led Ce témoin s allume en vert lorsque vous placez l émet teur sous tension 4 Compartiment de la pile Insérez une pile de 9 Volts alcaline standard dans ce compartiment Respectez les polarités et de la pile Nous conseillons la pile Duracell MN 1604 avec cet ...

Страница 21: ...n Jack 6 35 mm correspondant à l émetteur à l entrée d une console de mixage d un amplificateur d une machine de karaoké ou à l entrée de tout équipement à entrée ligne voir ci contre 3 Utilisez le cordon Jack 6 35 mm Jack 6 35 mm fourni pour relier le récepteur SR266 à la console de mixage 4 Utilisez le cordon adaptateur fourni Jack 6 35 mm vers deux RCA pour relier le récepteur SR266 à un équipe...

Страница 22: ...eure et faites la glisser vers le bas pour ouvrir le compartiment de la pile Insérez une pile alcaline de 9 Volts standard en respectant les polarités 7 Placez l émetteur HT6 sous tension en plaçant l interrupteur POWER sur la droite et replacez la section inférieure du micro Guide de prise en main 4 Plugging the receiver into a Karaoke machine using 1 4 1 4 cable 1 Plugging the receiver into the ...

Страница 23: ...ous tension 9 Placez la console de mixage ou l amplificateur connecté en veillant à régler son volume au minimum Veillez à ce que la transmission de l émetteur soit assurée et non en coupure audio en veillant à ce que le sélecteur Audio soit en position ON Ensuite montez le bouton de Volume du SR266 au maximum ce qui correspond au gain unitaire Parlez ou chantez normalement dans le micro tout en m...

Страница 24: ...5 5 dB Niveau de sortie maximum 900 mV Sensibilité 10 dBµV pour un signal bruit de 48 dB Connecteurs de sortie Deux Jacks 6 35 mm mono Niveaux de sorties audio 10 dB asymétrique Jack 6 35 mm Alimentation 100 240 Vca 50 60 Hz vers 12 Vcc 0 2 A Dimensions 200 mm x 134 mm x 43 mm Poids net 0 38 kg CARACTÉRISTIQUES DU MICRO MAIN ÉMETTEUR HT6 Puissance HF 10 mW Élément du micro Capsule H6 dynamique uni...

Страница 25: ...en ligne directe Vérifiez le réglage de niveau sur le récepteur et sur la console de mixage Distorsion audio Vérifiez le réglage de niveau sur le récepteur et sur la console de mixage Contrôlez la pile de l émetteur HT6 Remplacez la si besoin est Il se peut qu un autre émetteur utilise la même fréquence que vous Placez l émetteur qui semble causer le problème hors tension Décrochages audio L émett...

Страница 26: ...able contre les interférences en installations résidentielles Cet appareil génère uti lise et peut émettre des fréquences radio et s il n est pas installé ou uti lisé selon les instructions il peut causer des interférences aux communi cations radio Cependant il n y a aucune garantie que les interférences ne se manifestent jamais dans une installation donnée Si cet appareil cause des interférences ...

Страница 27: ...ben werden Dieses Produkt darf nicht mit dem normalen Hausmüll entsorgt werden Es gibt ein separates Entsorgungssystem für gebrauchte elektronische Produkte das die gesetzlichen Vorschriften zur korrekten Behandlung Verarbeitung und Wiederaufbereitung erfüllt Private Haushalte in den 25 Mitgliedstaaten der EU in der Schweiz und Norwegen können ihre gebrauchten elektronischen Produkte kostenlos bei...

Страница 28: ...ät 11 Benutzen Sie nur die vom Hersteller angegebenen Halterungen Zube hörteile 12 Benutzen Sie das Gerät nur mit den Wagen Ständern Stativen Halterungen oder Tischen die vom Hersteller empfohlen oder mit dem Gerät verkauft wurden Ge hen Sie beim Bewegen eines Wagens vorsichtig vor damit die Wagen Geräte Kombination nicht umkippt und Verletzungen verursacht 13 Ziehen Sie den Netzstecker des Geräts...

Страница 29: ...RANÇAIS DEUTSCHE ESPAÑOL ITALIANO Owner s Manual 29 Stage v266 Inhalt Einleitung 30 SR266 Empfänger Regler und Funktionen 31 HT6 Sender Regler und Funktionen 32 Schnellstart 33 Technische Daten 36 Fehlersuche 37 ...

Страница 30: ...n über dieses und andere Samson Produkte erhalten Besuchen Sie auch unsere Website www samsontech com auf der Sie ausführliche Informationen über unsere gesamte Produktpalette finden Die Seriennummer Ihres Geräts sollten Sie vorsorglich in der Zeile unten eintragen Seriennummer _______________________________ Kaufdatum __________________________________ Wenn Ihr Gerät einmal gewartet werden muss b...

Страница 31: ...üche verlieren 8 Channel 1 Ausgang Über diese unsymmetrische 6 35 mm Buchse verbinden Sie Kanal 1 des SR266 Empfängers mit dem Line Pegel Eingang eines Mischers Verstärkers oder anderen Audiogeräts Für eine gemischte Signalausgabe beider Empfänger belegen Sie nur einen Ausgang des SR266 Andernfalls werden über Kanal 1 und 2 getrennte Signale ausgegeben 9 Channel 2 Ausgang Über diese unsymmetrische...

Страница 32: ...rs sollten Sie das Audiosignal am externen Mischer oder Verstärker stummschalten um störende Poppgeräusche zu vermeiden 3 Spannungsanzeige Leuchtet grün wenn der Sender eingeschaltet ist 4 Batteriefach Hier legen Sie eine standard 9 Volt Alkaliebatterie ein Beachten Sie beim Einlegen die Markierungen für die Plus und Minus Polarität Wir empfehlen Batterien des Typs Duracell MN 1604 Obwohl man auch...

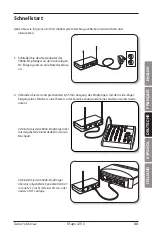
Страница 33: ...n 2 Verbinden Sie den entsprechenden 6 35 mm Ausgang des Empfängers mit dem Line Pegel Eingang eines Mischers einer Stereo oder Karaoke Anlage oder eines anderen Geräts siehe unten Verbinden Sie den SR266 Empfänger über das mitgelieferte Klinkenkabel mit einem Mischpult Verbinden Sie den SR266 Empfänger über das mitgelieferte Spezialkabel 6 35 mm auf 2 x Cinch mit einer Stereo oder anderen HI FI A...

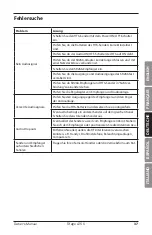
Страница 34: ...und nach unten schieben um das Batteriefach freizulegen Legen Sie eine standard 9 Volt Alkaliebatterie ein und beachten Sie hierbei die Markierungen für die Plus und Minus Polarität 4 Schalten Sie den HT6 Sender ein indem Sie den POWER Schalter nach rechts schieben Setzen Sie die Schnellstart 4 Plugging the receiver into a Karaoke machine using 1 4 1 4 cable 1 Plugging the receiver into the wall c...

Страница 35: ...den SR266 Empfänger ein 6 Schalten Sie den angeschlossenen Verstärker und oder Mischer bei ganz zurückgedrehter Lautstärke ein Stellen Sie den Audio Schalter des Senders auf ON um dessen Stummschaltung aufzuheben Drehen Sie dann den Pegelregler des SR266 ganz nach rechts Dies ist Unity Gain Sprechen oder singen Sie mit normaler Performance Lautstärke ins Mikrofon während Sie den Pegel am Verstärke...

Страница 36: ...nung 900 mV Empfindlichkeit 10 dBµV für 48 dB Geräuschspannungsabstand Ausgänge zwei 6 35 mm mono Klinkenbuchsen Audio Ausgangspegel 10 dB unsymmetrisch 6 35 mm Klinkenbuchse Spannungsversorgung 100 240V AC 50 60 Hz bis 12V DC 0 2 A Abmessungen 200 mm x 134 mm x 43 mm 7 9 x 5 3 x 1 7 Nettogewicht 0 38 kg 0 84 lbs TECHNISCHE DATEN HT6 HANDSENDER RF Ausgangsleistung 10 mW Mikrofonelement H6 dynamisc...

Страница 37: ...in Sichtver bind ung zueinander stehen Prüfen Sie die Pegelregler von Empfänger und Audioanlage Verzerrte Audiosignale Prüfen Sie den Ausgangspegel des Empfängers und den Pegel der Audioanlage Prüfen Sie die HT6 Batterien und ersetzen Sie sie nötigenfalls Eventuell überträgt ein anderer Sender auf dem gleichen Kanal Schalten Sie den störenden Sender aus Audio Dropouts Eventuell ist der Sender zu w...

Страница 38: ...r Installation in Wohngebieten bieten Dieses Gerät erzeugt verwendet und kann Rundfunkfrequenz Energie aus strahlen und kann wenn es nicht gemäß den Anleitungen instal liert und betrieben wird schädliche Interferenzen bei der Rundfunk kommu nikation erzeugen Es gibt allerdings keine Garantien dass bei einer bestimmten Installation keine Interferenzen auftreten Wenn dieses Gerät schädliche Interfer...

Страница 39: ...os electrónicos Todos los usuarios no profesionales y que sean ciudadanos de uno de los 25 países miembros de la EU Suiza y Noruega pueden devolver sus aparatos electrónicos usados sin coste alguno al comercio en el que fueron adquiridos si adquiere allí otro aparato similar o en determinados puntos limpios designados En el caso de cualquier otro país distinto a los anteriores póngase en contacto ...

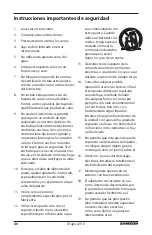
Страница 40: ...e 12 Utilice este aparato solo con el soporte trípode mesa o bastidor especificado por el fabricante o que sea comercializado con este aparato Cuando utilice un bastidor con ruedas tenga especial cuidado al mover la combinación bastidor aparato para evitar daños en caso de un vuelco 13 Desconecte este aparato de la corriente durante las tormentas eléctricas o cuando no lo vaya a usar durante un pe...

Страница 41: ...SPAÑOL ITALIANO Owner s Manual 41 Stage v266 Índice Introducción 42 Controles y funciones del receptor 43 Controles y funciones del transmisor 44 Guía de puesta en marcha 45 Especificaciones técnicas 48 Resolución de problemas 49 ...

Страница 42: ...s actualizada sobre este y otros productos Samson en el futuro Además asegúrese de acceder a nuestra página web www samsontech com para ver toda la información disponible relacionada con toda nuestra gama de productos Le recomendamos que apunte el número de serie y la fecha de compra en los espacios reservados para ello por si tiene que hacer cualquier consulta en el futuro Número de serie _______...

Страница 43: ...m para conectar el receptor del canal 1 del SR266 a la entrada de nivel de línea de una mesa de mezclas amplificador u otro dispositivo audio Para una señal mezclada de ambos receptores conecte solo una salida del SR266 En caso contrario el canal 1 y el 2 emitirán señales independientes 9 Salida del canal 2 Use esta toma no balanceada de 6 3 mm para conectar el receptor del canal 2 del SR266 a la ...

Страница 44: ...eñal audio en su mesa de mezclas o amplificador externo antes de apagar o encender el transmisor para evitar la producción de posibles chasquidos 3 Indicador de encendido Este piloto se ilumina en verde cuando el transmisor esté encendido 4 Compartimento de la pila Introduzca aquí una pila alcalina standard de 9 voltios Asegúrese de seguir las indicaciones de polaridad símbolos más menos a la hora...

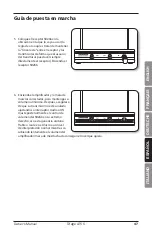
Страница 45: ...orriente 2 Conecte la salida de 6 3 mm adecuada del receptor a la entrada de una mesa de mezclas sistema stereo unidad de karaoke u otra entrada de nivel de línea vea abajo Use el cable incluido de 6 3 mm a 6 3 mm para conectar el receptor SR266 a una mesa de mezclas Use el cable incluido de 6 3 mm a doble RCA para conectar el receptor SR266 a un dispositivo HI FI o equipo stereo Guía de puesta en...

Страница 46: ...jo para hacer que quede al descubierto el compartimento de la pila Introduzca una pila alcalina de 9 V standard asegurándose de seguir las indicaciones de polaridad 4 Encienda el transmisor HT6 deslizando el interruptor POWER hacia la derecha y vuelva a colocar después la sección inferior Guía de puesta en marcha 4 Plugging the receiver into a Karaoke machine using 1 4 1 4 cable 1 Plugging the rec...

Страница 47: ...or Encienda el receptor SR266 6 Encienda el amplificador y o mesa de mezclas conectados pero mantenga su volumen al mínimo Después asegúrese de que su transmisor no esté anulado ajustando su interruptor Audio a ON Ajuste posteriormente el control de volumen del SR266 en su extremo derecho eso es la ganancia unitaria Hable o cante en el micro a un nivel de interpretación normal mientras va subiendo...

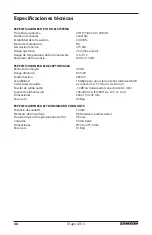
Страница 48: ...go dinámico 95 5 dB Salida máxima 900 mV Sensibilidad 10 dBµV para una relación señal ruido de 48 dB Conectores de salida 2x conectores TS mono de 6 3 mm Niveles de salida audio 10 dB no balanceado conector de 6 3 mm Fuente de alimentación 100 240 V CA 50 60 Hz a 12 V CC 0 2 A Dimensiones 200 x 134 x 43 mm Peso neto 0 38 kg ESPECIFICACIONES DEL TRANSMISOR DE MANO HT6 Potencia de salida RF 10 mW El...

Страница 49: ...llos Compruebe los controles de nivel del dispositivo de entrada audio y del receptor Sonido distorsionado Compruebe el nivel de salida del receptor y el nivel del dispositivo de entrada audio Compruebe la carga de las pilas del HT6 y sustitúyalas si están casi descargadas Es posible que haya otro transmisor emitiendo señal en el mismo canal Desactive el transmisor que pueda estar produciendo las ...

Страница 50: ...ión razonable contra las interferencias molestas en instalaciones residenciales Este aparato genera usa y puede emitir energía de radiofrecuencias y si no es instalado y usado de acuerdo con las instrucciones puede producir interferencias molestas en las comunicaciones de radio No obstante no está garantizado que estas interferencias no se produzcan en una instalación concreta Si este aparato prod...

Страница 51: ...ection system for used electronic products in accordance with legislation that requires proper treatment recovery and recycling Private household in the 25 member states of the EU in Switzerland and Norway may return their used electronic products free of charge to designated collection facilities or to a retailer if you purchase a similar new one For Countries not mentioned above please contact y...

Страница 52: ...pecificati dal produttore 12 Usare solo carrelli supporti cavalletti sostegni o tavoli speci ficati dal produttore o acquistati con l appa recchio Quando si usa un carrello prestare attenzione durante gli spostamenti onde evitare che la combinazione carrello unità possa ribaltarsi 13 Scollegare l unità dalla corrente du rante i temporali o quando inutilizza ta per lunghi periodi 14 Per l assistenz...

Страница 53: ...SCHE ESPAÑOL ITALIANO Owner s Manual 53 Stage v266 Indice Introduzione 54 Controlli e funzioni del ricevitore SR266 55 Controlli e funzioni del trasmettitore HT6 56 Guida rapida 57 Specifiche 60 Risoluzione dei problemi 61 ...

Страница 54: ...to e altri prodotti Samson Ti invitiamo anche a visitare il nostro sito web www samsontech com per informazioni complete sulla nostra intera linea di prodotti Ti raccomandiamo di annotare qui sotto il numero di serie come futuro riferimento Numero di serie _______________________________ Data d acquisto ____________________________ Se l unità necessitasse di riparazione prima di spedirla a Samson ...

Страница 55: ...mm per collegare il ricevitore SR266 Channel 1 all ingresso di linea di un mixer un amplificatore o altra attrezzatura audio Per usare il segnale combinato di entrambi i ricevitori collega una sola uscita sull SR266 Altrimenti Channel 1 e Channel 2 trasmetteranno segnali separati 9 Uscita Channel 2 Usa questo jack sbilanciato da 6 3 mm per collegare il ricevitore SR266 Channel 2 all ingresso di li...

Страница 56: ... sul mixer o sull ampli ficatore prima di accendere spegnere il trasmettitore o si potrebbe udire un rumore secco 3 Indicatore Power Il LED è verde quando il trasmettitore è acceso 4 Vano batteria Inserisci qui una batteria alcalina standard da 9 volt Nel farlo assicurati di rispettare la polarità positiva e negativa Racco mandiamo di utilizzare una batteria Duracell tipo MN 1604 Le batterie ricar...

Страница 57: ...steriore e a una presa elettrica 2 Collega l uscita da 6 3 mm in uso all ingresso di un mixer uno stereo o un karaoke o a un altro ingresso di linea vedi sotto Usa il cavo da 6 3 mm a 6 3 mm in dotazione per collegare il ricevitore SR266 a un mixer Usa il cavo da 6 3 mm a doppio RCA in dotazione per collegare il ricevitore SR266 a uno stereo o altro dispositivo Hi Fi Guida rapida 3 Plugging the re...

Страница 58: ...ala verso il basso per accedere al vano batteria Inserisci una batteria alcalina standard da 9 volt assicurandoti di rispettare la polarità positiva e negativa 4 Accendi il trasmettitore HT6 spostando a destra l interruttore Power e riposiziona la sezione inferiore Guida rapida 4 Plugging the receiver into a Karaoke machine using 1 4 1 4 cable 1 Plugging the receiver into the wall cable ...

Страница 59: ...ccendi il ricevitore SR266 6 Accendi l amplificatore e o il mixer collegato ma tieni il volume al minimo Quindi verifica che il trasmettitore non sia in mute spostando l interruttore Audio su ON Ruota completamente in senso orario la manopola del controllo volume sull SR266 questo è il guadagno unitario Parla o canta nel microfono a un volume da performance tipica alzando lentamente volume dell am...

Страница 60: ... Gamma dinamica 95 5 dB Uscita massima 900 mV Sensibilità 10 dBµV per 48 dB S N Connettori in uscita Due jack TS mono da 6 3 mm Livelli di uscita audio 10 dB sbilanciati connettore da 6 3 mm Alimentazione Da 100 240 V CA 50 60 Hz a 12 V CC 0 2 A Dimensioni 200 mm x 134 mm x 43 mm Peso netto 0 38 kg SPECIFICHE DEL TRASMETTITORE PALMARE HT6 Potenza RF in uscita 10 mW Elemento microfono Unidirezional...

Страница 61: ...nea di visuale Verifica i controlli del volume del ricevitore e del dispositivo di ingresso audio Audio distorto Verifica il livello di uscita del ricevitore e il livello del dispositivo di ingresso audio Controlla la batteria dell HT6 e sostituiscila se è quasi scarica Forse un altro trasmettitore sta usando lo stesso canale Spegni il trasmettitore che potrebbe causare l interferenza Interruzione...

Страница 62: ...one dalle interferenze nelle installazioni a carattere residen ziale Questo apparecchio genera usa e può emettere energia di radio frequenza e se non viene installato ed utilizzato secondo il manuale di istruzioni potrebbe causare interferenze dannose alle comunicazioni radio Non è tuttavia garantito che non si verifichino interferenze in una particolare installazione Se questa attrezzatura causa ...

Страница 63: ......
Страница 64: ...Samson Technologies 45 Gilpin Avenue Hauppauge New York 11788 8816 Phone 1 800 3 SAMSON 1 800 372 6766 Fax 631 784 2201 www samsontech com ...

Отзывы: