Samson Simplicity 6 Скачать руководство пользователя страница 3

Preliminary Stages and Planning


Below is a roof span chart which you MUST refer to in order to establish the maximum centre to 
centre dimensions of your roof bars and posts. 

Before starting your install please check all components for quantity and damage.

PLEASE NOTE – A MAXIMUM OF 500MM OVERHANG ON THE GUTTER IS ALLOWED

500mm Max Overhang on the 

Guttering from Post

500mm Max Overhang on the 
Guttering from Post

SPAN Chart Roof 
Bars 

Up to 3.5m 
Projection 

System 6 

600mm Roof Bar 
Spacings 


POST SPACINGS  

Up to & Including 
3.5m Projection 

System 6 

3m Post Spacings 


PLEASE NOTE, IF USING SELF CLEANING GLASS A MINIMUM PITCH OF 10

°

 IS REQUIRED.

At 3.5 metres projection the maximum pitch of your roof system is 13° due to glass length, contact 
the office for further details.

Be aware!  You must ensure all glass is installed with the film facing upwards (sky). This will ensure 
that if installing self cleaning glass it is the correct way up.
  
Please note when ordering Pilkington Self Cleaning Glass:

Pilkington Activ™ needs both daylight and rain to work effectively. When the roof angle gets too low 
the rain does not wash the loosened dirt off as effectively. A good flow of water across the glass is 
beneficial. Pilkington Activ™ still gives better results than ordinary glass with low angle roof 
applications. We recommend a minimum angle of 10 degrees.
 
You are now ready to start installing the structure, following all steps within this guide.

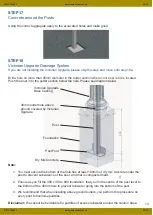
Lighting (if required)

The lighting consists of an aluminium extrusion that can fit to either the bottom of the wall plate, or 
the back of the gutter beam. When installing lighting please consider cable exist and cable entry to 
the light channel. The lighting also comes with an electrical capacitor for each 6m of light and an 
optional external grade plastic box to house the capacitors if the installation requires that they be 
mounted outside. 

3

01933 448850

www.samsondoors.co.uk

09/19

01933 448850

www.samsondoors.co.uk

09/19

Содержание Simplicity 6

Страница 1: ...Installation Guide Simplicity 6 V4 1 lu240419 01933 448850 www samsondoors co uk 09 19 01933 448850 www samsondoors co uk 09 19...

Страница 2: ...g Bar End Plate Gallow Support Bar Hex Headed Bolts Bolt Down Post Foot Above Ground if required In Ground Post Foot if required 2No Joining Plate 18mm x 300mm x 2mm Joining Plate 61 5mm x 300mm x 2mm...

Страница 3: ...lling self cleaning glass it is the correct way up Please note when ordering Pilkington Self Cleaning Glass Pilkington Activ needs both daylight and rain to work effectively When the roof angle gets t...

Страница 4: ...distance x up the wall and position your roof bar at this height on the wall Let the other end touch the ground and where that touches will be the centre of your hole for the foundation IMPORTANT Use...

Страница 5: ...e the wall plate is not twisted or bowed Use a spirit level to make sure the wall plate is fitted level Using suitable wall fixings fix the wall plate to the wall we recommend plastic caps are fitted...

Страница 6: ...arport is longer than 6m you may need to join the gutter sections as follows Joining Gutter Sections You will need the following to join every gutter beam 4No flat aluminium joining plates 2No 18mm x...

Страница 7: ...ed Bolts and Nuts supplied bolt through the gutter channel and joining plates and tighten up 7 After around 15 to 20 minutes and once the sealer has had time to harden stand the gutter beam with legs...

Страница 8: ...uare STEP 9 Fitting of the Glazing Bars Pre drill the glazing bar that is going to fit into the gutter section 15mm in from the edge and 30mm from the end of the bar drill your 6 5mm hole Do this on b...

Страница 9: ...radius inner section of the gutter section Using a 6 5mm drill bit drill 1 No hole through the bottom radius profile of the wall plate ensuring this also goes through the flat section of the glazing...

Страница 10: ...hile you are pushing the glass into the bar Then working from that top corner you steadily work along pushing the glass into the glazing bar which reduces the gap until the full length of glass is loc...

Страница 11: ...in a different place The trim fits into the channel on the front and the back of the gutter 1 trim on the front and 2 trims on the back inside of the gutter The Wall Plate Trim fits on the underside...

Страница 12: ...up the 2 No holes on the wall plate end plate with the port holes on the end of the wall plate section and using 2 No x 5 8 self tapping screws secure in place Repeat at the other end Please see diag...

Страница 13: ...t in to the gutter section below the hole Please see diagram below Note 1 You must ensure the bottom of the hole has at least 100mm of dry mix concrete under the post to prevent subsidence of the post...

Страница 14: ...to fix one at each end STEP 21 Fitting the Gutter Support Channel If supplied then the Gutter Support channel see profile image fits directly underneath the Gutter Channel It is held in place by usin...

Страница 15: ...cable to run it through the main bar and out of the wall plate to the capacitor Then you need to drill up through the trim channel above the light channel into the main bar next to the main bar fixing...

Страница 16: ...tended cables through the hole and run them into the building or the plastic external box supplied and connect them to the capacitor Then slide the polycarbonate lens back into the light and screw the...

Отзывы: