background image

116

Selección de curva de velocidad para los parches de disparo 

Pulse la tecla P.Curve para elegir una curva de velocidad para los parches de disparo. En la zona 

de operaciones de la pantalla aparecerá “P.Curve” junto con el número de la curva de velocidad 

activa en la zona de datos. La zona de operaciones pasará a mostrarle entonces la curva de 

velocidad activa. El valor también parpadeará debajo de la etiqueta “Pad Vel” en la segunda fila de 

la pantalla. Use los botones DATA +/– o introduzca directamente el valor por medio de las teclas 

numéricas del teclado. Pulse la tecla o el botón ENTER para confirmar su ajuste y almacenarlo. El 

nombre de la curva de velocidad será actualizado en pantalla y el valor dejará de parpadear. Las 

curvas que puede elegir son las mismas que las curvas de velocidad del teclado. 

Activación del control local 

La salida USB del puerto 1 ó 2 puede ser transmitida a través de la toma MIDI Out. Esto es 

controlado por el ajuste Local. Pulse la tecla Local para activar o desactivar este control local. En 

la zona de operaciones de la pantalla aparecerá parpadeando “Local” y su estado activo. Pulse 

el botón DATA+ (o la tecla numérica 1) para activar el control local. Pulse el botón DATA– (o la 

tecla numérica 0) para desactivarlo. Pulse la tecla o el botón ENTER para confirmar el ajuste y 

almacenarlo. 

Inversión del sentido del mando deslizante 

Los mandos deslizantes pueden ser invertidos en su movimiento para usarlos como tiradores. 

Pulse la tecla Drawbar para activar o desactivar esta función. En la zona de operaciones de la 

pantalla aparecerá parpadeando “Drawb” y su estado activo. El valor por defecto para esta función 

es Off. Pulse el botón DATA+ (o la tecla numérica 1) para activar esta función Drawbar. Pulse 

el botón DATA– (o la tecla numérica 0) para desactivarla. Pulse la tecla o el botón ENTER para 

confirmar el ajuste y almacenarlo. 

Configuración del pedal  

Pulse el pedal para asignar un código de control al pedal. En la zona de operaciones de la pantalla 

aparecerá “Pedal”, con el valor del control activo en la zona de datos. Este valor también aparecerá 

parpadeando debajo de la etiqueta “Val” en la segunda fila de la pantalla. Use los botones DATA 

+/– o introduzca directamente el valor por medio de las teclas numéricas del teclado. Pulse la 

tecla o el botón ENTER para confirmar su ajuste y almacenarlo. Una vez que haya almacenado el 

ajuste, el valor en pantalla dejará de parpadear. 

Reset de preset  

Pulse la tecla P.Reset para reiniciar la unidad a los valores de fábrica. En la zona de operaciones 

de la pantalla aparecerá “Reset No” y “No” parpadeará. Pulse el botón DATA+ (o la tecla numérica 

1) para cambiar este valor a “Yes” o el botón DATA– (o la tecla numérica 0) para ajustarlo a “No”. 

Pulse la tecla o el botón ENTER para confirmar su selección. Cuando confirme el ajuste “Yes”, en la 

zona de indicadores de estado en el lado derecho de la pantalla aparecerá “Reset” y “Loading…” 

aparecerá en la zona de operaciones. Una vez que haya sido realizado el proceso de reinicio, en la 

pantalla aparecerá “Reset OK”.

Modo Setup

Содержание Graphite 49

Страница 1: ...USB MIDI CONTROLLER OWNER S MANUAL...

Страница 2: ...n Technologies 45 Gilpin Avenue Hauppauge New York 11788 8816 Phone 1 800 3 SAMSON 1 800 372 6766 Fax 631 784 2201 www samsontech com Native Instruments NI and Komplete Elements are trademarks or regi...

Страница 3: ...UG WITH AN EXTENSION CORD RE CEPTACLE OR OTHER OUTLET UNLESS THE BLADES CAN BE FULLY INSERTED TO PREVENT BLADE EXPOSURE TO PREVENT FIRE OR SHOCK HAZARD DO NOT EXPOSE THIS APPLIANCE TO RAIN OR MOISTURE...

Страница 4: ...communications However there is no guarantee that interference will not occur in a particular installation If this equipment does cause harmful interference to radio or television reception which can...

Страница 5: ...tus When a cart is used use caution when moving the cart apparatus combination to avoid injury from tip over 11 Unplug the apparatus during lightning storms or when unused for long periods of time 12...

Страница 6: ...s 9 Rear Panel Controls and Functions 11 Quick Start 12 Display Features 13 Graphite 49 Modes 15 Preset Mode 16 Setup Mode 17 Zones 20 Performance Mode Parameters 22 Performance Controls 24 MIDI OUT 2...

Страница 7: ...d effects In these pages you ll find a detailed description of the features of the Graphite 49 keyboard controller as well as a guided tour of its control panel and inst ructions for setup and use You...

Страница 8: ...display provides real time feedback MIDI Out USB and sustain pedal connections Compact design perfect for live performance and studio applications Dedicated Transpose and Octave buttons Pitch Bend an...

Страница 9: ...end independent note and controller information 9 MUTE Button Press this button to enable the Mute function When activated the word MUTE will flash on the display and the keyboard will stop transmitti...

Страница 10: ...g They can also be as signed to control different parameters in the Setup Mode similar to the Function Buttons If you encounter a stuck hanging note press the Rewind and Fast Forward buttons together...

Страница 11: ...USB Connection Connect a standard USB cable from this port to the USB connection on a computer or iPad to provide power to the keyboard as well as to send and receive MIDI data 4 MIDI OUT Use a 5 pin...

Страница 12: ...ion 4 Launch your DAW or virtual instrument software and set the Graphite 49 as the MIDI Input and MIDI Output device 5 To use the Graphite 49 with an external MIDI device such as a sound module conne...

Страница 13: ...ton or pad is defined as note type the Val is the note number Oct Octave shift for the keyboard The range is 4 Trans Transpose shift for the keyboard The range is 12 Bank The bank is the collection of...

Страница 14: ...ion button is at On status the corresponding block will appear A B Indicates the active pad bank Trigger Pads When a pad is pressed the corresponding block will appear Transport Controls When a transp...

Страница 15: ...settings to match your needs In addition to the buttons on the top panel the first 17 keys on the keyboard are also available to access functions and enter numerical data This mode is activated by pre...

Страница 16: ...e 49 The communication between the computer and the keyboard is bidirectional and information from the software will appear on the Graphite s display You can edit the Presets in Setup Mode and save yo...

Страница 17: ...e keyboard channel in Zone 1 You can use the DATA button to select or press the 0 key on the keyboard to select Press the ENTER button or the ENTER key on the keyboard to confirm a selection You can c...

Страница 18: ...under the KB Vel tag on the second row of the display Use the DATA buttons or enter the number by pressing the numerical keys on the keyboard to select a curve Press the ENTER key or the ENTER button...

Страница 19: ...can be reversed to be used as drawbars Press the Drawbar key to switch the drawbar feature on or off Drawb and its current status will appear in the Operation area of the display and flash The default...

Страница 20: ...s to multiple outputs and more than one voice can be produced The PITCH BEND wheel MODULA TION wheel pedal and keyboard aftertouch are applied to all activated zones Note In Performance Mode the opera...

Страница 21: ...left key in the specific section of the keyboard 3 0 127 Zn Rang Note number of the most right key in the specific section of the keyboard 3 0 127 Zn Oct Octave shift for the specific section of the k...

Страница 22: ...h After hitting a key keep pressure on the key and the channel aftertouch value common to all keys message will be transmitted You can change the control of the aftertouch in Setup Mode p 17 The trans...

Страница 23: ...ve bank will be shown on the display The factory default settings for pads are listed in the Factory Default Setting table on p 32 You can select the pad velocity curve change param eters or assign ot...

Страница 24: ...ansmitted immediately You can set the Graphite 49 so that it transmits all encoder and slider movements simultaneously When you press the MUTE button Mute will blink in the Status Indicator area on th...

Страница 25: ...ecord respectively Please see detailed information for the default settings in the table below Component Category Description Port Message Transmitted Data H Type Mode Transport Button Rewind CC 116 C...

Страница 26: ...f the Local switch is set to On This is the default setting Messages sent to Port 3 and Port 4 will not be transmitted through the MIDI Out terminal Messages received from external device or computer...

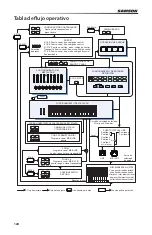
Страница 27: ...Local Pad Velocity curve FUNCTION BUTTON OPRATION CONTROLLER SETUP Setup and save to current Preset Keyboard velocity curve After touch Drawbar PAGE PAGE DATE DATE Select preset PRESET S1 S9 Port Chan...

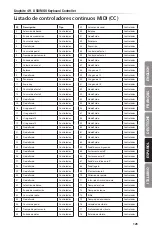
Страница 28: ...ller Controller 37 Portamento time Controller 38 Data entry Controller 39 Channel Volume Controller 40 Balance Controller 41 Undefined Controller 42 Pan Controller 43 Expression Controller 44 Effect c...

Страница 29: ...113 Undefined Controller 114 Undefined Controller 115 Undefined Controller 116 Undefined Controller 117 Undefined Controller 118 Undefined Controller 119 Undefined Controller 120 All Sound Off Control...

Страница 30: ...1 FORWARD MMC 162 REWIND MMC 163 RECORD STROBE MMC 164 RECORD EXIT MMC 165 RECORD PAUSE MMC 166 PAUSE MMC 167 EJECT MMC 168 CHASE MMC 169 COMMAND ERROR RESET MMC 170 MMC RESET MMC 171 Pitch Bend Pitch...

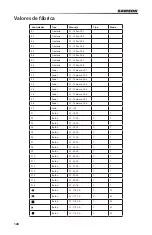
Страница 31: ...3 S4 Slider CC 7 Volume Ch 4 S5 Slider CC 7 Volume Ch 5 S6 Slider CC 7 Volume Ch 6 S7 Slider CC 7 Volume Ch 7 S8 Slider CC 7 Volume Ch 8 S9 Slider CC 152 F1 Button CC 16 Ch C T F2 Button CC 17 Ch C T...

Страница 32: ...1 2 Channel 1 1 9 Mute Off On Off Local On On Off Pad Bank A A B Preset P01 P01 P30 Aftertouch Aftertouch Channel Aftertouch Pedal Pedal CC 64 Sustain C M P1 BANK A Pad NOTE 36 Ch 10 N M P2 BANK A Pad...

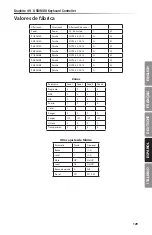
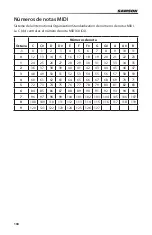
Страница 33: ...37 38 39 40 41 42 43 44 45 46 47 3 48 49 50 51 52 53 54 55 56 57 58 59 4 60 61 62 63 64 65 66 67 68 69 70 71 5 72 73 74 75 76 77 78 79 80 81 82 83 6 84 85 86 87 88 89 90 91 92 93 94 95 7 96 97 98 99...

Страница 34: ...nspose Operation Controls MAIN SETUP PRESET ZONE MUTE BANK A B BANK CHANNEL PAGE DATA ENTER Presets 30 1 Graphite 2 10 Remote Control 11 30 User Functions Keys 0 9 Enter Aftertouch KB Vel Pad Vel Draw...

Страница 35: ......

Страница 36: ...lamation pr vient l utilisateur de la pr sence d instructions importantes sur le fonctionnement et la maintenance de ce produit dans le mode d emploi fourni ATTENTION RISQUE D LECTROCUTION NE PAS OUVR...

Страница 37: ...n les instructions peut causer des interf rences aux communications radio Ceci dit nous ne pouvons pas garantir l absence totale d interf rences dans tous les cas Si cet appareil cause des interf renc...

Страница 38: ...c l appareil Lorsque vous utilisez un chariot proc dez avec vigilance lorsque vous vous d placez pour viter toute blessure aux personnes et tout dommage aux quipements 11 D connectez l appareil du sec...

Страница 39: ...requis 41 R glages et fonctions de face avant 42 R glages et fonctions de face arri re 44 Prise en main 45 Modes du Graphite 49 48 Mode de Presets 49 Mode de configuration 50 Zones 53 Param tres de j...

Страница 40: ...que vous puissiez jouer tout de suite nous vous fournissons les instruments virtuels Native Instruments Komplete Elements avec plus de 1 000 sons et effets Dans ces pages vous trouverez la descriptio...

Страница 41: ...s de batterie et vos chantillons cran LCD r tro clair de grande taille affichant les informations en temps r el Sortie MIDI Out port USB et entr e pour p dale de Sustain Format compact parfait pour la...

Страница 42: ...de note et de contr leur 9 Touche MUTE Appuyez sur cette touche r tro clair e pour utiliser la fonction de coupure Mute Lorsqu elle est active le mot MUTE clignote l cran et le clavier cesse de trans...

Страница 43: ...et d enregistrement dans l ordre selon la configuration d usine Elles peuvent galement tre affect es la gestion d autres para m tres en mode de configuration comme avec les touches de fonctions Si vou...

Страница 44: ...ur ou de votre iPad pour alimenter le clavier ainsi que pour transmettre et recevoir les donn es MIDI 4 MIDI OUT Utilisez un c ble MIDI 5 broches pour relier le Carbon 49 un quipement MIDI externe 5 E...

Страница 45: ...sur le clavier 4 Lancez votre logiciel d enregistrement ou d instrument virtuel et s lectionnez le Graphite 49 comme p riph rique d entr e MIDI In et Out 5 Pour utiliser le Graphite 49 avec un quipem...

Страница 46: ...comme type de note la valeur Val correspond au num ro de note Oct Transposition d octave du clavier Plage de 4 Trans Transposition en demi tons Plage de 12 Bank La banque regroupe tous les codeurs et...

Страница 47: ...e T moins de touches F1 F16 Lorsqu une touche de fonction est active sur On le signe correspondant s affiche A B Indique la banque de Pads active Pads de d clenchement Lorsque vous appuyez sur un Pad...

Страница 48: ...os besoins En plus des touches de la face sup rieure les 17 premi res touches du clavier vous permettent d acc der aux fonctions et de saisir des valeurs de param tres Vous pou vez activer ce mode ave...

Страница 49: ...le Graphite 49 La communication entre l ordinateur et le clavier est bidirectionnelle et les informations du logiciel s affichent l cran du Graphite Vous pouvez diter les Presets en mode de configurat...

Страница 50: ...s lectionner ou appuyez sur 0 au clavier pour s lectionner Appuyez sur la touche ENTER de la zone de r glage ou sur la touche ENTER du clavier pour confirmer la s lection Vous pouvez confirmer la s l...

Страница 51: ...a zone de donn es La zone de fonctionnement indique alors la courbe de v locit courante Le num ro clignote galement dans la zone KB Vel de la seconde rang e de l cran Utilisez les touches DATA ou sais...

Страница 52: ...ctiver d sactiver cette fonction Drawb et le statut courant de la fonction s affichent dans la zone de fonctionnement de l cran et clignotent Le r glage par d faut est Off Appuyez sur la touche DATA o...

Страница 53: ...superposent les touches de la zone superpos e transmettent les messages plusieurs sorties et plusieurs sons sont d clench s en m me temps La molette de PITCH BEND de MODULATION la p dale et l Aftertou...

Страница 54: ...de la note droite de la zone sp cifique du clavier 3 0 127 Zn Oct Transposition d octave de la section sp cifique du clavier 4 4 0 4 Zn Trans Transposition en demis tons de la section sp cifique du c...

Страница 55: ...es informations Aftertouch Le clavier est quip de la fonction Aftertouch Apr s avoir enfonc une touche continuez d ap puyer plus fort pour transmettre un message d Aftertouch de canal valeur commune t...

Страница 56: ...donn s dans le tableau des r glages d usine en p 32 Vous pouvez s lectionner la courbe de v locit des Pads les changements de param tres ou affecter d autres contr les aux Pads en mode de configuratio...

Страница 57: ...rque Donnez aux canaux la valeur pour que les curseurs et codeurs utilisent le canal de la Zone 1 Touche MUTE Les messages de mouvement des codeurs et curseurs sont transmis imm diatement Vous pouvez...

Страница 58: ...s dans le tableau des r glages d usine de la p 31 Touches de Transport Vous disposez de cinq touches de transport Par d faut les fonctions affect es sont le retour rapide l avance rapide l arr t la l...

Страница 59: ...sont galement transmis par la sortie MIDI Out lorsque la fonction Local Switch est r gl e sur On Ceci est le r glage par d faut Les messages transmis au Port 3 et au Port 4 ne sont pas transmis par l...

Страница 60: ...N CONTROLLER SETUP Setup and save to current Preset Keyboard velocity curve After touch Drawbar PAGE PAGE DATE DATE Select preset PRESET S1 S9 Port Channel Type Control code E1 E8 Port Channel Type Co...

Страница 61: ...5 Non d fini Contr leur 36 Foot controller Contr leur 37 Portamento time Contr leur 38 Data entry Contr leur 39 Volume de canal Contr leur 40 Balance Contr leur 41 Non d fini Contr leur 42 Pan Contr l...

Страница 62: ...tr leur 115 Non d fini Contr leur 116 Non d fini Contr leur 117 Non d fini Contr leur 118 Non d fini Contr leur 119 Non d fini Contr leur 120 All Sound Off Contr leur 121 Reset All Contr leurs Contr l...

Страница 63: ...NO 159 PLAY MMC 160 DEFERRED PLAY MMC 161 FORWARD MMC 162 REWIND MMC 163 RECORD STROBE MMC 164 RECORD EXIT MMC 165 RECORD PAUSE MMC 166 PAUSE MMC 167 EJECT MMC 168 CHASE MMC 169 COMMAND ERROR RESET MM...

Страница 64: ...S6 Curseur CC 7 Volume Can 6 S7 Curseur CC 7 Volume Can 7 S8 Curseur CC 7 Volume Can 8 S9 Curseur CC 152 F1 Touche CC 16 Can C T F2 Touche CC 17 Can C T F3 Touche CC 18 Can C T F4 Touche CC 19 Can C...

Страница 65: ...ne Param tre R glage Options Banque 1 1 2 Canal 1 1 9 Mute Off On Off Local On On Off Pad Bank A A B Preset P01 P01 P30 Aftertouch Aftertouch Aftertouch de canal P dale P dale CC 64 Sustain C M P1 BAN...

Страница 66: ...8 49 50 51 52 53 54 55 56 57 58 59 4 60 61 62 63 64 65 66 67 68 69 70 71 5 72 73 74 75 76 77 78 79 80 81 82 83 6 84 85 86 87 88 89 90 91 92 93 94 95 7 96 97 98 99 100 101 102 103 104 105 106 107 8 108...

Страница 67: ...nd Modulation Plage de notes Octave Transpose Gestion du fonctionnment MAIN SETUP PRESET ZONE MUTE BANK A B BANK CHANNEL PAGE DATA ENTER Presets 30 1 Graphite 2 10 Remote Control 11 30 User Touches de...

Страница 68: ...t Pfeilspitze im gleichseitigen Dreieck soll den Anwender vor nichtisolierter gef hrlicher Spannung im Ger teinnern warnen Diese Spannung kann so hoch sein dass die Gefahr eines Stromschlags besteht D...

Страница 69: ...angsantenne neu ausrichten oder neu positionieren Die Entfernung zwischen Ger t und Empf nger erh hen Das Ger t an die Steckdose eines anderen Stromkreises als den des Empf ngers anschlie en Einen Fac...

Страница 70: ...Sie beim Bewegen eines Wagens vorsichtig vor damit die Wagen Ger te Kombination nicht umkippt und Verletzungen verursacht 11 Ziehen Sie den Netzstecker des Ger ts bei Gewittern oder l ngeren Betriebsp...

Страница 71: ...73 Mindestsystemanforderungen 73 Vorderseitige Regler und Funktionen 74 Display Funktionen 78 Setup Modus 82 Zonen 85 Parameter des Performance Modus 87 Performance Regler 89 Performance Regler 90 MI...

Страница 72: ...Ihres Graphite 49 Keyboard Controllers sowie eine F hrung durch sein Bedienfeld und Anleitungen f r die Einrichtung und Anwendung Bitte vergessen Sie nicht die beiliegende Garantiekarte ausgef llt an...

Страница 73: ...Samples Gro es hinterleuchtetes LC Display mit Datenanzeige in Echtzeit Anschl sse f r MIDI Out USB und Sustainpedal Kompaktes Format perfekt f r Live Performances und Studioanwendungen Separate Trans...

Страница 74: ...Parameter eines Presets einstellen und zuweisen k nnen 8 ZONE Taster Mit diesem hinterleuchteten Taster editieren Sie die vier Zonen aus denen der Graphite 49 unabh ngige Noten und Controllerinformat...

Страница 75: ...city Kurven und Aftertouch erm glichen eine sehr detaillierte Steuerung 17 Transporttaster Die 5 Transporttaster sind werkseitig auf die universellen Funktionen Rewind Fast Forward Stop Play und Recor...

Страница 76: ...nes Computers oder iPads um das Keyboard mit Spannung zu versorgen und MIDI Daten zu senden empfangen 4 MIDI OUT Hier verbinden Sie den Graphite 49 ber ein 5 Pol MIDI Kabel mit einem ex ternen MIDI Ge...

Страница 77: ...t dem SUSTAIN Pedaleingang 3 Aktivieren Sie den POWER Schalter On 4 Starten Sie Ihre DAW oder Ihre Software f r virtuelle Instrumente und stellen Sie den Graphite 49 als MIDI Input und MIDI Output Ger...

Страница 78: ...ie Notennummer an Oct Oktavverschiebung der Tastatur im Bereich von 4 Trans Transponierung der Tastatur im Bereich von 12 Bank Die Bank ist die Zusammenstellung aller eingestellten Drehregler und Slid...

Страница 79: ...nzeigen F1 F16 Wenn der Status eines Funktionstasters On lautet erscheint der entsprechende Block A B Zeigt die aktive Pad Bank an Trigger Pads Wenn ein Pad gedr ckt wird erscheint der entsprechende B...

Страница 80: ...tern kann man auch mit den ersten 17 Tasten der Tastatur Funktionen aufrufen und numer ische Daten eingeben Zum Aktivieren dieses Modus dr cken Sie den SETUP Taster Weitere Infos finden Sie im Abschni...

Страница 81: ...ber den Graphite 49 aufrufen kann Die Kommunikation zwischen Computer und Keyboard erfolgt bidirek tional und Informationen der Software werden auf dem Graphite 49 Display angezeigt Sie k nnen die Pre...

Страница 82: ...m DATA Taster oder mit Taste 0 der Tastatur w hlen Um Ihre Wahl zu best tigen dr cken Sie den ENTER Taster oder die ENTER Taste der Tastatur Sie k nnen Ihre Wahl nach jedem Parameter oder erst nach de...

Страница 83: ...ktuelle Velocity Kurve Die Nummer blinkt auch unter dem KB Vel Feld in der dritten Displayzeile Um eine Kurve zu w hlen verwenden Sie die DATA Taster oder geben die Nummer ber die numerischen Tasten d...

Страница 84: ...den Dr cken Sie die Drawbar Taste um die Zugriegel Funktion ein oder auszuschalten Im Betriebsbereich des Dis plays blinkt Drawb und der aktuelle Status Off ist voreingestellt Dr cken Sie den DATA Tas...

Страница 85: ...h sich mehr als eine Stimme erzeugen l sst Das PITCH BEND und MODULATION Rad sowie das Pedal und die Aftertouch Funktion werden auf alle aktivierten Zonen angewandt Hinweis Im Performance Modus wirken...

Страница 86: ...rechts gelegenen Taste des jeweiligen Tastaturbereichs 3 0 127 Zn Oct Oktavverschiebung im jeweiligen Tastaturbereich 4 4 0 4 Zn Trans Transponierung im jeweiligen Tastaturbereich 5 12 0 12 1 n steht...

Страница 87: ...rtouch Die Tastatur ist mit Aftertouch ausgestattet Wenn Sie nach dem Tastenanschlag den Druck auf die Taste variieren werden Channel Aftertouch Meldungen f r alle Tasten gleich bertragen Man kann die...

Страница 88: ...ie werkseitigen Standardeinstel lungen f r Pads sind in der Tabelle der Werksvoreinstellungen auf Seite 32 aufgef hrt Im Setup Modus kann man die Pad Velocity Kurve w hlen Parameter ndern oder den Pad...

Страница 89: ...regler sind in der Tabelle der Werksvoreinstellungen auf Seite 31 aufgef hrt Hinweis Stellen Sie Channel auf ein damit die Slider und Drehregler dem Tastaturkanal von Zone 1 folgen MUTE Taster Meldung...

Страница 90: ...nf Transporttaster sind mit gekennzeichnet Ihre Standardeinstellungen sind Rewind R cklauf Fast Forward Vorlauf Stop Stop Play Wiedergabe und Record Aufnahme Detaillierte Infos zu den Standardeinstel...

Страница 91: ...auch ber den MIDI Out Anschluss bertragen wenn der Local Schalter auf On gesetzt ist Dies ist die Voreinstellung Zu Port 3 und Port 4 geleitete Meldungen werden nicht ber den MIDI Out Anschluss bertra...

Страница 92: ...OPRATION CONTROLLER SETUP Setup and save to current Preset Keyboard velocity curve After touch Drawbar PAGE PAGE DATE DATE Select preset PRESET S1 S9 Port Channel Type Control code E1 E8 Port Channel...

Страница 93: ...er 35 Undefiniert Controller 36 Foot controller Controller 37 Portamento time Controller 38 Data entry Controller 39 Channel Volume Controller 40 Balance Controller 41 Undefiniert Controller 42 Pan Co...

Страница 94: ...definiert Controller 115 Undefiniert Controller 116 Undefiniert Controller 117 Undefiniert Controller 118 Undefiniert Controller 119 Undefiniert Controller 120 All Sound Off Controller 121 Reset All C...

Страница 95: ...ANO 159 PLAY MMC 160 DEFERRED PLAY MMC 161 FORWARD MMC 162 REWIND MMC 163 RECORD STROBE MMC 164 RECORD EXIT MMC 165 RECORD PAUSE MMC 166 PAUSE MMC 167 EJECT MMC 168 CHASE MMC 169 COMMAND ERROR RESET M...

Страница 96: ...Slider CC 7 Volume Ch 5 S6 Slider CC 7 Volume Ch 6 S7 Slider CC 7 Volume Ch 7 S8 Slider CC 7 Volume Ch 8 S9 Slider CC 152 F1 Taster CC 16 Ch C T F2 Taster CC 17 Ch C T F3 Taster CC 18 Ch C T F4 Taster...

Страница 97: ...tellungen Parameter Einstellung Optionen Bank 1 1 2 Channel 1 1 9 Mute Off On Off Local On On Off Pad Bank A A B Preset P01 P01 P30 Aftertouch Aftertouch Channel Aftertouch Pedal Pedal CC 64 Sustain C...

Страница 98: ...3 54 55 56 57 58 59 4 60 61 62 63 64 65 66 67 68 69 70 71 5 72 73 74 75 76 77 78 79 80 81 82 83 6 84 85 86 87 88 89 90 91 92 93 94 95 7 96 97 98 99 100 101 102 103 104 105 106 107 8 108 109 110 111 11...

Страница 99: ...Bend Modulation Tastenbereich Octave Transpose Funktionsregler MAIN SETUP PRESET ZONE MUTE BANK A B BANK CHANNEL PAGE DATA ENTER Presets 30 1 Graphite 2 10 Remote Control 11 30 User Funktionstasten 0...

Страница 100: ...ngulo equil tero pretende advertir al usuario de la presencia de voltajes peligrosos no aislados dentro de la carcasa del producto que pueden ser de suficiente magnitud como para suponer un riesgo de...

Страница 101: ...ar o reubicar la antena receptora Aumentar la separaci n entre este aparato y el receptor Conectar este aparato a una salida de corriente o regleta distinta a la que est conectado el receptor Pedir co...

Страница 102: ...ado al mover la combinaci n bastidor aparato para evitar da os en caso de un vuelco 11 Desconecte este aparato de la corriente durante las tormentas el ctricas o cuando no lo vaya a usar durante un pe...

Страница 103: ...s y funciones del panel frontal 106 Controles y funciones del panel trasero 108 Puesta en marcha 109 Funciones de la pantalla 110 Modos del Graphite 49 112 Modo Preset 113 Zonas 117 Par metros del mod...

Страница 104: ...del teclado controlador Graphite 49 as como un recorrido guiado por su panel de control e instrucciones paso a paso para su configuraci n y uso Tambi n encontrar una tarjeta de garant a no se olvide...

Страница 105: ...idos de bater a y muestreos Gran pantalla LCD retroiluminada para un control y respuesta en tiempo real Conexiones MIDI Out USB y de pedal de sustain Dise o compacto perfecto tanto para aplicaciones d...

Страница 106: ...entro de un preset 8 Bot n ZONE Pulse este bot n retroiluminado para realizar ediciones en las cuatro zonas desde las que el Graphite puede enviar informaci n de nota y controlador independiente 9 Bot...

Страница 107: ...t neo como conmutadores Para un mayor control estos parches disponen de cuatro curvas de velocidad as como aftertouch 17 Botones de transporte Estos cinco botones de transporte controlan las funciones...

Страница 108: ...n USB de un ordenador o iPad para pasar alimentaci n el ctrica al teclado y para el env o y recepci n de datos MIDI 4 MIDI OUT Use un cable MIDI de 5 puntas para conectar el Graphite 49 a un dispositi...

Страница 109: ...ptor POWER para hacer que quede en la posici n ON 4 Ejecute su software DAW o de instrumento virtual y configure el Graphite 49 como el dispositivo de entrada y salida MIDI 5 Para usar el Graphite 49...

Страница 110: ...clado El rango es 4 Trans Ajuste de trasposici n aplicado al teclado El rango es 12 Bank Un banco es el grupo de todos los mandos giratorios y deslizantes ajustados cuando el preset elegido es el 01 o...

Страница 111: ...de Preset Indicadores de botones F1 F16 Cuando un bot n de funci n est en ON el icono correspondiente aparecer en pantalla A B Indica el banco de parche activo Parches de disparo Cuando pulse un parc...

Страница 112: ...rior tambi n tiene disponibles las 17 primeras teclas del teclado para acceder con ellas a funciones e introducir valores num ricos Para acceder a este modo deber pulsar el bot n SETUP Para m s detall...

Страница 113: ...te 49 a las funciones principales La comunicaci n entre el ordenador y el teclado es bidireccional por lo que la informaci n del software aparecer en la pantalla del Graphite Puede editar estos preset...

Страница 114: ...bot n DATA para elegir o pulsar la tecla 0 del teclado para elegir Pulse el bot n ENTER o la tecla ENTER del teclado para confirmar una selecci n Puede confirmar la selecci n tras ajustar cada par met...

Страница 115: ...peraciones cambiar entonces para indicarle el valor de velocidad activo El n mero tambi n parpadear debajo de la etiqueta KB Vel en la segunda fila de la pantalla Use los botones DATA para cambiar el...

Страница 116: ...u movimiento para usarlos como tiradores Pulse la tecla Drawbar para activar o desactivar esta funci n En la zona de operaciones de la pantalla aparecer parpadeando Drawb y su estado activo El valor p...

Страница 117: ...va zonas que quedan superpuestas las teclas correspondientes a la secci n superpuesta enviar n mensajes a varias salidas y podr producir m s de una voz Las ruedas PITCH BEND y MODULATION el pedal y el...

Страница 118: ...lado 3 0 127 Zn Rang N mero de nota de la tecla m s a la derecha de la secci n concreta del teclado 3 0 127 Zn Oct Cambio de octava de la secci n concreta del teclado 4 4 0 4 Zn Trans Trasposici n de...

Страница 119: ...s de pulsar una tecla ejerza algo m s de presi n sobre ella y ser transmitido el mensaje de aftertouch de canal valor com n a todas las teclas Puede cambiar el control del aftertouch en el modo Setup...

Страница 120: ...r mostrado en la pantalla Los ajustes de f brica para los parches aparecen en la tabla de Ajustes de f brica de la p 31 Puede elegir la curva de velocidad de los parches cambiar par metros o asignar o...

Страница 121: ...go 0 127 Puede cambiar los par metros o asignar otros controles a los faders en el modo Setup p 17 Los ajustes de f brica para los faders aparecen en la tabla de Ajustes de f brica de la p 31 Nota Asi...

Страница 122: ...de f brica para estos botones de funci n aparecen en la tabla de Ajustes de f brica de la p 31 Botones de transporte Dispone de cinco botones de transporte indicados como Los valores de f brica para c...

Страница 123: ...tambi n a la terminal MIDI OUT si el interruptor Local est ajustado a On su valor por defecto Los mensajes enviados a los puertos 3 y 4 no ser n transmitidos a trav s del terminal MIDI Los mensajes r...

Страница 124: ...TONES DE FUNCI N CONFIGURACI N CONTROLADOR Ajuste y almacenamiento en el preset activo Curva de velocidad de teclado After touch Drawbar PAGE PAGE DATE DATE Selecci n de preset PRESET S1 S9 Puerto can...

Страница 125: ...r 36 Control de pedal Controlador 37 Tiempo de portamento Controlador 38 Entrada de datos Controlador 39 Volumen de canal Controlador 40 Balance Controlador 41 No definido Controlador 42 Panorama Cont...

Страница 126: ...or 116 No definido Controlador 117 No definido Controlador 118 No definido Controlador 119 No definido Controlador 120 Todos los sonidos off Controlador 121 Reset de todos los controladores Controlado...

Страница 127: ...ducci n diferida MMC 161 Avance r pido MMC 162 Rebobinado MMC 163 Estrobo de grabaci n MMC 164 Salida de grabaci n MMC 165 Pausa de grabaci n MMC 166 Pausa MMC 167 Expulsi n MMC 168 Captura MMC 169 Re...

Страница 128: ...h 4 S5 Fader CC 7 Volume Ch 5 S6 Fader CC 7 Volume Ch 6 S7 Fader CC 7 Volume Ch 7 S8 Fader CC 7 Volume Ch 8 S9 Fader CC 152 F1 Bot n CC 16 Ch C T F2 Bot n CC 17 Ch C T F3 Bot n CC 18 Ch C T F4 Bot n C...

Страница 129: ...Par metro Ajuste Opciones Banco 1 1 2 Canal 1 1 9 Mute Off On Off Local On On Off Banco de parche A A B Preset P01 P01 P30 Aftertouch Aftertouch Aftertouch de canal Pedal Pedal CC 64 Sustain C M P1 BA...

Страница 130: ...54 55 56 57 58 59 4 60 61 62 63 64 65 66 67 68 69 70 71 5 72 73 74 75 76 77 78 79 80 81 82 83 6 84 85 86 87 88 89 90 91 92 93 94 95 7 96 97 98 99 100 101 102 103 104 105 106 107 8 108 109 110 111 112...

Страница 131: ...producci n grabaci n Ruedas Inflexi n tonal modulaci n Rango de teclado Octava Trasposici n Controles operativos MAIN SETUP PRESET ZONE MUTE BANK A B BANK CHANNEL PAGE DATA ENTER Presets 30 1 Graphite...

Страница 132: ...te per costituire un rischio di scosse elettriche Il simbolo del punto esclamativo all interno di un triangolo equilatero segnala la presenza di importanti istruzioni operative e di manutenzione nei d...

Страница 133: ...o dal ricevitore collegare l attrezzatura a una diversa presa elettrica in modo che attrezzatura e ricevitore si trovino su circuiti diversi Per assistenza rivolgersi al rivenditore o a un tecnico rad...

Страница 134: ...e durante gli spostamenti onde evitare che la combinazione carrello unit possa ribaltarsi 11 Scollegare l unit dalla corrente durante i temporali o quando inutilizzata per lunghi periodi 12 Per l assi...

Страница 135: ...el pannello frontale 138 Funzioni e controlli del pannello posteriore 140 Guida rapida 141 Caratteristiche del display 142 Modalit di Graphite 49 144 Modalit Preset 145 Modalit Setup 146 Zone 149 Para...

Страница 136: ...escrizione dettagliata delle caratteristiche della tastiera controller Graphite 49 un tour guidato del pannello di controllo e istruzioni per il collegamento e l uso Troverai inclusa anche una cartoli...

Страница 137: ...campioni Un grande display LCD retroilluminato per feedback in tempo reale Connessioni MIDI Out USB e per il pedale sustain Design compatto perfetto sia in performance live sia in studio Pulsanti dedi...

Страница 138: ...tro zone da cui Graphite pu inviare informazioni di nota e controller indipendenti 9 Pulsante MUTE La pressione del pulsante attiva la modalit Mute Quando attiva la parola MUTE lampegger sul display e...

Страница 139: ...setup di base del produttore controllano rispettivamente le funzioni universali Rewind Fast Forward Stop Play e Record In modalit Setup puoi assegnarli per controllare parametri diversi in modo simil...

Страница 140: ...standard da questa porta a quella sul computer o iPad per alimentare la tastiera e per trasmettere e ricevere dati MIDI 4 MIDI OUT Usa un cavo MIDI a 5 pin per collegare un dispositivo MIDI esterno 5...

Страница 141: ...AIN 3 Sposta l interruttore POWER in posizione ON 4 Apri la tua DAW o il software virtual instrument e imposta Graphite 49 come dispositivo di ingresso e uscita MIDI 5 Per usare Graphite 49 con un dis...

Страница 142: ...ome tipo nota Val indica il numero di nota Oct spostamento di ottave della tastiera L estensione 4 Trans trasposizione della tastiera L estensione 12 Bank il banco la raccolta di tutti gli encoder e g...

Страница 143: ...o lo stato di un tasto funzione On appare il blocchetto corrispondente A B indica il banco di pad attivo Pad trigger quando un pad viene premuto appare il blocchetto corrispondente Controlli di traspo...

Страница 144: ...e alle funzioni e inserire dati numerici oltre ai pulsanti sul pannello superiore puoi usare i primi 17 tasti della tastiera Questa modalit si attiva premendo il pulsante SETUP Per maggiori dettagli v...

Страница 145: ...nzioni pi comuni direttamente dal Graphite 49 La comunicazione tra il computer e la tastiera bidirezionale le informazioni dal software compariranno sul display del Graphite Puoi modificare i preset i...

Страница 146: ...usare il pulsante DATA o premere il tasto 0 sulla tastiera per selezionare Premi il pulsante ENTER o il tasto ENTER sulla tastiera per confermare una selezione Puoi confermare la selezione dopo ogni...

Страница 147: ...r per mostrare l attuale curva di velocity Il numero lampegger anche sotto l etichetta KB Vel nella seconda riga del display Per scegliere una curva usa i pulsanti DATA o inserisci il numero premendo...

Страница 148: ...usati come drawbar Premi il tasto Drawbar per accendere o spegnere la funzione Drawbar Nell area operativa del display comparir e lampegger Drawb e il suo stato attuale L impostazione predefinita Off...

Страница 149: ...suonate nell intervallo sovrapposto invieranno messaggi a uscite multiple e pu essere prodotta pi di una voce contemporaneamente Le rotelle PITCH BEND e MODULATION il pedale e l aftertouch della tast...

Страница 150: ...astiera 3 0 127 Zn Rang Numero della nota del tasto pi a destra nella specifica sezione di tastiera 3 0 127 Zn Oct Spostamento di ottava per la specifica sezione di tastiera 4 4 0 4 Zn Trans Trasposiz...

Страница 151: ...fornita di aftertouch Continuando a far pressione su un tasto dopo averlo premuto verr trasmesso il messaggio di aftertouch di canale valore comune a tutti i tasti Puoi modificare il controllo dell af...

Страница 152: ...encate nella tabella Impostazioni di default a pagina 32 In modalit Setup puoi scegliere la curva di velocity cambiare i parametri o assegnare altri controlli ai pad Impostazione di Canale Programma M...

Страница 153: ...egna il canale a per far s che slider ed encoder seguano il canale della tastiera della zona 1 Pulsante MUTE I messaggi per le attivit di encoder e slider verranno trasmessi immediatamente Puoi impost...

Страница 154: ...azioni di default sono rispettivamente Rewind Fast Forward Stop Play e Record Consulta la tabella seguente per informazioni dettagliate sulle impostazioni iniziali Pulsante Categoria Descrizione Porta...

Страница 155: ...che attraverso il terminale MIDI Out se Local impostato su On Questa l impostazione di default I messaggi inviati alle porte 3 e 4 non verranno trasmessi attraverso il terminale MIDI Out I messaggi ri...

Страница 156: ...UTTON OPRATION CONTROLLER SETUP Setup and save to current Preset Keyboard velocity curve After touch Drawbar PAGE PAGE DATE DATE Select preset PRESET S1 S9 Port Channel Type Control code E1 E8 Port Ch...

Страница 157: ...to Controller 36 Controllo pedale Controller 37 Tempo Portamento Controller 38 Immissione dati Controller 39 Volume canale Controller 40 Bilanciamento Controller 41 Non definito Controller 42 Pan Cont...

Страница 158: ...n definito Controller 117 Non definito Controller 118 Non definito Controller 119 Non definito Controller 120 Tutti i suoni off Controller 121 Ripristina tutti i controlli Controller 122 Controllo loc...

Страница 159: ...Stop MMC 159 Play MMC 160 Play in differita MMC 161 FORWARD MMC 162 REWIND MMC 163 RECORD STROBE MMC 164 RECORD EXIT MMC 165 RECORD PAUSE MMC 166 PAUSE MMC 167 EJECT MMC 168 CHASE MMC 169 Ripristino...

Страница 160: ...ider CC 7 Volume Ch 6 S7 Slider CC 7 Volume Ch 7 S8 Slider CC 7 Volume Ch 8 S9 Slider CC 152 F1 Pulsante CC 16 Ch C T F2 Pulsante CC 17 Ch C T F3 Pulsante CC 18 Ch C T F4 Pulsante CC 19 Ch C T F5 Puls...

Страница 161: ...di default Parametro Impostazione Opzioni Bank 1 1 2 Channel 1 1 9 Mute Off On Off Local On On Off Pad Bank A A B Preset P01 P01 P30 Aftertouch Aftertouch Channel Aftertouch Pedale Pedale CC 64 Sustai...

Страница 162: ...3 54 55 56 57 58 59 4 60 61 62 63 64 65 66 67 68 69 70 71 5 72 73 74 75 76 77 78 79 80 81 82 83 6 84 85 86 87 88 89 90 91 92 93 94 95 7 96 97 98 99 100 101 102 103 104 105 106 107 8 108 109 110 111 11...

Страница 163: ...d Rotelle Pitch Bend Modulation Estensione tasti Octave Transpose Controlli operativi MAIN SETUP PRESET ZONE MUTE BANK A B BANK CHANNEL PAGE DATA ENTER Preset 30 1 Graphite 2 10 Remote Control 11 30 U...

Страница 164: ...Samson Technologies 45 Gilpin Avenue Hauppauge New York 11788 8816 Phone 1 800 3 SAMSON 1 800 372 6766 Fax 631 784 2201 www samsontech com...

Отзывы: