background image

Setting up  the Rubicon R5a and R6a

Background on the Rubicon R5a and R6a Studio Reference Monitor

The Rubicon R5a and R6a are self-powered near-field reference monitors, featuring robust power, advanced 
electronics and custom designed drive units. For pristine high’s, the Rubicon 5a and 6a boast a 1-inch by 2-
inch velocity ribbon tweeter. The Rubicon ribbon tweeters are constructed using a Kapton diaphragm with 
vaporized aluminum applied to the surface. The diaphragm is then set between an array of neodymium mag-
nets creating an opposing magnetic field. Since the ribbon is both the coil and the diaphragm, the diaphragm 
can accelerate and decelerate quickly resulting in un-matched transient response. Unlike conventional dome 
tweeters, the ribbon tweeter exhibits no coloration due to resonance, as well as, extremely low intermodula-
tion and FM distortion. The result is a wide linear response producing high frequencies that are sweet, while 
clear and accurate. For the low frequency response, the R6a employees a 6.5-inch, copolymer low frequency 
drive unit with butyl rubber surround, and for the R5a, a 5-inch, copolymer, low frequency butyl rubber sur-
round drive unit. Both woofers are well matched to the tuned enclosure and provide punchy and focused 
bass frequency response.The monitor’s crossover has been carefully designed with high quality components 
insuring a linear frequency and phase response. The Rubicon R5a and R6a enclosures are constructed from 
MDF (Medium Density Fiberboard) and are finished in scuff resistant, textured paint. The monitor’s enclo-
sure also includes a tuned vent port that provides extended low-end response, and with a low turbulence 
design, the low frequency driver can move freely with minimal effect on the overall impedance. On the rear 
of the enclosure, you’ll find Rubicon R5a or R6a’s control panel, which features a variety of input connections 
including both XLR balanced input, and a1/4-inch TRS balanced input plus an RCA unbalanced input on the 
R5A . These inputs are connected to Rubicon R5a or R6a’s internal bi-amp power module providing 75 watts 
of power for the low frequency woofer, an active crossover, and 25 watts of power for the high frequency 
tweeter for the R6a, and 50 watts for the low end and 25 watts on the high end for the R5a. You will also find 
the pre-amp controls, including VOLUME knob, used to adjust the overall level of the internal power amplifier, 
as well as the innovative Ribbon Level control.  This four-position switch allows the mix engineer to contour 
the high frequency response of the monitor allowing you to adjust for room acoustics or listening preference. 
The Rubicon R5a and R6a have been designed to provide flat, accurate monitoring, and at the same time, to 
provide an adjustable response curve so that the sound of other popular near-field monitors can be easily 
emulated.

Positioning the Rubicon R5a and R6a

Near field monitoring has become the choice of many engineers in large and small studios because it mini-
mizes the effect of room acoustics. This is especially important in today’s project studios since the budget 
for room acoustics is often close to nothing. By positioning the reference monitors in the near field (close to 
the listeners), you can greatly reduce the effects of room acoustics. The most important considerations when 
evaluating the effects of room acoustics are reflective surfaces that are around the monitoring area. These 
can include flat tabletops, glass mirrors or 
framed pictures, large open walls and even 
the surface of your mixing console.  Mostly 
all reflecting sound will eventually reach 
the listening position, but since it is slightly 
delayed from the direct source,  the result is 
random cancellation of some frequencies, or 
comb filtering. If possible, remove any and 
all reflective surfaces. You may also want to 
hang some acoustic foam on walls that are 
close to the monitors. When positioning the 
monitors you’ll want to set up what is com-
monly referred to as the “mix triangle”.  In this 
ideal configuration, the space between the 
left and right monitor is equal to the dis-

Prime Listening Spot

Equal Distance

Figure 1.

ENGLISH

7

Содержание 6A

Страница 1: ...S T U D I O R E F E R E N C E M O N I T O R S Two way Active Ribbon Reference Monitor A U D I O ...

Страница 2: ...tant Safety Instructions 1 Please read all instructions before operating the unit 2 Keep these instructions for future reference 3 Please heed all safety warnings 4 Follow manufacturers instructions 5 Do not use this unit near water or moisture 6 Clean only with a damp cloth 7 Do not block any of the ventilation openings Install in accordance with the manufacturers instructions 8 Do not install ne...

Страница 3: ...almente o si ha caído al suelo Instrucciones de seguridad Istruzioni di Sicurezza ATTENZIONE per ridurre il rischio di incendio o di scariche elettriche non esponete questo apparecchio a pioggia o umidità Per ridurre il pericolo di scariche elettriche evitate di rimuoverne il coperchio o il pannello posteriore Non esistono all interno dell apparecchio parti la cui regolazione è a cura dell utente ...

Страница 4: ...Copyright 2004 2005 Samson Technologies Corp v5 1 Printed August 2005 Phone 1 800 3 SAMSON 1 800 372 6766 Fax 516 364 3888 www samsontech com ...

Страница 5: ...n 29 Rubicon R5a und R6a einrichten 30 Boxen Ausrichtung 30 Momente der Reflexion 30 Rubicon R5a und R6a anschließen 31 Rubicon R5a und R6a Schnellanschlüsse 31 Rubicon R5a und R6a betreiben 32 Rubicon R5a und R6a Bedienfeld 32 Rubicon R5a und R6a ans Stromnetz anschließen 32 Rubicon R5a und R6a betreiben 33 Anschluss an den Resolv120a Subwoofer 34 Rubicon R5a und R6a mit Mono Sub 34 Verdrahtung 5...

Страница 6: ...ed installations or where great sound is desired In these pages you ll find a detailed description of the features of the Rubicon R5a and R6a monitors as well as a guided tour through its control panel step by step instructions for its setup and use and full specifications You ll also find a warranty card enclosed please don t forget to fill it out and mail it in so that you can receive online tec...

Страница 7: ...r amplifier with 75 watts on the LF driver and 25 watts on the HF driver for the R6a and 50 watts for the low end and 25 watts on the high end for R5a Four position high frequency Ribbon Level control allows the listener to contour the response curve to custom tailor the response that works best in the mix environment Active crossover utilizing a multi pole design for linear response from bottom t...

Страница 8: ...p end 2 POWER LED Blue LED illuminates indicating the unit is powered on ready for operation 3 LOW FREQUENCY DRIVER Heavy duty 6 5 for the R6a and 5 0 for the R5a extended range low frequency transducer 4 TUNED PORT Quiet port design offering linear extended low frequency response 5 ENCLOSURE Rigid MDF construction 6 FINISH Sleek black textured finish Front View Layout ENGLISH 4 ...

Страница 9: ...omized voicing 3 1 4 INCH PHONE Balance TRS Tip Ring Sleeve 1 4 inch phone plug used to connect balanced or unbalanced 4dBu line level signals Rubicon R5a and R6a Layout Rear Panel Layout R5a 4 RCA Used to connect signals from unbalanced 10dBV devices 5 POWER SWITCH Main power switch 6 AC INLET Connect the supplied IEC power cable here ENGLISH 5 ...

Страница 10: ... is connected here via standard XLR microphone cable Rubicon R5a and R6a Layout Rear Panel Layout R6a 4 RCA Used to connect signals from unbalanced 10dBV devices 5 1 4 INCH PHONE Balance TRS Tip Ring Sleeve 1 4 inch phone plug used to connect balanced or unbalanced 4dBu line level signals 6 POWER SWITCH Main power switch 7 AC INLET Connect the supplied IEC power cable here ENGLISH 6 ...

Страница 11: ...lanced input on the R5A These inputs are connected to Rubicon R5a or R6a s internal bi amp power module providing 75 watts of power for the low frequency woofer an active crossover and 25 watts of power for the high frequency tweeter for the R6a and 50 watts for the low end and 25 watts on the high end for the R5a You will also find the pre amp controls including VOLUME knob used to adjust the ove...

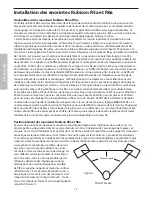
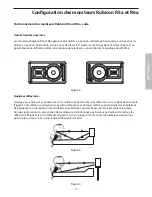
Страница 12: ...eight that reduces the occurrence of reflections that will end up in the prime listening spot Figure 4 In most cases the ideal position is slightly behind and above the mixing console s meter bridge Prime Listening Spot Speaker Orientation The Rubicon R5a and R6a s can be used in either the vertical or horizontal position When using the monitors in the horizontal position be certain to place the l...

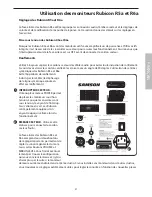
Страница 13: ...efore plugging in and turning on remember the last on first off rule of power amplifiers and pow ered monitors When powering up your system be sure that all the wires are connected turn your mixer and any other outboard gear on and then last turn your Rubicon R5a or R6a s on When powering down turn your Rubicon R5a or R6a s off first and then your mixer and outboard gear The Rubicon R5a and R6a co...

Страница 14: ...cross them at a 90 degree angle for the least amount of induced hum Using the Rubicon R5a and R6a s balanced input connectors will greatly protect against the induced hum thanks to the common mode rejection the induced hum is phase canceled that its balanced input circuit provides POWER SWITCH The POWER switch is used to turn on the Rubicon R5a and R6a s active electronics When set to the on posit...

Страница 15: ...first time start with the volume control set all the way off Slowly raise the Volume control to reach a comfortable listening level The Ins and The Outs The Rubicon R5a and R6a features a full complement of input connectors pro viding easy installation with a variety of audio devices like recording consoles hard disk recorders CD players and com puter sound cards to name a few The following sectio...

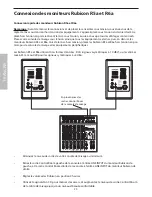
Страница 16: ...ps in the diagram below to set up your system Lower your mixer s master outputs to all the way off Connect the mixer s left output to the RESOLV 120 s LEFT LINE INPUT and the mixer s right output to the RESOLV 120 s RIGHT LINE INPUT Now connect the RESOLV 120 s LEFT LINE OUTPUT to the input of the left Rubicon R5a or R6a and the RESOLV 120 s RIGHT LINE OUTPUT to the input of the right Rubicon R5a ...

Страница 17: ... 25 Watts pour les hautes fréquences Les moniteurs Rubicon sont d excellents moniteurs de proximité pour les studios la post production vidéo les installations fixes ou pour n importe quelle application nécessitant une sonorité de haute qualité Dans ces pages vous trouverez une description détaillée de toutes les fonctions des moniteurs Rubicon R5a et R6a ainsi qu une description des réglages des ...

Страница 18: ...e distorsion très faible Système d électronique actif pour les deux modèles de moniteurs Rubicon incluant un amplificateur de puissance bi amplifié de 75 Watts pour le Woofer et 25 Watts pour le Tweeter R6a et de 50 Watts pour le Woofer et 25 Watts pour le Tweeter moniteurs R5a Commutateur quatre positions permettant de régler le niveau du Tweeter à ruban et ainsi de créer une courbe de réponse ad...

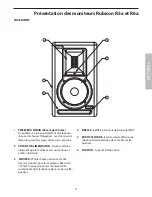
Страница 19: ...t Led bleu indiquant que le moniteur est sous tension et prêt à l utilisation 3 WOOFER Woofer haute puissance de 165 mm 6 5 pouces pour les moniteurs R6a et de 127 mm 5 pouces pour les moniteurs R5a servant à étendre la réponse dans les basses fré quences 4 BAFFLE Baffle à panneaux de particules MDF 5 ÉVENT ACCORDÉ Évent accordé offrant une réponse linéaire étendue dans les basses fré quences 6 FI...

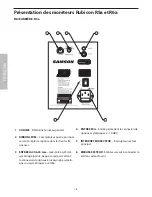
Страница 20: ...rique pointe bague corps permettant la connexion de signaux à niveau ligne symétri ques ou asymétriques à 4 dBu Présentation des moniteurs Rubicon R5a et R6a FACE ARRIÈRE R5a 4 ENTRÉE RCA Entrée permettant la connexion de signaux asymétriques à 10 dBV 5 INTERRUPTEUR SECTEUR Interrupteur secteur principal 6 EMBASE SECTEUR Embase servant à connecter le cordon secteur fourni FRANÇAIS 16 ...

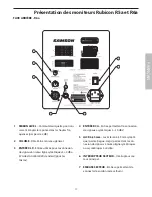
Страница 21: ...le XLR standard pour les micros Présentation des moniteurs Rubicon R5a et R6a FACE ARRIÈRE R6a 4 ENTRÉE RCA Entrée permettant la connexion de signaux asymétriques à 10 dBV 5 JACK 6 35 mm Jack stéréo 6 35 mm symétri que pointe bague corps permettant la con nexion de signaux à niveau ligne symétriques ou asymétriques à 4 dBu 6 INTERRUPTEUR SECTEUR Interrupteur sec teur principal 7 EMBASE SECTEUR Emb...

Страница 22: ...ntrée RCA asymétrique ainsi qu une embase XLR symétrique sur les R6a Ces entrées sont directement reliées au module interne bi amplifié avec filtre actif des Rubicon générant pour les R6a une puissance de 75 Watts pour le Woofer et 25 Watts pour le Tweeter et pour les enceintes R5a une puissance de 50 Watts pour les graves et 25 Watts pour les aigus Les réglages du préamplificateur offrent aussi u...

Страница 23: ... hauteur permettant de réduire les réflexions atteignant le point d écoute Figure 4 Dans la plupart des cas la position idéale correspond au point situé au dessus et en arrière du bandeau de VU mètres Prime Listening Spot Orientation des enceintes Les moniteurs Rubicon R5a et R6a peuvent être utilisés en position verticale ou horizontale Lorsque vous les utilisez en position horizontale assurez vo...

Страница 24: ... R6a Remarque Avant de réaliser les connexions et de placer les enceintes sous tension souvenez vous de la règle de mise sous tension hors tension des équipements L appareil placé sous tension en dernier doit être placé hors tension en premier Avant la mise sous tension assurez vous que tous les câblages sont corrects Placez votre console de mixage sous tension ainsi que tous les équipements exter...

Страница 25: ...s des Rubicon R5a et R6a évite l apparition de ronflements induits par les câbles le déphasage de la ligne symétrique annule en effet ces ronflements INTERRUPTEUR SECTEUR L interrupteur secteur POWER permet de placer les moniteurs sous hors tension Lorsque les enceintes sont sous tension le voyant de l interrup teur s allume en vert Les Rubicon sont également équipées d un voyant rouge qui s allum...

Страница 26: ... le volume au mini mum et augmentez le progressivement Entrées et sorties Les Rubicon R5a et R6a disposent de nombreux connecteurs d entrée pour assurer une installation simple avec de nombreux équipements audio consoles d enregistrement enregistreurs D t D lec teurs de CD cartes sons etc Le chapitre qui suit décrit avec précision les connec teurs d entrée des Rubicon R5a et R6a Consultez égalemen...

Страница 27: ...nectez la sortie de gauche de la console de mixage à l entrée LEFT LINE INPUT du RESOLV 120a et la sortie droite de la console de mixage à l entrée RIGHT LINE INPUT du RESOLV 120a Reliez la sortie gauche LEFT LINE OUTPUT du RESOLV 120a à l entrée du Rubicon R5a ou R6a de gauche et la sortie droite RIGHT LINE OUTPUT du RESOLV 120a à l entrée du Rubicon R5a ou R6a de droite Utilisez le signal d un C...

Страница 28: ...n die einen großartigen Sound erfordern Auf diesen Seiten finden Sie eine detaillierte Beschreibung der Funktionen der Rubicon R5a und R6a Monitore sowie einen geführten Rundgang durch deren Bedienfeld schrittweise Anleitungen für die Einrichtung und Anwendung plus umfassende Technische Daten Die beiliegende Garantiekarte sollten Sie ausfüllen und an uns zurücksenden damit Sie online technischen S...

Страница 29: ...et 75 Watt beim LF Treiber und 25 Watt beim HF Treiber der R5a leistet 50 Watt beim LF Treiber und 25 Watt beim HF Treiber Mit einem 4 Weg Ribbon Pegelregler für die Höhen lässt sich die Ansprechkurve anpassen und auf den Frequenzgang abstimmen der in der Mischungsumgebung am besten funktioniert Aktives Crossover mit Multipol Design für einen linearen Frequenzgang von ganz unten bis ganz oben Schn...

Страница 30: ...ende blaue LED zeigt an dass das Gerät eingeschaltet und betriebsbereit ist 3 BASS TREIBER Hoch belastbarer Bass Wand ler mit erweitertem Frequenzbereich 6 5 Durchmesser beim R6a bzw 5 0 beim R5a 4 ABGESTIMMTER PORT Diese geräuscharme Port Konstruktion bietet einen erweiterten line aren Bass Frequenzgang 5 GEHÄUSE Steife MDF Konstruktion 6 FINISH Elegante schwarz texturierte Oberfläche Vorderseiti...

Страница 31: ...BUCHSE Symmetrische TRS Tip Ring Sleeve 1 4 Klinkenbuchse zum Anschließen symmetrischer oder asymmetri scher 4 dBu Line Pegel Signale Rubicon R5a und R6a Layout Rückseitiges Layout R5a 4 CINCH Zum Anschließen der asymmetrischen Signale von 10 dBV Geräten 5 POWER SCHALTER Haupt Netzschalter 6 AC EINGANG Zum Anschließen des mitgeliefer ten IEC Netzkabels DEUTSCHE 27 ...

Страница 32: ... standard XLR Mikrofon Kabeln Rubicon R5a und R6a Layout Rückseitiges Layout R6a 4 CINCH Zum Anschließen der Signale von asymmetrischen 10 dBV Geräten 5 1 4 KLINKENBUCHSE Symmetrische TRS Tip Ring Sleeve 1 4 Klinkenbuchse zum An schließen symmetrischer oder asymmetrischer 4 dBu Line Pegel Signale 6 POWER SCHALTER Haupt Netzschalter 7 AC EINGANG Zum Anschließen des mitgelie ferten IEC Netzkabels DE...

Страница 33: ...XLR Eingang einem symmetrischen 1 4 TRS Eingang sowie einem asymmetrischen Cinch Eingang beim R5A Diese Eingänge sind mit dem internen Bi Amp Leistungsmodul der Rubicon R5a oder R6a verbunden und bieten 75 Watt Leistung für den Bass Woofer ein aktives Crossover sowie 25 Watt Leistung für den Höhen Tweeter beim R6a bzw 50 Watt für die Bässe und 25 Watt für die Höhen beim R5a Auf dem Bedienfeld find...

Страница 34: ...Monitoren ausgehen und wählen Sie eine Höhe die das Auftreten von Reflexionen verringern die bis zur primären Abhörposition gelangen Abb 4 In den meisten Fällen liegt die Idealposition etwas hinter und über der Anzeigenleiste des Mischpults Prime Listening Spot Boxen Ausrichtung Die Rubicon R5a und R6a sind entweder in horizontaler oder vertikaler Ausrichtung verwendbar Bei horizon taler Ausrichtu...

Страница 35: ...ne Regel für Endstufen und Aktivmonitore erinnern Zuletzt ein zuerst aus Beim Einschalten des Systems sollten Sie zuerst sicherstellen dass alle Kabel angeschlossen sind und dann den Mischer sowie alle anderen Peripheriegeräte und zuletzt die Rubicon R5a oder R6a einschalten Beim Ausschalten des Systems sollten Sie zuerst Ihren Rubicon R5a oder R6a und dann Ihren Mischer und die Peripheriegeräte a...

Страница 36: ...inden um die Induzierung von Brummgeräuschen zu minimieren Die symmetrischen Eingänge der Rubicon R5a und R6a schützen aufgrund der vom symme trischen Eingangsschaltkreis erzeug ten Gleichtaktunterdrückung sehr gut gegen Brummeinstreuungen das induzierte Brummen wird durch Phasendrehung entfernt POWER SCHALTER Mit dem POWER Schalter schalten Sie die aktive Elektronik des Rubicon R5a und R6a ein In...

Страница 37: ...Drehen Sie dann den Volume Regler langsam auf bis ein angenehmer Abhör pegel erreicht ist Ein und Ausgänge Die Rubicon R5a und R6a verfügen über eine ganze Reihe verschiedener Eingänge die den einfachen Anschluss an ein breites Spektrum von Audiogeräten z B Aufnahmepulte Harddisk Recorder CD Player und Computer Soundkarten ermöglichen Der folgende Abschnitt beschreibt die Eingänge des Rubicon R5a ...

Страница 38: ...prechend dem folgenden Diagramm ein Regeln Sie die Master Ausgänge Ihres Mischers ganz zurück Schließen Sie den linken Ausgang des Mischers an den LEFT LINE INPUT des RESOLV 120 und den rechten Ausgang des Mischers an den RIGHT LINE INPUT des RESOLV 120 an Verbinden Sie dann den LEFT LINE OUTPUT des RESOLV 120 mit dem Eingang des linken Rubicon R5a oder R6a und den RIGHT LINE OUTPUT des RESOLV 120...

Страница 39: ...n las que se necesite un sonido de gran calidad En estas páginas encontrará una descripción detallada de todas las características de los monitores Rubicon R5a y R6a así como un recorrido guiado por su panel de control instrucciones paso a paso para su montaje y uso y una completa tabla con las especificaciones También encontrará una tarjeta de garantía no se olvide de rellenarla y enviárnosla por...

Страница 40: ...uyendo una etapa de potencia bi amplificada con 75 watios en el cabezal de graves y 25 en el de agudos en el caso del R6a y con una de 50 watios para los graves y 25 para los agudos para el R5a Un control de nivel de cinta de agudos con cuatro posiciones permite al oyente modelar la curva de respuesta para personalizar la salida que de mejores resultados en su entorno de mezcla Crossover activo co...

Страница 41: ... se ilumina para indicarle en qué momento está encendida la unidad y lista para funcionar 3 CABEZAL DE GRAVES Woofer de rango ampliado y gran rendimiento de 6 5 en el caso del R6a y de 5 0 para el R5a 4 TOBERA AFINADA Un diseño de tobera silenciosa que le ofrece una respuesta en graves ampliada y lineal 5 RECINTO ACUSTICO Construido en MDF de extraordinaria robustez 6 ACABADO Negro satinado con gr...

Страница 42: ...m balanceado que se usa para la conexión de señales de nivel de línea a 4dBu tanto balanceadas como no balanceadas Controles y conectores del Rubicon R5a y R6a Distribución del panel trasero R5a 4 RCA Toma que se usa para la conexión de señales procedentes de dispositivos no balanceados a 10 dBV 5 INTERRUPTOR POWER Interruptor general de encendido 6 ENTRADA DE CORRIENTE AC Conecte a esta toma el c...

Страница 43: ...ono standard Controles y conectores del Rubicon R5a y R6a Rear Panel Layout R6a 4 RCA Toma que se usa para la conexión de señales procedentes de dispositivos no balanceados a 10 dBV 5 TOMA DE 6 3 MM Entrada TRS punta anillo lateral de 6 3 mm balanceado que se usa para la conexión de señales de nivel de línea a 4dBu tanto balanceadas como no balanceadas 6 INTERRUPTOR POWER Interruptor general de en...

Страница 44: ...l módulo de etapa de potencia biamplificada interna del Rubicon R5a ó R6a que ofrece 75 watios de potencia para el woofer de graves un crossover activo y 25 watios de potencia para el tweeter de agudos en el caso del R6a y 50 watios para los graves y 25 para los agudos en el R5a También encontrará los controles de preamplificación incluyendo el mando VOLUME que se usa para ajustar el nivel global ...

Страница 45: ...y elija una altura que reduzca la producción de reflexiones que terminen en el punto de escucha principal Figura 4 En la mayoría de los casos la posición ideal es ligeramente por detrás y por encima del panel de medidores de la mesa Prime Listening Spot Orientación de los altavoces Puede usar el Rubicon R5a y R6a tanto en posición horizontal como vertical Cuando use estos monitores en posición hor...

Страница 46: ...ncender ningún aparato recuerde la regla de oro de las etapas de potencia y monitores autoamplificados el último en encender el primero en apagar Cuando encienda su sistema asegúrese de que todos los cables estén conectados encienda después la mesa y el resto de dispositivos exteriores y finalmente el Rubicon R5a ó R6a A la hora de apagar el sistema apague primero el Rubicon R5a ó R6a y después lo...

Страница 47: ...ctos para reducir los zumbidos al mínimo El usar los conectores de entrada balanceados del Rubicon R5a y R6a le protegerá en gran medida contra los zumbidos indicidos gracias a su rechazo al modo común el zumbido inducido está cancelado en su fase INTERRUPTOR POWER Este interruptor se usa para encender los circuitos electrónicos activos del Rubicon R5a y R6a Cuando lo coloque en ON el piloto inter...

Страница 48: ...a posición de este control lentamente hasta un nivel de escucha adecuado Las entradas y salidas El Rubicon R5a y R6a dispone de una amplia gama de conectores de entrada que permiten una fácil instalación con una gran variedad de dispositivos audio como mesas de mezclas grabadoras de disco duro reproductores de CD y tarjetas de sonido por citar algunas A continuación le detallamos los conectores de...

Страница 49: ...diagrama siguiente Reduzca al mínimo las salidas master de su mesa de mezclas Conecte la salida izquierda de la mesa de mezclas a la ENTRADA DE LINEA IZQUIERDA del RESOLV 120 y la salida derecha de la mesa a la ENTRADA DE LINEA DERECHA del RESOLV 120 Conecte después la SALIDA DE LINEA IZQUIERDA del RESOLV 120 a la entrada del Rubicon R5a ó R6a de la izquierda y la SALIDA DE LINEA DERECHA del RESOL...

Страница 50: ...campo ravviccinato ideale per studi suite di post produzione video installazioni fisse e ovunque sia desiderabile un suono alla grande In queste pagine troverete una dettagliata descrizione delle caratteristiche dei monitor Rubicon R5a ed R6a una visita guidata al loro pannello di controllo istruzioni passo a passo per il collegamento e l uso e le specifiche complete Troverete anche inclusa la gar...

Страница 51: ...sore delle BF e 25 watt per il diffusore delle FA per gli R6a e 50 watt per i bassi e 25 watt per gli acuti per gli R5a Il controllo di Livello per le frequenze acute del Nastro a quattro posizioni permette all ascoltatore di ade guare la curva di risposta scegliendo l andamento specifico che meglio si adatta all ambiente di missaggio Il crossover attivo sfrutta una progettazione multipolare per u...

Страница 52: ...TAZIONE LED blu che si accende per indicare quando l unità è alimen tata e pronta a funzionare 3 TRASDUTTORE PER LE BASSE FREQUENZE trasduttore per le basse frequenze heavy duty a risposta estesa da 6 5 per gli R6a e da 5 0 per gli R5a 4 APERTURA ACCORDATA silenzioso progetto aperto che offre una estesa risposta alle basse frequenze 5 MOBILE rigida costruzione in MDF 6 FINITURA elegante finitura i...

Страница 53: ...phono bilanciata TRS Tip Ring Sleeve Punta Anello Corpo da 1 4 per il collegamento bilanciato o sbilanciato di segnali a livello di linea a 4dBu Rubicon R5a ed R6a Il Layout Il Pannello Posteriore R5a 4 RCA da usare per il collegamento di segnale da apparecchi sbilanciati a 10dBV 5 INTERRUTTORE DI ALIMENTAZIONE è l inter ruttore principale di accensione 6 PRESA IN CA va collegato qui il cavo IEC d...

Страница 54: ...andard XLR per cavi microfonici Rubicon R5a ed R6a Il Layout Il Pannello Posteriore R6a 4 RCA da usare per il collegamento di segnale da apparecchi sbilanciati a 10dBV 5 JACK PHONO DA 1 4 presa phono bilanciata TRS Tip Ring Sleeve Punta Anello Corpo da 1 4 per il collegamento bilanciato o sbilanciato di segnali a livello di linea a 4dBu 6 INTERRUTTORE DI ALIMENTAZIONE è l inter ruttore principale ...

Страница 55: ... sugli R6a che RCA sbilanciati Gli ingressi sono collegati al modulo di biamplificazione interno con crossover attivo che negli R6a forniscono 75 watt di potenza per per le frequenze basse e 25 watt per le frequenze acute e negli R5a 50 watt per i bassi e 25 watt per gli acuti Trovate anche i controlli di preamplificazione tra cui il VOLUME che permette di regolare il livello generale del finale d...

Страница 56: ...or e scegliete una altezza de riduca il formarsi di riflessioni verso la migliore osizione di ascolto Figura 4 Nella maggior parte dei casi la posizione ideale è leggermente dietro e sopra i livelli di misura della consolle Prime Listening Spot L Orientazione delle Casse Acustiche I Rubicon R5a ed R6a possono essere usati sia in posizione verticale che orizzontale Quando li usate in confi gurazion...

Страница 57: ...egola dei finali di potenza e dei monitor ampli ficati l ultimo da accendere è il primo da spegnere Quando accendete il vostro sistema assicuratevi di aver collegato tutti i cavi accendete il mixer e tutte le altre apparecchiature esterne e per ultimi accendete i Rubicon R5a o R6a Quando spegnete il sistema spegnete per primi i Rubicon R5a o R6a poi il mixer e le apparecchiature esterne I Rubicon ...

Страница 58: ...ronzìo indotto L uso dei connettori di ingresso bilanciati dei Rubicon R5a and R6a è di grande protezione contro il rumore indotto grazie al modo comune di reiezione fornito dal circuito di bilanciamento in ingresso che costringe il rumore indotto in cancellazione di fase INTERRUTTORE POWER DI ACCEN SIONE l interruttore POWER per mette di accendere e spegnere l elet tronica attiva dei Rubicon R5a ...

Страница 59: ...e dei Rubicon R5a ed R6a Quando li accendete per la prima volta par tite col controllo di volume completamente chiuso poi alzatelo lentamente fino a rag giungere un livello di ascolto confortevole Gli Ingressi e le Uscite I Rubicon R5a ed R6a godono di una dota zione completa di connettori in ingresso per l installazione immediata con un gran nume ro di apparecchi audio come consolle di regi straz...

Страница 60: ...a seguite i passi elencati sotto il disegno Chiudete completamente le uscite principali del mixer Collegate l uscita di sinistra del mixer all INGRESSO DI LINEA DI SINISTRA del RESOLV 120 e l uscita di destra del mixer all INGRESSO DI LINEA DI DESTRA del RESOLV 120 Poi collegate l USCITA DI LINEA DI SINISTRA del RESOLV 120 all ingresso del Rubicon R5a o R6a a sinistra e l USCITA DI LINEA DI DESTRA...

Страница 61: ... ways to interface the Rubicon R5a and R6a depending on your exact monitoring set up Follow the cable diagrams below for connecting your monitor system Balanced XLR to XLR Cable Balanced 1 4 to 1 4 Cable Un Balanced 1 4 to 1 4 Cable RCA to RCA Cable WiringGuide Plandecâblage Verdrahtung Guíadecableado Cablaggio ...

Страница 62: ...MS Crossover Frequency 3KHz 4 pole 24dB Oct filter Inputs Unbalanced 10dBV Line Level Connector RCA Balanced 4dBu Line Level Connector 1 4 inch Phone TRS Tip Ring Sleeve XLR R6a yes XLR R5a no Enclosure Construction MDF Medium Density Fiberboard Finish Black Textured Epoxy Paint Dimensions R6a 9 1 4 235mm W x 15 381mm H x 10 3 4 273mm D R5a 8 203mm W x 13 1 4 337mm H x 9 1 4 235mm D Weight R6a 18 ...

Страница 63: ...59 59 Specifications Caractéristiques techniques Technische Daten Especificaciones técnicas Specifiche ...

Страница 64: ...Samson Technologies Corp Phone 1 800 3 SAMSON 1 800 372 6766 Fax 516 364 3888 www samsontech com ...

Отзывы: