background image

EB 9511 EN


 12-1

Removal

12 Removal

The work described in this section is only to 
be performed by personnel appropriately 

qualified to carry out such tasks.

Electrostatic discharge will damage the in-

stalled modules.


Î

Observe the ESD requirements according 
to IEC 61340-5-1.

12.1 Removing the option 

module

1.  Put the gateway out of operation (see the 

'Decommissioning' section).

2.  Disconnect the connecting lines on the 

option module.

3. 

Undo the five screws on the cover and 

remove the cover.

4.  Pull the option module out of the slot and 

store it in its packaging.

If the gateway is to continue operating with-
out the option module:


Î

Place on the cover and fasten it.


Î

Put the gateway back into operation (see 

the 'Start-up and configuration' section).

12.2 Removing the gateway

1.  Put the gateway out of operation (see the 

'Decommissioning' section).

2. 

Removing the option module

3.  Disconnect the wires for the power sup-

ply from the gateway.

4.  To remove the gateway, loosen the fas-

tening screws.

NOTICE

!

Содержание 5007-2 Series

Страница 1: ...Translation of original instructions EB 9511 EN Firmware version 1 03 11 Edition January 2021 SAM Connect Gateway Type 5007 2...

Страница 2: ...If you have any questions about these instructions contact SAMSON s After sales Service aftersalesservice samsongroup com Documents relating to the device such as the mounting and operating instructi...

Страница 3: ...nd on site transport 4 1 4 1 Accepting the delivered goods 4 1 4 2 Removing the packaging from the SAM Connect Gateway and modules 4 1 4 3 Transporting the SAM Connect Gateway 4 1 4 4 Storing the gate...

Страница 4: ...nctions 9 1 9 1 Troubleshooting 9 1 10 Servicing 10 1 10 1 Firmware updates 10 1 10 2 Periodic inspection and testing of the gateway 10 1 11 Decommissioning 11 1 12 Removal 12 1 12 1 Removing the opti...

Страница 5: ...way is not suitable for the following applications Use outside the limits defined during sizing and by the technical data Furthermore the following activities do not comply with the intended use Use o...

Страница 6: ...afety regulations Opera tors are obliged to provide these mounting and operating instructions to the operating per sonnel and to instruct them in proper operation Furthermore operators must ensure tha...

Страница 7: ...ing device safety and electromagnetic compatibility Risk of damage to the device due to incorrect mounting position Mount the device in the upright position only Incorrect installation and removal of...

Страница 8: ...1 4 EB 9511 EN...

Страница 9: ...no Var ID 1 2 3 4 5 6 1 The first two figures of the serial number in reverse order indicate the year of manufacture example serial number 71xxxxx Year of manufacture 2017 2 15 digit serial number for...

Страница 10: ...Old New 1 02 07 1 03 09 New version 230 V version Increased measuring accuracy of the analog inputs Russian and Turkish added as menu and display language Start up wizard added Improved operation Four...

Страница 11: ...dule slot 1 AI Analog input 4 AIA Analog input active 6 Option module slot 2 Without 0 AI Analog input 4 AIA Analog input active 6 Option module slot 3 Without 0 AI Analog input 4 AIA Analog input act...

Страница 12: ...2 4 EB 9511 EN...

Страница 13: ...ANAGEMENT web portal Application The SAM Connect Gateway can accept up to four 4 to 20 mA signals and transfer the data over the integrated GSM module As a result transmitters installed in a plant e g...

Страница 14: ...1 EN Design and principle of operation Filling levels of four tanks are transferred to the gateway Media 5 Media 5 Media 6 Media 6 WWW SAM TANK MANAGEMENT Fig 3 2 Sample application 1 of the SAM Conne...

Страница 15: ...3 Design and principle of operation Filling levels and absolute pressures of two tanks are transferred to the gateway Media 6 WWW SAM TANK MANAGEMENT Media 6 Fig 3 3 Sample application 2 of the SAM Co...

Страница 16: ...the gateway as well as view process parameters online TROVIS VIEW can be downloaded free of charge from our website at www sam songroup com Service Support Down loads TROVIS VIEW 3 2 Versions 24 V ver...

Страница 17: ...EB 9511 EN 3 5 Design and principle of operation 9 12 12 11 10 12 12 13 14 1 6 8 8 7 2 3 4 5 Fig 3 4 Operating controls...

Страница 18: ...modules can be retrofitted The following option modules are available AI Analog input This module works passively and has galvanically isolated inputs It can accept signals from devices with their ow...

Страница 19: ...stationary use at non weath er protected locations 4K4 with restrictions air temperature 40 to 55 C temperature inside the housing must not exceed 70 C when exposed to direct sunlight 4M4 The display...

Страница 20: ...Input voltage 100 to 230 V 50 Hz 100 to 110 V 60 Hz Output voltage 14 V DC Power Max 10 W Table 3 3 Optional additional functions AI Analog input Version 4 to 20 mA current input externally powered g...

Страница 21: ...apacity 25 W Impedance 50 Polarization Vertical Frequency GSM 900 MHz AMPS 824 894 MHz ISM 868 MHz DCS 1800 MHz PCS 1900 MHz 3G UMTS 2 1 GHz SIM card M2M Industrial Plug in High Temperature operating...

Страница 22: ...3 10 EB 9511 EN Design and principle of operation 3 7 Dimensions in mm 134 18 20 14 176 21 53 102 60 29 132 80 31...

Страница 23: ...EB 9511 EN 3 11 Design and principle of operation 3 7 1 Dimensions for mounting mm 168 283 Dimensions with opened cover Drill pattern for mounting 60 80 30 30 27 5 28 5 35 5 17 5 4x M8...

Страница 24: ...3 12 EB 9511 EN...

Страница 25: ...nd modules Observe the following sequence Do not remove the packaging until im mediately before installation Dispose and recycle the packaging in accordance with the local regulations Keep the packagi...

Страница 26: ...al in fluences e g impact Protect the gateway against moisture and dirt Make sure that the ambient air is free of acids or other corrosive media Do not place any objects on the gate way Observe the en...

Страница 27: ...on Proceed as follows Check the gateway to make sure that it is clean and not damaged Lay out the necessary material and tools to have them ready during installation work The kit for pipe mounting is...

Страница 28: ...functions due to electrostatic dis charge Observe the ESD requirements according to IEC 61340 5 1 1 Disconnect the electrical power supply from the gateway and connected mod ules 2 Undo the five screw...

Страница 29: ...EB 9510 EN 5 3 Cover Option module Fig 5 1 Inserting option modules...

Страница 30: ...be used during the first start up when no other power supply is available A lithium battery allows the device to run for approx seven days To continue to supply the power supply unit with power after...

Страница 31: ...EB 9510 EN 5 5 Installation Observe the correct polarity when inserting the battery Cover 1 5 V battery Fig 5 2 Inserting the 1 5 V battery...

Страница 32: ...ge supply and protect it against unintentional re connection Only use power interruption devices that are protected against unintentional re connection of the power supply Upon installation of the ele...

Страница 33: ...EB 9510 EN 5 7 Installation 60 80 30 30 27 5 28 5 35 5 17 5 4x M8 Fig 5 3 Drill pattern Fig 5 4 Kit 1402 1910 for pipe mounting...

Страница 34: ...of the gateway has five thread ed boreholes which can be fitted with cable glands as required The cable gland version depends on the ambient temperature range see techni cal data in the Design and pri...

Страница 35: ...Connected internally at the factory 11 12 AI Analog input 19 20 AIA Analog input active Terminals of the option modules Supply voltage 24 V version PE 24 V DC 230 V version L N PE to 230 V AC 100 V A...

Страница 36: ...5 10 EB 9510 EN...

Страница 37: ...y warning LED Status LEDs for GSM module Fig 6 1 Operating controls of the SAM Connect Gateway 6 1 Capacitive keys The capacitive keys for on site operation are located to the right of the display Con...

Страница 38: ...e basic start up settings A list of parameters for on site operation is included in Annex A configuration in structions 1 Status and measured value of the option module 1 2 Status and measured value o...

Страница 39: ...minutes the display returns to the start screen We recommend proceeding as follows during first start up 1 Start the option module wizard 2 Set user level see section 7 1 1 3 Enter the local power li...

Страница 40: ...7 1 Settings 7 1 1 Setting the user level The gateway has two user levels with different access privileges Maintenance staff values and parameters can be selected and read in this user level Changes...

Страница 41: ...g 7 1 3 Activating password protection The password can only be changed and activated in the Specialist user level 1 Press key in start screen to go to the main menu 2 Select Start up 1 with or key an...

Страница 42: ...with key 3 Select power line frequency 1 6 with or key 4 Press key to change the setting 50 Hz or 60 Hz 7 1 5 Performing option module settings The settings of the option module parameters can be perf...

Страница 43: ...le Table 8 1 below describes the meaning of the LEDs 8 1 2 Improving the signal quality The signal strength can be indicated by the LEDs on the GSM module Proceed as fol lows 1 Press the service key o...

Страница 44: ...are error Fast blinking incoming SMS text message SYS Green 1x system ON Table 8 2 Signal strength reading Reading CSQ value 1 Signal quality Red LED R 8 96 dBm No signal Red LED 1x green LED R G 15 8...

Страница 45: ...play by error messages in conjunction with an icon for status classification and an error ID The meaning of the icons and their order of pri ority are listed in Table 9 1 On the start screen error mes...

Страница 46: ...ting control is switched on Select lower temperature limit 206 Temperature inside device above max limit The temperature limit inside the device has ex ceeded the adjusted max limit Check whether the...

Страница 47: ...becomes void if service or repair work not described in these instructions is performed without prior agreement by SAMSON s After sales Service Only use original spare parts by SAMSON which comply wi...

Страница 48: ...amaged missing or incorrect to renew them Clean any inscriptions that are covered with dirt and are illegible Check the gateway to ensure it is mounted firmly Tighten the any loose mounting screws Che...

Страница 49: ...wiring performing any work on the device or opening the device disconnect the voltage supply and protect it against unintentional re connection Only use power interruption devices that are protected...

Страница 50: ...11 2 EB 9511 EN...

Страница 51: ...onnecting lines on the option module 3 Undo the five screws on the cover and remove the cover 4 Pull the option module out of the slot and store it in its packaging If the gateway is to continue opera...

Страница 52: ...12 2 EB 9511 EN...

Страница 53: ...esponsibility that the devices are handled to meet all requirements stipulated by VBG 62 or similar regulations until they are handed over to the manufac turer Otherwise SAMSON does not accept any res...

Страница 54: ...13 2 EB 9511 EN...

Страница 55: ...other household waste Check whether a battery is inserted in the gateway and remove it before dis posing of the device Observe local national and internation al refuse regulations before disposing of...

Страница 56: ...14 2 EB 9511 EN...

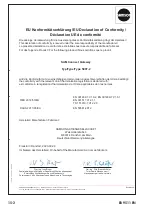
Страница 57: ...on the next pages EU declaration of conformity for Type 5007 The certificates shown were up to date at the time of publishing The latest certificates can be found on our website u www samsongroup com...

Страница 58: ...en einschl gigen Harmonisierungsrechtsvorschriften der Union best tigt the conformity with the relevant Union harmonisation legislation is declared with est conforme la l gislation d harmonisation de...

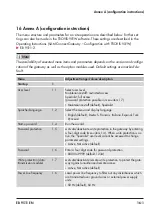
Страница 59: ...ible in menu item 1 7 Maintenance staff default Specialist Sprache Language 1 2 Select the menu and display language English default Deutsch Fran ais Italiano Espanol T rk P Start up wizard 1 4 Run th...

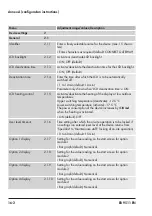
Страница 60: ...er switching temperature deactivate 12 5 C Lower switching temperature activate 17 5 C The power consumption of the device increases by 510 mA when the heating is activated ON default OFF User level t...

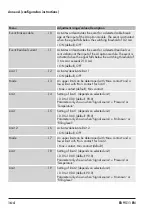
Страница 61: ...Enter a name max 15 characters for identification Enter characters as required default OPTION Signal source 4 Enter the signal source on which the 4 to 20 mA signal is based Unknown default liquid lev...

Страница 62: ...mined with Max contact and a lower limit with Min contact for limit 1 Max contact default Min contact Limit 14 Setting of limit 1 depends on selected unit 0 0 to 100 0 default 90 0 Parameter only show...

Страница 63: ...efault 90 0 Parameter only shown when Signal source Unknown or Filling level 4 to 20 mA measured value 24 Reading of the current in mA at the option module Relative measured value 25 Reading of the cu...

Страница 64: ...he current input value e g 103 and the measured value is set to 100 Reset span span is set to 0 Set span default reset span The following values are displayed Measured value analog input signal in Cur...

Страница 65: ...Diagnostics 4 Status messages 4 1 Status messages provide an overview on the current states of individual functions or components of the gateway A corre sponding status icon is assigned to failures an...

Страница 66: ...it within the specified range if the current device temperature is above the adjusted limit an error message is generated and displayed The status changes to Out of specification 10 to 70 C default 60...

Страница 67: ...or defects arise You can reach our after sales service at aftersalesservice samsongroup com Addresses of SAMSON AG and its subsid iaries The addresses of SAMSON AG its subsid iaries representatives an...

Страница 68: ...17 2 EB 9511 EN...

Страница 69: ......

Страница 70: ...4 EB 9511 EN...

Страница 71: ...EB 9511 EN 5...

Страница 72: ...2021 01 13 English SAMSON AKTIENGESELLSCHAFT Weism llerstra e 3 60314 Frankfurt am Main Germany Phone 49 69 4009 0 Fax 49 69 4009 1507 samson samsongroup com www samsongroup com EB 9511 EN...

Отзывы: