background image


Instruction manual


Two rotor rake  

TANGO


- 25 -


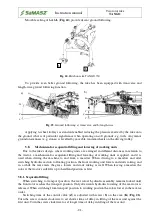
Fig. 34. 

Rake in position for headlands 


CAUTION: 

When preparing the rake for position for headlands, there is a risk of tilting 
and  falling  of  the  aggregate,  thus  this  should  be  carried  out  on  an  even 
ground. When turning back, reduce the driving speed accordingly!


5.12.


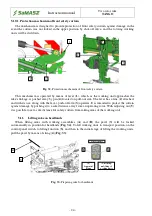
 Removing clogging and jams 

When  operating  the  machine  pay  attention  to  variable  conditions  in  field,  which  may 

influence the clogging and blocking, such as: terrain unevenness, height and density of grass as well 
as  other  objects  in  the  grass  (stones,  branches,  piles  of  soil).  In  order  to  avoid  clogging  and 
blocking, operating speed should be adjusted to the mentioned conditions. 


CAUTION: 

Removing clogs and jams while the machine is in operation can lead to the 
accident ! 


In case of machine blockage caused by wrapped material, set the machine on a flat surface, 

remove  excess  material  using  sharp  tool.  After  clearing  the  machine  check  if  nothing  has  been 
damaged. 

To remove any clogging it is obligatory to disconnect the drive and the motor, take out the 

ignition key. When eliminating any clogging on the machine, use also safety means for operator, so 
protective gloves and tight wear. 


5.13.


 Dismounting machine from tractor


CAUTION: 

When dismounting, make sure there is no person in between the machine 
and the tractor. 
 

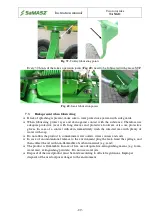
To dismount the machine from the tractor: 


Set the machine onto an even, stable ground, 


Turn the tractor's ignition off and take the key out, 


Secure the machine against moving by placing wedges at wheels, 


Fold out the support leg and protect with safety pin, 


Disconnect the machine's hydraulics and electrics from the tractor, 


Disconnect control panel, 


Dismount the telescopic articulated shaft and place it on the shaft holder, which is standard-

delivered with the machine, 


Detach the machine from the tractor. 


Содержание TANGO 730

Страница 1: ...sta 1 Established 1984 NIP PL 966 159 29 76 tel 48 85 664 70 31 fax 48 85 664 70 41 e mail samasz samasz pl www samasz pl OPERATOR S MANUAL TWO ROTOR RAKE TANGO 730 IN307USA001 2016 06 15 EDITION No 1 Translation of the original manual Serial number ...

Страница 2: ...Do not fold the rakes until all operating parts are stopped WARNING Do not operate the rake when any person remains in the danger area of 170 NOTE Keep this manual for future use Well proven design with thousands of machines in regular use in many countries and quality materials ensure high durability and reliability of SaMASZ rakes We congratulate you on the purchase of your new SaMASZ rake and w...

Страница 3: ...itching the rake from transport to working position 17 5 6 Preparing rake for operation 17 5 7 Operation 20 5 8 Mechanism for sequential lifting and lowering of working units 21 5 8 1 Sequential lifting 21 5 8 2 Sequential lowering 22 5 9 Setting rake for forming one row 22 5 10 Switching rake from forming one row to forming two single rows 23 5 10 1 Protection mechanism of front safety curtain 24...

Страница 4: ...be considered the rake s basic equipment and should be kept for further reference If the rake is handed over to another user it should be serviceable and include this operator s manual CE declaration of conformity and its required basic equipment Before operating the rake its user must familiarize himself with this manual as well as current work safety rules The rake is manufactured according to i...

Страница 5: ...iliar with its characteristics and with safety regulations Tampering with the rake may release the manufacturer from responsibility for any resulting malfunctions or damages 3 1 Technical data Tab 1 General specification Rake type TANGO 730 Working width ft in m 21 8 23 11 6 60 7 30 Transport width ft in m 9 10 2 99 Transport height ft in m 13 3 97 Transport length ft in m 25 5 7 75 Tractor s PTO ...

Страница 6: ...es the drive with shafts 4 on carousel gear I 3 and carousel gear II Then the drive from the carousel gear II is transmitted with the shaft onto the carousel gear II 5 On the rotor there are arms 6 installed to which raking tines 7 are mounted Carousel gears are equipped with safety guards 8 For the transport the extreme most arms can be detached and placed in holders Adjustment cranks 9 are used ...

Страница 7: ...ke sure to follow the PTO shaft lubrication frequency Lubrication points marked in Fig 4 should be lubricated every 50 hours Always lubricate the PTO shaft before and after a period of longer idleness PTO shafts of other brands with equivalent technical parameters may be used on the SaMASZ permission 4 SAFETY PRECAUTIONS 4 1 Safety rules and regulations Front axis of the tractor should be balanced...

Страница 8: ...ctor rake aggregate is not well balanced Never start the rake if any people or animals are around the rake Always follow safety labels describing hazards and warning signs placed on the machine Before starting the tractor make sure that each drive is disconnected and control levers for hydraulics are in neutral position Do not drive the rake backwards when operating Never get onto the rake Never s...

Страница 9: ... the machine wheels regularly In the event of any break in the equipment operation turn off the drive In the event of a fatal failure please call for technical service and if an accident in this case road accident occurs respect first aid rules and contact responsible services 4 2 Transport Any modifications in the rake s position are possible only if no unauthorized personnel is around children i...

Страница 10: ...le parts should be blocked in transport position When relocating the rake onto another vehicle there should be no unauthorized personnel permitted to remain within the danger area The rake should be protected against moving on the vehicle s trailer WARNING Securing the maneuver area and providing safety for operation performed is the responsibility of the person in charge of moving of the machine ...

Страница 11: ...al leaks until the entire assembly is under pressure Note It is recommended that the hydraulic oil used should not exceed 10 oil purity class in accordance with NAS 1638 When using hydraulic hoses Avoid stretching the hoses when operating Do not allow hydraulic hoses to get deflected Do not expose hydraulic hoses to contact with any sharp edges If damaged or worn replace the hoses Service life for...

Страница 12: ...included in the operator s manual while making sure the tractor s drive is turned off Before any works focus your attention solely on the tasks to do Never operate the rake being under influence of alcohol drugs or strong medicines Wear clothing that is not too loose or too tight Too loose clothing elements may be pulled in by the rake s rotating parts Make sure the rake is not operated by childre...

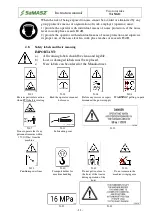
Страница 13: ...their meaning IMPORTANT a All warning labels should be clean and legible b Lost or damaged labels must be replaced c New labels can be ordered at the Manufacturer N 01 Exercise particular caution when PTO shaft is rotating N 03 Read the operator s manual before use N 04 Before any service or repair disconnect the power supply N 06 WARNING pulling in parts N 07 Do not operate the if any personnel r...

Страница 14: ...opes where the vehicle is likely to slip or tilt N 156 N 157 N 167 Do not remain on the machine while driving N 162 N 168 Do not touch the machine before the rotating parts have not come to a complete stop N 179 N 180 N 182 N 183 Caution danger of pulling in of legs N 184 N 196 Recommended pressure in rake s wheels N 200 N 202 Admissible speed when transporting ...

Страница 15: ...required Personal Protective Fig 7 Location of warning labels NOTE Any spare part used for repair of the rake should have all safety labels provided by the manufacturer N 01 N 49 N 124 N 15 N 82 N 162 N 204 N 205 N 206 N 200 N 200 N 156 N 157 N 179 N 180 N 182 N 182 N 202 N 184 N 03 N 04 N 06 N 07 N 23 N 50 N 105 N 133 N 117 N 167 N 168 N 183 ...

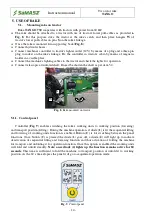
Страница 16: ...copic articulated shaft If need be shorten the shaft as per item 5 4 Fig 8 Rake mounted on tractor 5 1 1 Control panel Controller Fig 9 enables switching the rake s working units to working position lowering and transport position lifting During the machine operation if diode 1 is lit the sequential lifting and lowering of working units function is enabled Button C is for switching between the pan...

Страница 17: ...n off the PTO shaft raking arms cannot be in motion lift safety guards to transport position take out the extreme most raking arms from a rotor place them in transport holes depending on max height of obstacles under way Fig 10 lower and secure a support leg lift working assemblies and secure them with a pawl Fig 10 Transport dimensions NOTE Once the machine is set to transport position check whet...

Страница 18: ...NOTE If necessary shorten the shaft as provided in the corresponding operator s manual Fig 12 Fig 12 Telescopic articulated shaft shortening instructions CAUTION The articulated telescopic shaft should remain connected only during rake operation During transport or any servicing operations the shaft should be disconnected from the PTO of the tractor CAUTION Use machines with correspondingly design...

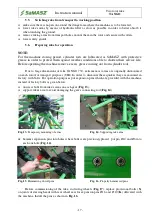
Страница 19: ...rods Due to large dimensions of rake TANGO 730 extreme most arms are originally dismounted on each rotor for transport purposes TIR In order to dismount these quicker they are mounted in factory with bolts For operation purposes put expansion pins which are provided with the machine instead of factory bolts as given below unscrew bolts from rake s arms on each gear Fig 13 support rake s arm to avo...

Страница 20: ...vel ground lift or lower adjustment lever Fig 18 to set the required raking height Recommended distance of raking tines and the ground is 0 4 1 cm Fig 21 Fig 18 Raking height adjustment lever WARNING It is forbidden to lower raking arms below 0 4 1 cm from the ground as this may cause damages to the machine such as bending the raking arms breaking the linkage or the gear faster wearing of raking t...

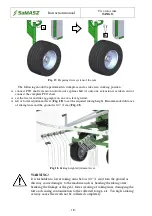
Страница 21: ...ncontrolled fall Unscrew nuts 1 remove washers 2 and then draw out the arm of front wheels 3 and insert the locking pin 4 into lower sleeve 5 Trolley s pin 6 should be located in upper sleeve 7 Left 8 and right 9 arm to be switched analogically Fig 19 Increasing raking height with driving trolley Fig 20 Trolley s height in a normal setting b increased setting start the spline drive and operate at ...

Страница 22: ...other gear 5 7 Operation Rotary rake is used for raking up swath or grass after tedders The driving speed should be the result of ground configuration quantity of grass and raking cleanness Depending on setting the working assemblies operating widths the rake will be able to form either one or two rows When forming two rows both swath screens should be lowered a b Fig 23 Rake TANGO forming a one r...

Страница 23: ...g of working units is applied and it is used when driving the machine to and from a meadow When driving to a meadow and after switching hydraulic section to floating position the front working unit lowers and starts raking and in a while the rear enters the grass lowers and starts raking as well When leaving a meadow the rotor at the tractor s side lifts up to headland position as first 5 8 1 Sequ...

Страница 24: ...quired rate of lowering of the rear rotor by means of valve on the cylinder of the rear working unit Fig 27 Fig 27 Rear working unit lowering control valve 5 9 Setting rake for forming one row In order to prepare the machine for forming one row perform the following using the tractor s hydraulics lift the front guard Fig 28 maximally up secure the lifting mechanism by closing the cylinder valve Fi...

Страница 25: ...ng tines on front working assembly do not overlap with tines on the rear assembly open valve on tarpaulin cover mechanism cylinder Switching the valve shall cause the cover to get lifted as headlands with working assemblies and be set for operation as the machine starts raking When forming two rows the rear cover is set the same as when forming a single one Once the work is completed first lift th...

Страница 26: ...ts use along with the lever push off arm 3 operates It is intended to protect the curtain against damage by pushing it to a safe distance away from an operating rotor With adjusting nut 5 it is possible to set a safe distance for safety curtain from raking arms of the working unit 5 11 Lifting rake on headlands When lifting arms with working assemblies A and B the pawl 3 will be locked automatical...

Страница 27: ... wrapped material set the machine on a flat surface remove excess material using sharp tool After clearing the machine check if nothing has been damaged To remove any clogging it is obligatory to disconnect the drive and the motor take out the ignition key When eliminating any clogging on the machine use also safety means for operator so protective gloves and tight wear 5 13 Dismounting machine fr...

Страница 28: ...cing connecting rods In case of connecting rod damage a simple replacement is possible by removing the damaged part Replace as follows Secure raking arm with support Fig 14 Remove expansion pins 1 from arm mount Once pins are removed slide down arm mount from connecting rod Loosen four screws 2 that fix connecting rod to gearbox body Remove damaged connecting rod module Install new connecting rod ...

Страница 29: ...y and refill the oil perform periodic checkups of the rake and protect all operating parts with grease in order to prevent their baking and creating any sources of corrosion which significantly influences the rake s proper operation The detached machine should be stored in a standstill position unfolded tine arms together with rotors drive chassis set on the ground like in position to work main fr...

Страница 30: ...ce removing the vent A Fig 37 in upper section of the gear The oil level in the gear can be checked by opening check plug A If the oil level is too low refill the oil preferably Transol or other gearbox oil until it is visible in the check opening A To drain oil use plug B The oil capacity in the gear is approx 8 l Fig 37 Oil inspection points in gear 7 2 Joints and bearings Every 50 hours of the ...

Страница 31: ...ective footwear Also use protective gloves In case of a contact with skin immediately wash the infected area with plenty of water with soap Do not allow the product to contaminate water outlets water courses and soils In case of an unintentional release to the environment plug the leak limit the spillage and then collect the oil with non flammable absorbent material e g sand The product is flammab...

Страница 32: ... shaft and if need be replace with new one Damaged raking tines Raking arms set too low Set raking height properly with adjustment lever or with trolley turf soils Contamination of raked swath Raking tines immersed too deep Set bigger distance between raking arms and the ground Twisted raking tines Replace with new ones Oil leak in gear Assembly not tight enough Examine tightness and check oil lev...

Страница 33: ...y claim procedure 1 The manufacturer warrants good quality and defect free operation of the rake under this warranty if the rake is operated in accordance with the operator s manual 2 Faults or damages to the machine found within 24 month period from the date of purchase shall be removed free of charge at the purchaser s or the manufacturer s 3 Faults or damages should be submitted personally in w...

Страница 34: ...escribed in the operator s manual 8 The Manufacturer can break the service agreement with immediate effect when the user does not pay the invoice according to that agreement in a timely manner and the delay in payment is longer than 30 days from maturity date Breaking the service agreement by the Contractor due to causes dependent on the user shall lead to termination of the warranty given for the...

Страница 35: ...nual Two rotor rake TANGO 33 11 2 Warranty repairs record Repair scope and spare parts replaced Date stamp and signature of repair shop Date stamp and signature of repair shop Date stamp and signature of repair shop ...

Отзывы: