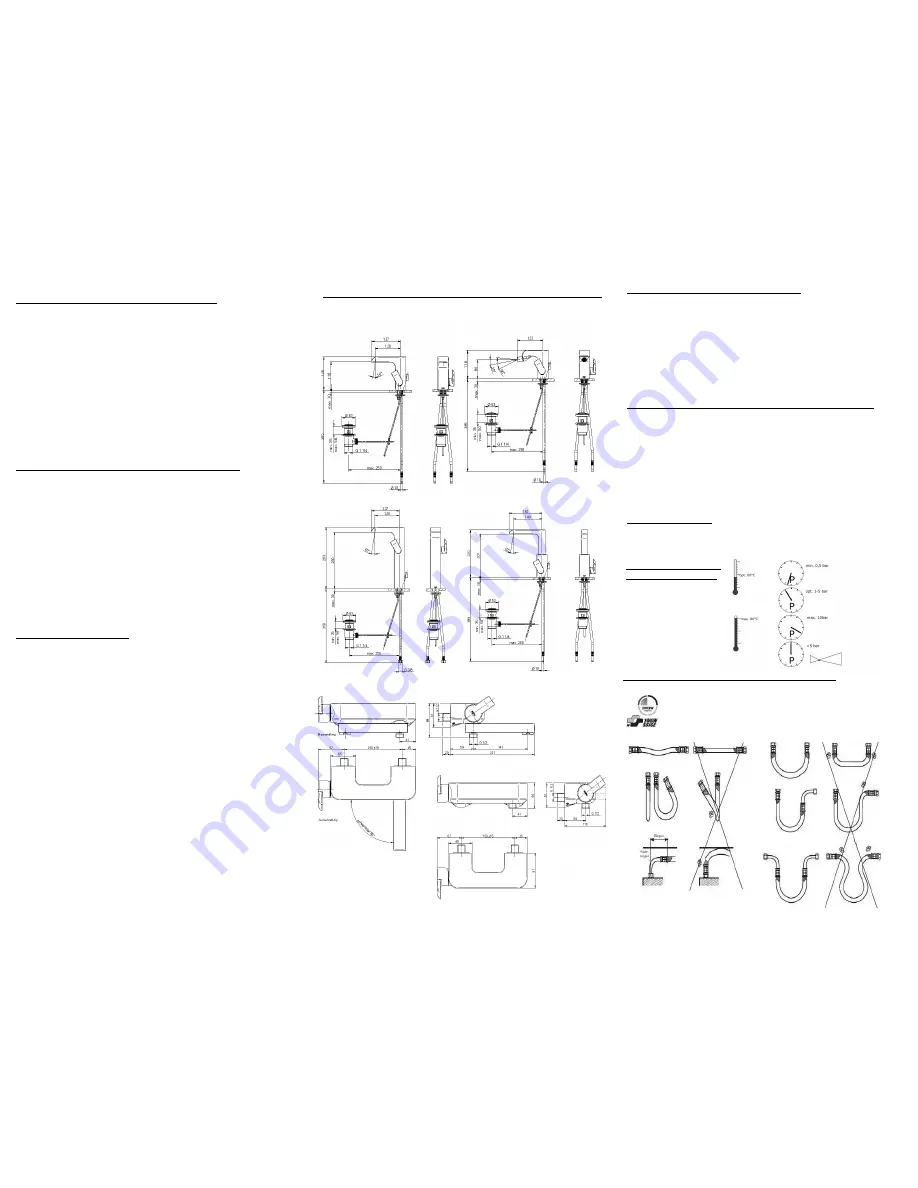
Installation of single lever mixer for basin
1. Flush the incoming lines!
2. Screw studbolts into faucet body.
3. Push pop-up-rod into faucet body.
4. Drop single lever mixer with the inserted o-ring onto the sink.
5. Push rubber disc and fastening disc over the studbolts and
tighten the fitting with the nuts (SW 9).
6. Connect the flex hoses to the isolating valves.
Right is for cold water, left is for hot water.
7. Please control tightness and functioning of faucet!
Installation of single lever mixer for bath and shower mixer
1. Flush the incoming lines!
2. Put the Wall lop into the wall disc and then screw the wall lop into
the extention.
3. Align the wall disc with the supplied Stores
4. Put the enclosed O-rings 44x3 on the first groove of the wall-
disc
5. Now tighten the wall lop.The wall disc must be flat and flush on the
tiles
6. Please control tightness and functioning of faucet!
Cleaning the aerator
With the included key unscrew the aerator, clean the aerator and
screw it again. Adjust the Water jet by pressing lightly against the
aerator
307 8106 010/ 307 8124 010
307 8057 010/... 8109 010
Einhebelmischbatterie für Waschtisch und Bidet
1. Spülen der Rohrleitungen!
2. Stiftschraube in das Gehäuse einschrauben.
3. Zugstange in das Waschtischgehäuse einschieben.
4. Einhebelmischbatterie mit untergelegtem O-Ring auf das
Becken aufsetzen.
5. Gummischeibe und Befestigungsscheibe über die
Stiftschraube schieben und Armatur mit der Mutter
(SW 13) befestigen.
6. Flexschläuche mit den Eckventilen verbinden.
Dabei ist der rechte Anschluß für Kaltwasser und der linke
Anschluß für Warmwasser vorzusehen.
7. Dichtheit der Anschlüsse und Funktion der Armatur sind zu
prüfen.
Einhebelmischbatterie für Wanne-Brause und Dusche
1. Spülen der Rohrleitungen!
2. Führen Sie den Wandanschlussstutzen durch die Wandan-
schlussscheibe und schrauben Sie den Wandanschlussstutzen
in die Hahnverlängerung.
3. Richten Sie die Wandanschlussscheiben mit dem mitgelieferten
Abstanshalter an der Wand aus. Nun drehen Sie den Stutzen fest
an.Die Wandscheiben müssen eben und bündig auf den Fliesen
anliegen.
4. Beigelegte O-Ringe 44x3 auf die erste Nut der Wandanschluss-
scheibe ziehen.
5. Setzen Sie die Armatur über die Wandscheiben auf und befesti-
gen Sie die Armatur mit den Innensechskantschrauben
(SW2,5) an der Wand.
6. Dichtheit der Anschlüsse und Funktion der Armatur sind zu prüfen
Reinigen des Luftsprudlers
Mit dem beigelegten Schlüssel den Luftsprudler ausschrauben,den
Luftsprudler reinigen und wieder einschrauben. Am Luftsprudler kann
durch leichtes Drücken gegen das Sieb die Strahlrichtung des
Wassers individuell eingestellt werden.
Installationshinweise - Installation instructions
307 8243 010
307 8144 010
307 8135 010
Flexschlauchinstalation/Flex hose installation instructions:
DIN EN 806
richtig/right falsch/wrong richtig/right falsch/wrong
Betriebsbedingungen /
Operation conditions:
307 8194 010
DIN EN 13618
DVGW (DN6-12)
W270 , W543 , KTWA
SVGW (DN8-12)
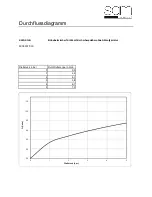
Armaturendurchfluß Waschtischarmaturen :
Im Auslieferungszustand wird ein Durchfluß von 5,5 l/min erreicht.
Wenn mehr Durchfluß gewünscht wird, können Sie folgende Strahlregler zum
Austausch des eingebauten Strahlreglers als Zubehör bei sam bestellen:
7,5l/min ---> 399 8774 000 Luftsprudler mit beweglichen Strahlregler
9,5l/min ---> 399 8775 000 Luftsprudler mit unbeweglichem Strahlregler
Flow rate for basin mixer:
Delivery status of flow rate is 5,5l/min. If more flow rate desired you can order follo-
wing flow regulator by sam .
7,5l/min ---> 399 8774 000 areator with swiveling flow regulator
9,5l/min ---> 399 8775 000 areator without swiveling flow regulator
Содержание sica 3078107010
Страница 1: ...sam sica 3078107010 ...
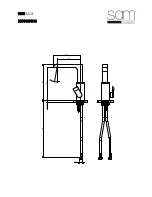
Страница 2: ...sam sica 3078107010 10 140 162 220 200 max 30 G 3 8 350 ...
Страница 3: ...sam sica 3078107010 3 2 1 4 6 5 ...
Страница 5: ...sam sica 3078107010 10 140 162 220 200 max 30 G 3 8 350 ...


