background image

Salvislab Thermocenter TC40/100                                                                                         User Manual 

- 29 

Copyright© SalvisLab / Edition 30062016_2.0 

11.7


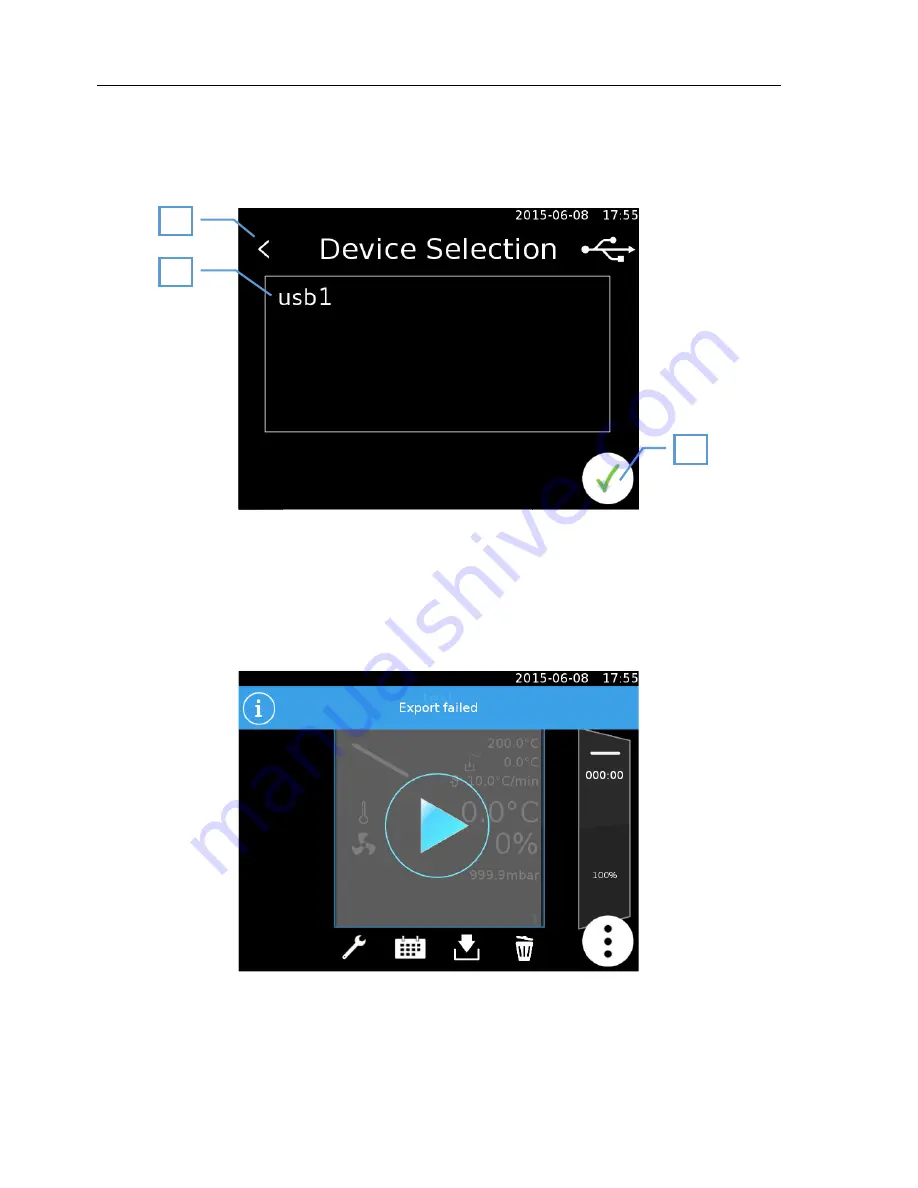
Export program 

The selected program can be exported to a USB stick. A program can only be exported after a USB stick has 
been inserted into the device. 


1


Back 

2


Export target 

3


Export 

 
You are informed via an information bar after the program has been successfully exported or if an error 
occurred during the export process. 


Содержание EW-52403-01

Страница 1: ...Salvislab Thermocenter TC40 100 User Manual swiss made ...

Страница 2: ... CONSTRUCTION 9 5 4 CONTROLLER 9 5 5 REGULATION 10 5 6 DISPLAY 10 5 7 GENERAL SETTINGS 10 5 8 MULTI USER LEVELS 11 5 9 DATA CONNECTION 11 5 10 DOOR ALARM 11 5 11 SAFETY POWER CUT OFF 11 6 GETTING STARTED 12 6 1 PARTS DELIVERED 12 6 2 INSTALL REQUIREMENTS 12 6 3 INSTALLING 12 6 4 CLEANING 12 7 SYSTEM COMPONENTS 13 8 OPERATION 14 8 1 DEFINITIONS OF TERMS 14 9 SALVISTEQ GRAPHIC USER INTERFACE FIRST S...

Страница 3: ... 37 12 5 SCREEN SAVER 37 12 6 GENERAL SETTINGS 38 12 6 1 System restart process 38 12 6 2 Calibration 38 12 6 3 Date and time 39 12 6 4 System log 40 12 6 5 Temperature unit 41 12 6 6 Upper temperature limit 41 12 6 7 Lower temperature limit 41 12 6 8 Reset 42 12 6 9 Test 42 12 6 10 Update 42 12 6 11 Network settings 43 12 6 12 Buzzer delay 45 12 6 13 Sterilization 45 12 6 14 Product information 4...

Страница 4: ...a program run 56 APPENDIX B 58 WIRING DIAGRAM TC40 100 58 APPENDIX C 59 SALVISTEQ RU PRINTED BOARD 59 APPENDIX D 60 SALVISTEQ DU PRINTED BOARD 60 APPENDIX E 61 LEGEND 61 APPENDIX F 62 DRAWING SALVISLAB THERMOCENTER TC40 62 APPENDIX G 63 DRAWING SALVISLAB THERMOCENTER TC100 63 APPENDIX H 64 DRAWING SPARE PARTS TC40 64 APPENDIX I 65 DRAWING SPARE PARTS TC100 65 APPENDIX J 66 DRAWING SPARE PARTS PANE...

Страница 5: ...ument en übereinstimmt to which this declaration relates is in conformity with the following standard s or other normative document s auquel se réfère cette déclaration est conforme à la aux norme s ou autre s document s normatif s Titel und oder Nummer sowie Ausgabedatum der Norm en oder der anderen normativen Dokumente title and or number and date of issue of the standard s or other normative do...

Страница 6: ...Renggli AG 1 4 Presentation of safety advice The following symbols indicate safety tips and other general information Indicates a danger that may lead to physical injury or to irreversible loss of data i Indicates additional information and tips 2 Safety 2 1 Observe safety advice Read all safety advice in this document carefully as well as all warning signs attached to the device Pay attention to ...

Страница 7: ...r Salvislab Thermocenter drying oven Please fill out all the necessary information of your Thermocenter in the form below and keep it ready in case you will need to contact for assistance your Dealer or Service department SERIAL NUMBER TYPE OF OVEN TC40 TC100 SERVICE PHONE NUMBER PURCHASE DATE SOFTWARE VERSION Settings Menu_Informations FIRMWARE VERSION Settings Menu_Informations Notes ...

Страница 8: ...0 20 60 Equipment SalvisTEQ controller with predictive regulation Yes Yes Capacitive touch display inches pixels 5 7 640x480 5 7 640x480 Linear logarithmic heating gradient Yes Yes Adjustable fan speed 60 100 60 100 Multi user levels Yes Yes Program mode programs steps 99 99 99 99 USB host interface for data import export Yes Yes Ethernet port Yes Yes Preselectable restart procedure in case of pow...

Страница 9: ...ry applications Examples of usage color fastness test for textiles ageing test for plastics and foils quality control of electronic circuits food analysis dry sterilization in hospitals 5 3 Construction Due to extremely compact all in door construction the Thermocenter saves valuable space in lab Electro polished stainless steel inner chamber chemical resistant and highly durable All edges rounded...

Страница 10: ...IN 12880 Select input for target temperature Communication between regulation and display unit works with SPI bus Error handling PT100 interface has 4 wires circuit Internal system voltage 5 6 Display Capacitive touch Display 5 7 Resolution of 640x480 pixels Landscape format User friendly and intuitive graphic user interface Graphic accelerator Internal system voltages Display regulation unit work...

Страница 11: ...ights Service It is the highest level This access is granted only to qualified factory technicians for service and upgrades 5 9 Data connection USB 2 0 Port LAN Port RJ45 10 100 Mbit optional 5 10 Door alarm The door is monitored by a mechanical switch It is not possible to start a manual process when the door is open the message door open will appear on the display The heating process is interrup...

Страница 12: ...er see options list If you install a ducting to exhaust system then please contact your dealer for more information 6 3 Installing Place shelf in appropriate position Plug in the power cable Close the door Switch power on Display shows Salvislab logo during boot The device is ready for use when the SalvisTEQ Home menu appears on screen For information on how to operate and navigate properly throug...

Страница 13: ... Components 1 SalvisTEQ touch display 2 USB Port 3 LAN Port 4 Main on off switch 5 Air inlet 6 Door handle 7 Air flap 8 Air exhaust 9 Shelf support 10 Shelf 11 Fan outlet 12 Spring loaded door lock 13 Door switch 14 Rating plate Thermocenter front view closed door Thermocenter front view open door ...

Страница 14: ...s to specific set temperature indicated in ºC min or F min Negative gradients not allowed Maximal value of gradient depends on system and has a range which is predefined by manufacturer Hold time Duration a set temperature has to be hold build in timer is starting to count back as soon as set temperature is reached Maximal set time is 999 hours and 59 minutes Start date time Future date time to st...

Страница 15: ...ect the power cable Turn on the device using the main power switch on the side of the device 9 1 Startup screen The device starts in manual mode The settings available in this mode are described in chapter 10 Program mode is described in chapter 11 1 User level 2 Logged on users 3 Date and time display 4 Open menu 9 2 Menu Pressing the tool button 4 opens the device menu Program mode 11 Manual mod...

Страница 16: ...00 User Manual 16 Copyright SalvisLab Edition 30062016_2 0 10 Manual mode 1 Temperature settings 10 1 2 Device specific settings 10 2 3 Time settings 10 3 4 Play button starts the warming process using the selected settings 1 3 4 2 ...

Страница 17: ... Internal the internal sensor is located inside the device External the external sensor is inserted into a port on the device and can be placed at the point where the set temperature should be reached optional 3 Select the type of heating curve Linear heating using the set gradients Exponential heating the target temperature is approached with the largest possible gradient 4 Target temperature 5 G...

Страница 18: ...ting options 10 2 1 Fan settings This menu provides options for controlling the fan 1 Back 2 Fan rotation speed The fan speed can be set between 60 100 3 Confirm input i The fan is always required to ensure even internal heating The speed can therefore be reduced but the fan cannot be turned off completely 1 2 3 ...

Страница 19: ...nd stop times 1 Back to main screen 2 Select start mode Start in Start delay 10 3 1 Start at Start at specified time 10 3 2 Hold for Heat up and hold for specified time 10 3 3 3 Time settings dependent on selected mode 4 Confirm input 10 3 1 Start in Start of the heating process is delayed by the set time i A time of 000 00 indicates an immediate start 1 2 3 4 ...

Страница 20: ...2 0 10 3 2 Start at The date and time to start the process is selected 1 Time 2 Date 10 3 3 Hold for Hold the target temperature for a specific length of time The hold time begins once the target temperature has been reached 1 Time for which the target temperature should be held 1 2 1 ...

Страница 21: ...the menu opens This provides the user with the following menu options Load a program from a USB stick 11 3 Program list 11 2 Create new program 11 1 Existing programs can be modified once they have been loaded 11 5 11 1 Create new program To create a new program you first need to enter a name for it i The name you enter cannot be changed later 1 Back to main screen 2 Confirm input 1 2 ...

Страница 22: ...er the name has been confirmed the user is asked to create the first program step 1 Edit create program 11 5 2 Menu 11 2 Program list This screen contains a list of all existing programs on the device 1 Back 2 Program list 3 Save program as 11 2 2 4 Load program from device 11 2 1 1 2 2 1 3 4 ...

Страница 23: ... a new name Therefor the keyboard 13 1 appears 11 3 Load a program from a USB stick If you have programs on a USB stick then it is possible to load these onto the device Insert the USB stick in to the device and select Load from USB from the menu 11 4 Program options An overview of the program is displayed once it has been loaded Several actions are available 1 Program name 2 Start 3 Terminate 11 ...

Страница 24: ...rogram 1 Current program step 2 Temperature general step settings 11 5 2 3 Fan settings 10 2 1 4 Previous program step 5 Insert new program step before current step 11 5 1 6 Delete program step 7 Next program step 8 Insert new program step after current step 11 5 1 9 Finish editing 1 3 4 5 8 7 9 2 6 ...

Страница 25: ...ing the symbols on the screen switches through the different program steps The following table describes the four program steps Symbol Mode Description Fast The set temperature will be reached as quickly as possible Linear The set temperature is approached linearly Hold The current temperature is held for a set period of time Repeat The program jumps to a selected program step ...

Страница 26: ...perature change per minute Time How long to hold the temperature from the previous program step Jump to The step to which the program should jump Repeat How often should this step be repeated when reaching this program step 11 6 Schedule program A selected program can be terminated The user has the option of setting a program to start at a defined date and time Programs can also be set to be regul...

Страница 27: ...27 Copyright SalvisLab Edition 30062016_2 0 If a specific time is set for the program to run then the scheduler is automatically started 1 Execution time display 2 Cancel scheduler 11 6 1 Daily repetition 1 Execution time 2 Confirm input 1 2 1 2 ...

Страница 28: ...Copyright SalvisLab Edition 30062016_2 0 11 6 2 Weekly repetition 1 Execution time 2 Selected weekday 11 6 2 1 3 Confirm input 11 6 2 1 Select day The corresponding buttons are used to the select the desired days for the program to be started 1 2 3 ...

Страница 29: ...he selected program can be exported to a USB stick A program can only be exported after a USB stick has been inserted into the device 1 Back 2 Export target 3 Export You are informed via an information bar after the program has been successfully exported or if an error occurred during the export process 2 3 1 ...

Страница 30: ...Thermocenter TC40 100 User Manual 30 Copyright SalvisLab Edition 30062016_2 0 11 8 Delete program The loaded program can be deleted from the device This action must then be confirmed 1 Back 2 Confirm deletion 1 2 ...

Страница 31: ...Salvislab Thermocenter TC40 100 User Manual 31 Copyright SalvisLab Edition 30062016_2 0 12 Settings Information 12 1 Language 12 2 Users 12 3 General settings 12 6 Logging 12 7 ...

Страница 32: ...turer are displayed in an information window The info screen also contains a QR code that can be scanned to directly access the manufacturer s website 1 Back 2 Device type 3 Serial number 4 RU serial number 5 DU serial number 6 Control unit software version 7 Regulator firmware version 8 Manufacturer address 9 QR code contains link to manufacturer s website 8 9 1 2 3 4 5 6 7 ...

Страница 33: ...0 100 User Manual 33 Copyright SalvisLab Edition 30062016_2 0 12 2 Language The user can select the interface language by pressing on the flag for the desired language The language setting is applied after pressing the OK button ...

Страница 34: ...rs can then be created Each user needs a user name a password and an access permission type The administrator can create additional administrators as well as users The user level is indicated using stars User Calibrator Administrator Service technician 1 Back 2 Username 3 User level 4 Log out 5 Create new user 12 3 1 6 Delete user 12 3 2 7 Confirm input 2 1 3 4 5 6 7 ...

Страница 35: ...35 Copyright SalvisLab Edition 30062016_2 0 12 3 1 Create user 1 Back 2 Enter username 3 Enter password 4 Select role 5 Confirm input 12 3 2 Delete user 1 Back 2 User list select a user by clicking 3 Delete selected user 4 Back 2 3 4 1 5 4 1 2 3 ...

Страница 36: ... This requires the user to first log in Once the user is logged in they can start the oven or program in manual mode A small lock now appears on the display The screen can now be locked by using your finger to drag the lock into the circle that appears on screen 1 User is logged on 2 Start heating process 3 Open lock appears 4 Drag lock 5 Circle appears 6 Drag lock into circle the oven is now lock...

Страница 37: ...ings up the login screen The operator who originally locked the oven needs to log in again here in order to unlock it i The screen can be unlocked at any time by an administrator or service technician Other users cannot unlock the oven 12 5 Screen saver A screensaver appears after 30 minutes of standby time This screen will only be activated if no regulation is in progress Touch the display on any...

Страница 38: ...ehavior of the system when restarted Depending on the settings the process being worked on beforehand will be stopped resumed newly restarted 12 6 2 Calibration The internal and external temperature sensors can be calibrated with the help of this menu i Calibration is secured using a password or can be done only by the service technician For more detailed information please contact the manufacture...

Страница 39: ...Thermocenter TC40 100 User Manual 39 Copyright SalvisLab Edition 30062016_2 0 12 6 3 Date and time 1 Back 2 Set date 3 Set time 4 Confirm input 12 6 3 1 Set date 1 Back 2 Select date 3 Confirm input 2 1 1 3 3 4 2 ...

Страница 40: ... are logged by the controller here and displayed The controller deletes the oldest file after a certain period of time If you want to permanently save the log data then you will need to do a regular export operation You can swipe up and down to scroll through the system log 1 Back 2 List of log files 3 Open log 4 Export log 5 Delete log 6 Back 1 1 6 6 2 3 5 4 ...

Страница 41: ...g the external sensor the oven temperature is monitored with this value Errors may occur if the limit is too narrowly set i The limits do not define the precision of the regulator They define only when the safety regulator is activated 12 6 7 Lower temperature limit The lower temperature limit can be set between 2 and 20 degrees Celsius If the target temperature in the oven drops lower than the se...

Страница 42: ... parameters programs and users 12 6 9 Test The test screen allows all sensors and actuators to be monitored and tested The test screen is explained in more detail in chapter 16 2 12 6 10 Update The user can run a software update from here The new software first needs to be loaded onto a USB stick This is then inserted into the device For further detail please refer to chapter 16 1 ...

Страница 43: ...ress to be set The IP address is automatically assigned by default whereby the controller is automatically assigned an IP address by the network This can be manually set using static mode 12 6 11 1 Automatic 1 Back 2 Mode change by clicking 3 Current address assigned by the network 4 Current subnet mask assign by the network 5 Confirm input 1 2 3 4 5 ...

Страница 44: ... Manual 1 Back 2 Mode change by clicking 3 Set address 4 Set subnet mask 5 Set gateway 6 Confirm input i It can take a little time for the IP address to be assigned as the controller must first check whether the set address is already in use on the network before setting the new address 1 2 3 4 5 6 ...

Страница 45: ...0 minutes in accordance with WHO guidelines Devices that can reach a maximum of 160 C are held at this temperature for 180 minutes If the sterilization procedure is interrupted then it is considered as invalid This is saved in the oven Successful sterilization is recorded with the date and time in the oven in order to show that the last successful sterilization was run 12 6 14 Product information ...

Страница 46: ...ature is fixed by the oven but depending on the requirements of the process that the oven is being used for can be lowered Please check all of your programs if any after setting the temperature Existing programs are not automatically adjusted 12 6 16 Process log time This allows you to set the interval for logging process data The value can be set between 2s and 5min i Longer sample times allow pr...

Страница 47: ...ation The system error screen appears if the red bar is touched 1 Information about the occurred error 12 6 17 2 System error screen This screen can be accessed by clicking on an error popup bar or in the general settings window 1 Back 2 Acknowledge the marked error 3 List of appeared errors 4 Scroll i If you acknowledge an error who is gone it will be automatically deleted from the list If the er...

Страница 48: ...ith the corresponding option 12 6 18 DAC The device has two analogue outputs They can be mapped to the system sensors The following options are possible Sensor Formula Temperature internal Voltage V temperature C 30 1V Temperature external Voltage V temperature C 30 1V Temperature ambient Voltage V temperature C 30 1V Fan speed Voltage V fan speed 10 12 7 Logs Users have the option to export or de...

Страница 49: ...62016_2 0 13 Keyboard The keyboard can be switched between text QWERTZ and number input 13 1 QWERTZ 1 Back 2 Switch to numeric keyboard 3 Delete last character 4 Confirm input 13 2 Numeric 1 Back 2 Delete last character 3 Switch to QWERTZ keyboard 4 Confirm input 4 1 2 3 4 1 2 3 ...

Страница 50: ...ding screen using a unified user interface The respective maximum and minimum values cannot be exceeded 13 3 1 Input using number keys 1 Back 2 Increase the respective digit 3 Clicking on a number opens up the keyboard input 13 3 2 4 Lower the respective digit 5 Name of the value to set 6 Decimal point position varies depending on value value range 7 Unit 8 Confirm input 1 2 4 3 8 7 6 5 ...

Страница 51: ...ethod allows the value to be entered directly Input uses a fixed decimal point location This means for example to set a temperature of 120 C you need to press 1 2 0 0 1 Back 2 Name of the value to set 3 Delete last digit 4 Confirm input If an invalid value is entered then the user is prompted to enter a valid value 1 4 3 2 ...

Страница 52: ... if a USB stick is available A message is provided on an information bar if a suitable stick is detected i It is possible that not all USB sticks will be recognized by the controller Please contact the manufacturer to determine a suitable type 15 Ethernet The current status of the device can be called up over the Ethernet interface A TCP IP connection with the following properties is created for t...

Страница 53: ...t all USB sticks will be recognized by the controller Please contact the manufacturer to determine a suitable type Clicking on the button 3 searches the USB stick for the appropriate files This may take a moment The file can then be selected and the update starts The pre set file name of the update may not be changed on the computer An update may take several minutes The controller will restart du...

Страница 54: ...nd to do this The pre set file name of the update may not be changed on the computer An update may take several minutes The controller will restart during the update Please ensure to follow all instruction on the screen and never turn off the device Only remove the USB stick once the update has completed and the device has restarted 16 2 Test screen The test screen allows all features and sensors ...

Страница 55: ...perature limiter safety controlling Thermal levels of a Thermocenter unit ID Color ID Param Description Typ value C 1 TB Mechanical temperature limiter 260 2 TWB Electronical temperature limiter 200 3 Tsp Set point temperature Tr TWB 4 TWW max Electronical over temperature protection Tsp Tsp 10 5 TWW min Electronical under temperature protection Tsp 10 Tsp ...

Страница 56: ...nge No working points allowed 2 Gradient can be set in this range 3 Upper gradient range No working points allowed Graphical presentation of a program run This example shows a custom user program defined in the custom programs section with 4 steps and a pre set calendar start date time For further detail please refer to chapter 11 Program mode ...

Страница 57: ...ng after end of step 4 program ends Program step 0 can be set through calendar Program steps 1 3 can be set up in relation to the following parameters Set temperature gradient hold time Program step 4 repeats program step 2 The program steps 1 4 contain respectively 1 A Positive gradient adjustable B Hold time adjustable 2 C Positive gradient adjustable D Hold time adjustable 3 E Positive gradient...

Страница 58: ...Device main switch power on off PE Protective earthing OMF Over temperature melting fuse H Heating element PF Potential free contact DS Door switch FA Fan AO Analog output I1 PT100 temperature probe I2 Redundant PT100 temperature probe EX External connector Wiring diagram Salvislab Thermocenter TC40 100 Standard device wiring up Optional device wiring up ...

Страница 59: ...T2AL 250V AC F3 Sensors 24V T2AL 250V AC J1 Connection to display unit J3 PT100 temperature probe J4 Connection for pressure transducer J5 Redundant PT100 temperature probe J7 Connection for door switch J8 Vacuum valve J9 External connector J11 Connection for ventilation valve J14 External connector analogue output J15 Potential free contact J16 Connection for main switch P1 Connection for heating...

Страница 60: ...ppendix D SalvisTEQ DU printed board ID Description P2 Connection to regulation unit J2 Power supply B1 Battery 3V 225 mAh P1 SD card slot J1 Display connection J3 Power supply P3 USB Port J5 Ethernet Port P4 USB extension J6 LAN extension DU Printed board 2D Layout DU Printed board 3D view ...

Страница 61: ...se 115 230V T10AL 250V AC F2 24V Power supply protection T2AL 250V AC F3 Sensors 24V T2AL 250V AC J1 Connection to display unit J3 PT100 temperature probe J4 Connection for pressure transducer J5 Redundant PT100 temperature probe J7 Connection for door switch J8 Vacuum valve J9 External connector J11 Connection for ventilation valve J14 External connector analogue output J15 Potential free contact...

Страница 62: ... TC40 100 User Manual 62 Copyright SalvisLab Edition 30062016_2 0 Appendix F Drawing Salvislab Thermocenter TC40 Renggli AG SalvisLab reserves the right to change technical specifications and dimensions without prior notice ...

Страница 63: ... TC40 100 User Manual 63 Copyright SalvisLab Edition 30062016_2 0 Appendix G Drawing Salvislab Thermocenter TC100 Renggli AG SalvisLab reserves the right to change technical specifications and dimensions without prior notice ...

Страница 64: ...Salvislab Thermocenter TC40 100 User Manual 64 Copyright SalvisLab Edition 30062016_2 0 Appendix H Drawing spare parts TC40 ...

Страница 65: ...Salvislab Thermocenter TC40 100 User Manual 65 Copyright SalvisLab Edition 30062016_2 0 Appendix I Drawing spare parts TC100 ...

Страница 66: ...Salvislab Thermocenter TC40 100 User Manual 66 Copyright SalvisLab Edition 30062016_2 0 Appendix J Drawing spare parts panel TC40 100 ...

Страница 67: ...cking bolt spring x 10 31W04144016 Locking bolt x 11 31W04144017 Exhaust U insulation x 12 31W04143019 Fan 230V x 31W04143053 Fan 115V x 13 31W04144026 Mounting strap heating element x 14 31W04960700 Door switch x 15 31W04144128 PT100 temperature sensor 4 wires circuit x 16 31W04140002 Door inner case TC40 x 31W04140000 Door inner case TC100 x 17 31W04144002 Door hinge x 18 31W04144009 Heating ele...

Страница 68: ...Exhaust air adapter TC100 o 39 31F04700 Program and user software upgrade o 40 31F04701 Process graph software upgrade o 41 31F04702 Product temperature controller software upgrade and interface o 42 31F04703 Product temperature probe PT100 with special connector o 43 31F04706 LAN interface software upgrade o 44 31F04707 Redundant PT100 temperature probe o 45 31F04713 Analog output programmable o ...

Страница 69: ...on Unit Typ value 1 ϕ Relative humidity 40 60 2 TB Mechanical temperature limit C 260 3 Tr Standard room temperature C 25 3 Tsp Set point Temperature C Tr TWB 4 TWB Electronical temperature limit C 200 5 TWW max Electronical over temperature limit C Tsp Tsp 10 6 TWW min Electronical under temperature limit C Tsp 10 Tsp ...

Страница 70: ...Renggli AG Salvislab Industrie Ost CH 6343 Rotkreuz Switzerland T 41 0 41 798 14 14 F 41 0 41 798 14 40 www salvislab com salvislab renggli com ...

Отзывы: