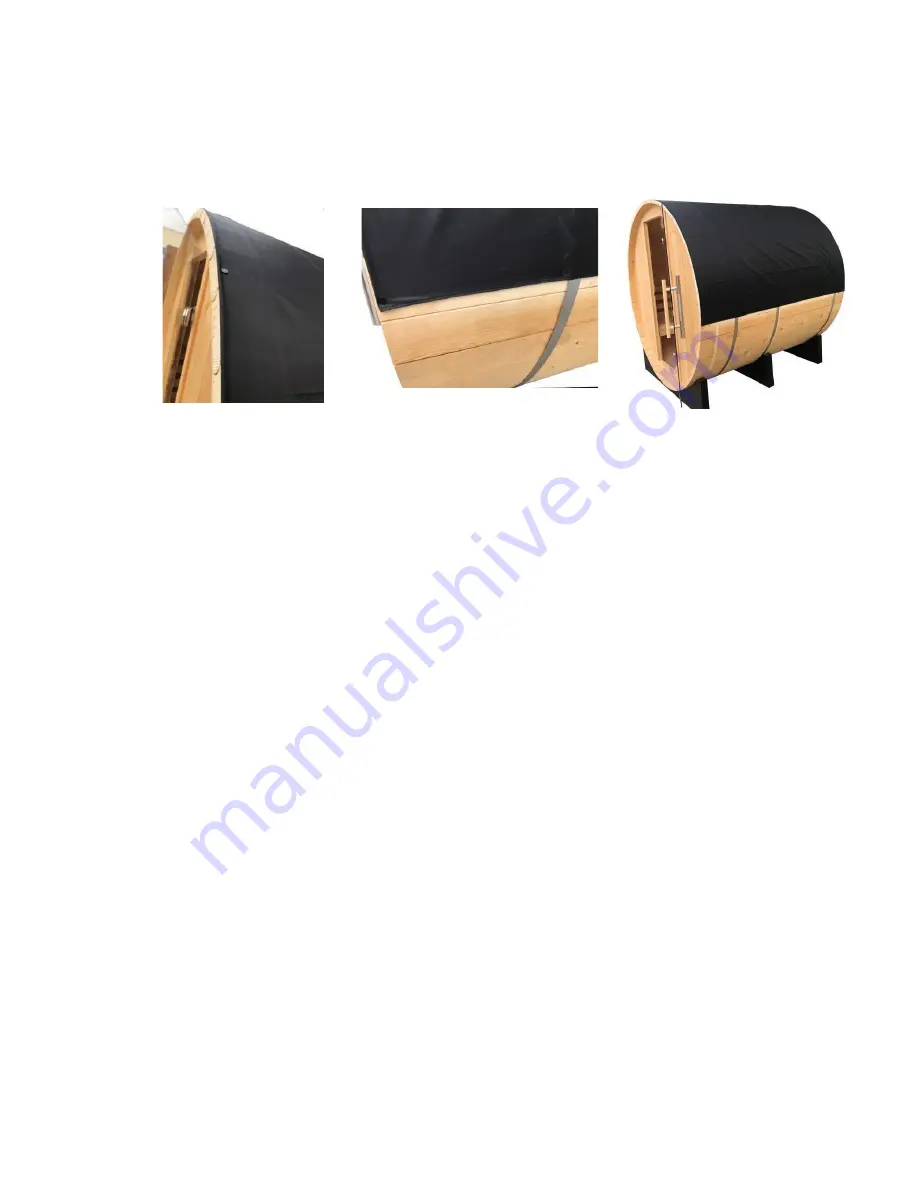
Salus Karlstad II Скачать руководство пользователя страница 23

23 


provided (7) rain cover pushpins for each side to secure the rain cover at the front and rear 
of the sauna barrel. The remaining (8) rain cover pushpins are to be used to secure the 
horizontal edges for each side.  See figure 15. 


figure 15 


ASSEMBLY COMPLETE 

Содержание Karlstad II

Страница 1: ...he heater must be installed by a certified licensed electrician per the manufacturer s manual The heater must be installed per the electrical code in your area with reference to the breaker and wire s...

Страница 2: ...e weight of the sauna and its occupants We recommend a concrete base or wood deck to support the sauna If you will be placing the sauna directly on the ground you must use such materials as concrete c...

Страница 3: ...oor roof Please note that water seepage will not hurt the wood and will usually dry quickly due to the heated environment If you want to keep the sauna completely dry you will need to install the saun...

Страница 4: ...into the sauna room 13 The power cord and plug must be located out of the reach of children and away from any water source Please consult with a certified electrician for safety concerns 14 Never inse...

Страница 5: ...xperience overheating dizziness weakness sleepiness or fainting 28 Consult with your medical doctor before using the sauna if you suffer from diabetes blood circulation disease blood pressure issues h...

Страница 6: ...or manufacturer for troubleshooting and replacement parts The wood is naturally resistant to the weather elements but the weathering elements can affect the wood over time PLEASE NOTE The pictures an...

Страница 7: ...The above assembly diagram is for a quick reference visual guide only All sauna models may not be shown Parts and accessories do vary and are subject to change 7 Components Karlstad Barrel Sauna...

Страница 8: ...The above assembly diagram is for a quick reference visual guide only All sauna models may not be shown Parts and accessories do vary and are subject to change 8 Karlstad Barrel Sauna continued...

Страница 9: ...The above assembly diagram is for a quick reference visual guide only All sauna models may not be shown Parts and accessories do vary and are subject to change 9 Karlstad Barrel Sauna continued...

Страница 10: ...ly You will end up with some extra staves wide and some extra staves narrow The rain cover is an optional accessory Stave wide Stave narrow set What s Needed 3 Adults Phillips Screwdriver battery oper...

Страница 11: ...11 Karlstad Barrel Sauna Basic Dimensions 4 Person Model Karlstad...

Страница 12: ...ere is a power outlet within reach of the power cord before assembling the barrel sauna The light will require a 120V 15AMP outlet b Make sure to position the front door in the correct direction figur...

Страница 13: ...e the leveler to make sure that each stave is placed level and straight Do not allow excessive gaps in between the staves See figure 3 figure 3 4 Place Bottom Support Cradles According to step 3 arran...

Страница 14: ...s will need to lift the front wall panel up and into the groove on the staves Use the leveler to make sure that the front wall is level after installing onto the staves One adult will need to continue...

Страница 15: ...he screws Only install the bottom screws See figure 6 A B C figure 6 7 Placing Top Half of Acrylic Rear Panel The top half of the acrylic rear wall will need to be lifted up and placed between the two...

Страница 16: ...r and mallet to make sure that each stave is placed level and straight Do not allow excessive gaps in between the staves Attach the stave using the provided stainless steel nails on the front wall onl...

Страница 17: ...space to install the thinner staves which you received in five pieces Carefully fit the pieces into the left over space being very careful not to break the thinner stave pieces You do not need to use...

Страница 18: ...support panel Please note that the bench support panels are not interchangeable Use a Phillips screwdriver power screwdriver will save time and the provided screws to mount the bench support panel to...

Страница 19: ...wood and the bench First use the provide screws and mount the short bench front wood plank to the short bench supports Then use the provided screws to mount the bench support wood to the short bench...

Страница 20: ...ight using the provided screws Be sure to connect the cord for the lights to receive power See figure 13a and 13b figure 13 figure 13a figure 13b You will need to follow steps 13a through 13b and belo...

Страница 21: ...three sections of the stove guard together as seen in figure 14 Procced to use the provided screws to mount the stove guard to the inside of the front wall panel as seen in figure 14a and 14b The sto...

Страница 22: ...ing it exposed to the weather elements then you may experience some moisture seeping into the cabin This will not hurt the cabin or heater But if you wish to not experience this you may want to instal...

Страница 23: ...ushpins for each side to secure the rain cover at the front and rear of the sauna barrel The remaining 8 rain cover pushpins are to be used to secure the horizontal edges for each side See figure 15 f...

Страница 24: ...r temperature and gradually work your way up Follow all stove instructions for stove usage 3 It is best to remove all clothing before taking a sauna Swimsuits can be worn if need be It is recommend no...

Страница 25: ...y help you to sleep easier and deeper 9 To protect the user from coming into contact with the heater be sure to install the heater wood guard 10 After the sauna session is over do not jump into the sh...

Страница 26: ...una Some medications may induce drowsiness while others may affect the heart rate blood pressure and or blood circulation 10 Exercise care before and after sauna use 11 Never sleep inside the sauna 12...

Страница 27: ...lacement parts are required be sure they meet the specified requirements of the manufacturer Unauthorized substitutes may result in fire electric shock or other hazardous conditions After any repairs...

Страница 28: ...sized Allen wrench to loosen the screws a few turns only on the glass door while the door is slightly opened Next the person on the outside of the glass door will push the glass door shut with the ca...

Страница 29: ...anship at the time of delivery The warranty is extended through the manufacturer for the product including but not limited to sauna room sauna control panel and the connected wire harnesses All exchan...

Страница 30: ...al costs expense or damages which may include the removal of permanent structures or other custom fixtures or the necessity for crane removal arising directly or indirectly out of the use or inability...

Страница 31: ...it B Ontario CA 91761 Please include a copy of your sales receipt showing date of purchase as this will serve as proof of purchase Serial number S N is located on the sauna s front panel rear panel or...

Отзывы: