G
B
5
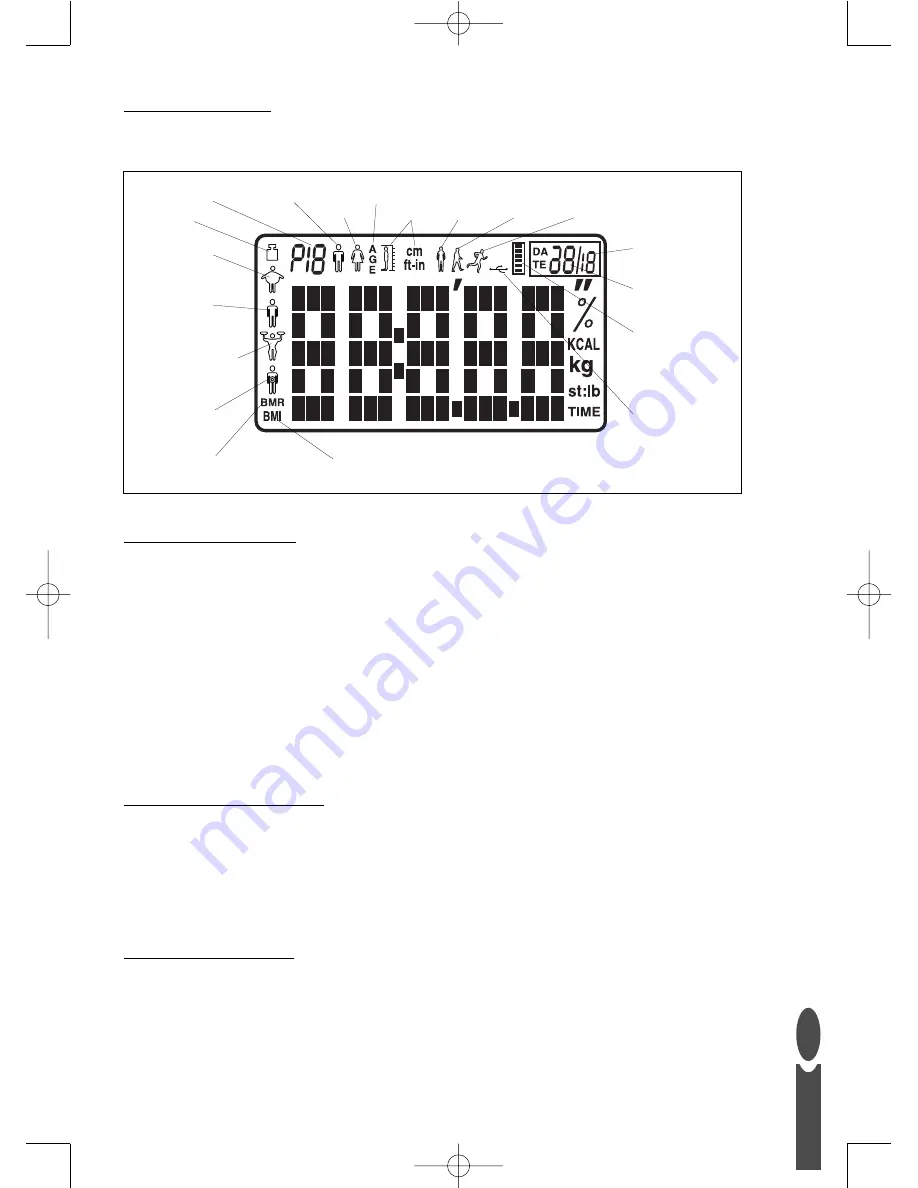
Step 3: Scale Display
Use the illustration below to familiarise yourself with the features of the scale display.
Step 4: Set Date & Time
1. Press and release platform to turn scale on.
2. Wait until display shows zero.
3. Press and hold
ON/SET
button until year flashes on display. Adjust year using
and
buttons.
Press
ON/SET
button to confirm.
4. Month flashes. Adjust month using
and
buttons. Press
ON/SET
button to confirm.
5. Day flashes. Adjust day using
and
buttons. Press
ON/SET
button to confirm
6. Hour flashes (note clock is 24 hour). Adjust hour using
and
buttons.
Press
ON/SET
button to confirm.
7. Minutes flash. Adjust minutes using
and
buttons. Press
ON/SET
button to confirm.
8. Zero is displayed.Wait for scale to switch to clock mode.
Note:
When not in use the scale will display the time
Step 5: Software Installation
The MiBody computer software is compatible with Windows 2000, XP and Vista. It is not compatible
with Apple computers.
1. Close all open programs.
2. Insert the Salter MiBody CD supplied into computer.
3. Follow the on screen installation instructions.
Step 6: USB Flash Drive
Before using the USB flash drive for the first time, insert it into the USB slot on your computer.Wait
while the computer identifies the USB flash drive and installs the necessary driver.
To avoid corrupting the data on the USB flash drive always click the
Safely Remove Hardware
icon
before removing the USB flash drive.The icon is on the right of the toolbar along the bottom edge of
your computer screen.The icon is identified by a bright green arrow.
You are now ready to begin using your scale.
Weight
Body fat %
Total body
water %
Muscle mass %
Visceral fat
rating
Body Mass Index
Basal Metabolic Rate (kcal)
User number
Male
Female
Age
Height
Fitness
mode 1
Fitness
mode 2
Fitness
mode 3
USB
Flash drive
User
memory
status
Month
Day
HG7789_MiBody_IB.qxd:Layout 1 17/9/07 13:59 Page 5


