

http://salt.box
Username admin
admin
Password
1 2 3 4
Login
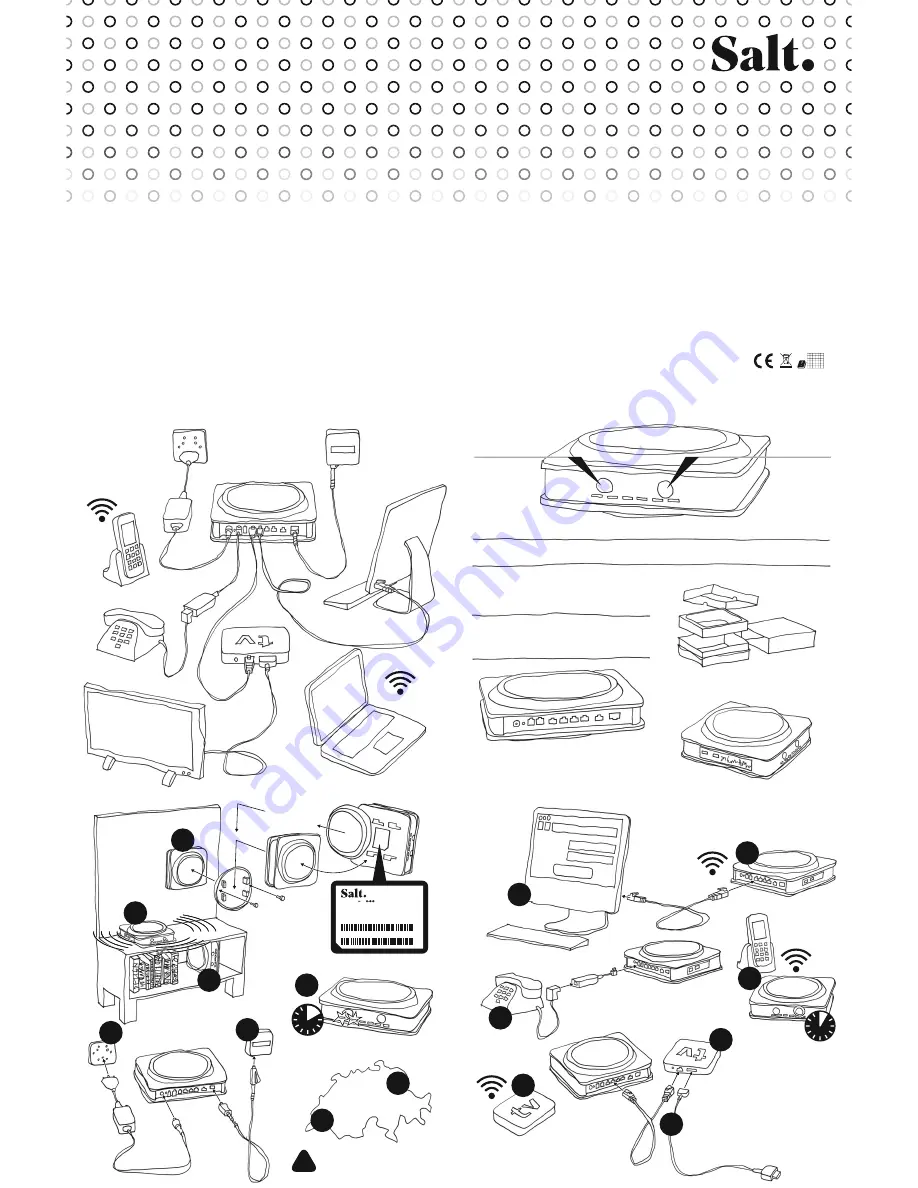
Press briefly (2 seconds):
Turn WiFi on / off
Description of the ports:
Salt Fiber Box
5 meters
fibre cable
included
Standing position
Vertical position
Position your Fiber Box
in any position, as centrally
as possible, without any
objects in front of it.
For best WiFi perfomance,
choose position 1A.
Connect your Fiber Box
to the power plug.
Remove the
black protective
cover of port F
to plug the
square connector
into the
Fiber Box.
Remove the protections
at both ends of the
fibre cable (green plugs).
The triangular
connector must
be connected to the
wall’s fibre plug.
Allow up to 10 minutes for synchronisation.
The POWER LED must glow in green and no longer blink. As soon as the
FIBRE LED
stops blinking, your Fiber Box will be ready for connection.
Connect your TV box to one of the four gigabit
ports with an Ethernet cable. We strongly
recommend this to ensure the best TV experience.
More details provided under step 10.
If your TV box is close to your Fiber Box, you can ensure WiFi
connection of your TV box with the same procedure as in step 5.
This is not recommended if the TV box and the Fiber Box
are far apart or in different rooms.
HDMI
plug
for the TV set.
Plug your phone directly into the phone port
or use the RJ11 – TT83 adapter.
Access the configuration
portal of your Fiber Box
with your browser.
Use «admin» for
user name and password
and change it in the
«Administration» menu
when you log in for the
first time.
To connect a new generation DECT phone,
press the DECT button for more than 5 seconds.
Configure your Fiber Box as the new DECT base and confirm.
To test the pairing, press the DECT button briefly, your phone should ring.
Please check whether the port number of the wall fibre plug
corresponds to your connection address (map) or enter
your ZIP code on: fiber.salt.ch/port
Port 1 is used in most regions, except for:
Geneva & Lausanne (port 2) and St. Gall (port 4).
To mount your Fiber Box,
use 2 screws to attach
the rounded cover to the wall.
Slide the rounded
cover aside to prepare
wall installation.
WiFi information is provided on the label
beneath the rounded cover.
Wall-mounted position
Desktop computer
Laptop
Connected to WiFi
3 meters RJ45
Ethernet gigabit cable
included
TV
box
Power adapter
included
Power
adapter
Power plug
Fibre plug
RJ11 – TT83
adapter
included
HDMI
cable
included
TV set
Phone
Keep the cardboard box in case you have to return the Fiber Box to Salt.
Enjoy colouring these instructions,
hand-drawn by designer Alfredo Häberli in 2018.
Connect the TV box to the power plug and use the HDMI cable
to connect the TV box to your TV set.
Select the source corresponding to the HDMI port to which your
TV box is connected and follow the instructions on your TV screen.
Select «Switzerland» and «Salt» as the provider.
«Salt.tv» and «Salt.video»will be installed. Open «Salt.tv»,
press login and allow Salt TV to access your Salt subscription.
For more details, please refer to the online guide:
fiber.salt.ch/tv/guide
DECT
phone
Press longer (5 seconds):
Enable WPS mode
PORT 1
POWER
WiFi
DECT
FIBRE WWW WiFi
WPS
PHONE
A
Power plug
B
Reset button
C
2 phone ports
D
4 Ethernet ports
E
1 10Gbit/s Ethernet port
F
Fibre plug
G
2 USB 3.0
ports
First simple steps
English
Plug & Play: It takes less than 5 minutes!
Functionality of the buttons, LED lights and ports
• Install in a dry, unconfined
and ventilated place, at temperatures
from 0°C to 40°C and protect from
sunlight.
• It is strictly forbidden to use
the Fiber Box outdoors.
• Optimal WiFi connection is ensured
in a horizontal position (re. no. 1)
without any obstacles in a 50 cm
radius. In particular, avoid using any
other electronic devices in the
proximity of the Fiber Box, do not
cover it with any other devices,
e.g. a TV box.
• Do not disassemble the Fiber Box
to avoid any risk of electric shock.
In the event of problems,
please contact Salt's support.
• Keep away from the Fiber Box in
the event of a thunderstorm.
• Protect it from dust and clean
regularly with a slightly moistened
soft cloth.
Installation
• The Fiber Box complies with
European standards governing
radiation and wave exposure.
• The Fiber Box should be positioned
at a minimum distance of 30 cm
from any other electronic device or
human being. The proximity of
other wireless devices may cause
interferences.
• The device is restricted to indoor use
only when operating in 5150 to
5350 MHz frequency range.
Maximum transmission power:
• WiFi
2400-2483.5 MHz: 20 dBm
5150-5350 MHz:
23 dBm
5470-5725 MHz:
30 dBm
• DECT
1880-1900 MHz:
24 dBm
Wireless
• The Fiber Box should never be
disposed of together with
domestic waste but returned
directly to Salt for repackaging
or recycling.
• The Fiber Box meets
Ecodesign requirements 2009/125EC
and measures (EC) No 278/2009,
(EC) No 1275/2008
and (EU) No 801/2013.
Environment
• The Fiber Box, Saltbox 1 A 1.0,
is CE-certified. Arcadyan,
the manufacturer, certifies that the
WiFi and DECT components
comply with the standards
and requirements of EU Directive
2014/53 / EU.
• The Fiber Box declaration of
conformity was published on
http://fiber.salt.ch/box
Conformity
For further details, please refer to fiber.salt.ch/support
Deutsch
Die deutsche Version finden Sie auf der Rückseite.
PORT 2
PORT 4
1
7
10
8
A
B
C
D
E
F
G
!
AT BE BG CH CY CZ
DE DK EE EL ES FI
FR HR HU IE IS IT
LI LT LU LV MT NL
NO PL PT RO SE SI
SK TR UK
A
A
1
B
1
C
2
3
4
6
5
9
B
9
Power: 12V 4A
2 Ghz SSID: Salt_2GHz_123456
5 Ghz SSID: Salt_5GHz_123456
Password: XXXXXXXX
S/N: SFAAYWWXXXXX
MAC: MACOUI123456
1 2 3 4
10 MIN
5 SEC
Press briefly (2 seconds):
Page DECT phone handset
Press longer (5 seconds):
Connect DECT phone
Connect your computer to the Fiber Box, either:
A by means of the Ethernet cable you can plug into one of the four Gigabite ports.
B
by means of WiFi, by pressing the WiFi button shortly.
The Fiber Box designation and password can be found underneath the rounded cover.
OR in WPS mode, press the WiFi button for more than 5 seconds,
until the WPS LED begins to blink. You can then connect any device, using the WPS mode.
B
A
POWER
Green
On
Power on, normal operation
Red
Flashing
Firmware upgrade in process
Green
Off
Power off or no power
FIBRE
Green
On
Authorised fibre network access
Red
On
Optical signal lost
Green
Flashing
On-going registration for fibre access
Red
Flashing
Optical network access blocks by the network
Green
Off
No access to the fibre network or registration failed
WWW
Green
On
Received one IP address from the Internet
Green
Off
No link to Internet
WiFi
Green
On
WiFi is enabled
Green
Off
WiFi is disabled
WPS
Green
On
WPS
is activated
Green
Off
WPS
is not activated
Green
Flashing
WPS pairing possible
PHONE
Green
On
VoIP service available
Green
Flashing
VoIP call on-going
Green
Off
VoIP service not available
Blue
On
DECT
is enabled
Blue
Off
DECT
is disabled
Blue
Flashing
DECT
paging / registering / firmware upgrade


