background image


The  recorded  date  may  be  damaged,  in  case  one  of  the  following  situations  with 

regard to the memory card : 

-

  Improper use of the memory card; 

-

  Disconnection of the power supply or taking the memory card out during recording, 

deleting (formatting) or reading; 


You are recommended to backup important data on an 


other media like soft disk, hard disk, CD. 


Camera Maintenance 


Keep it in a dry and dark place when not in use; 


Use proper protective cover to avoid lens and display scratched; 


Keep the camera into a protection case to avoid scratches on the lens and screen; 


In case of cleaning the surface of camera lens, first blow the dust off the surface, use 

a  cloth  or  paper  available  to  optical  equipment  to  wipe  the  lens  gently.  Use  the 

professional camera cleanser to clean the lens. Do not use any organic solvent; 


Do not touch the lens surface with your fingers. 


3.  System requirements 

When operating or using the digital camera, please take minimum system requirements 

for the computer of the camera into consideration. You are strongly recommended to use 

high  quality  computer  equipment  operating  the  camera  for  best  results.  The  minimum 

system requirements are indicated below: 

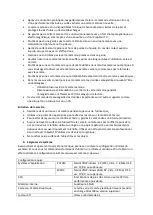
System Requirements 

Operating System 

PCCAM 

Microsoft 

Window 

XP(SP3), Vista,7,8 Mac OS 

X  ver:10.8.0  or  higher 

version   

MSDC 

Microsoft 

Window 

2000  ,XP,  Vista,7,8  Mac 

OS  X  ver:10.0.0  or  higher 

version 

CPU 

Intel  Pentium  of more than 

1GHz  or  other  CPU  with 

equivalent performance 

Internal Memory 

Larger than 1GB 

Sound card and Display card 

The  sound  card  and  video 

card shall support DirectX8 

or higher version 

CD Driver 

Speed of 4 times or faster 

Hard Disk 

Free  space  of  more  than 

2GB 

Others 

One  standard  USB1.1  or 

USB2.0 port 


Содержание ACP550

Страница 1: ...dat de door u aangekochte camera iets verschilt van de in de handleiding gebruikte omschrijvingen 2 Waarschuwingen TF kaarten mul media geheugenkaarten met een minimale high speed klasse van 4 dient u...

Страница 2: ...breken van de stroomvoorziening of uithalen van de geheugenkaart tijdens het opnemen verwijderen formatteren of het lezen van data Wij adviseren u van belangrijke data een back up te maken op een ande...

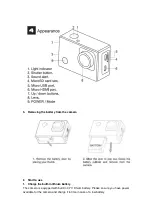
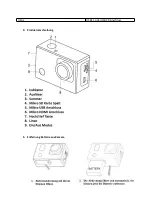
Страница 3: ...Overig USB1 1 of USB2 0 poort 4 Omschrijving product 5 Verwijderen van de batterij uit de camera...

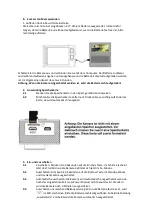
Страница 4: ...orrect in de sleuf overeenkomstig de aanwijzingen bij de sleuf 2 2 om de geheugenkaart te verwijderen drukt u voorzichtig op het uiteinde van de kaart deze zal nu vanzelf eruit komen 3 Opstarten en ui...

Страница 5: ...5 2 Oplaad indicator Indien de camera is uitgeschakeld zal deze indicator aan gaan tijdens het opladen van de batterij 6 Foto Opname Voertuig montage modus Deze zal automatisch in de opname modus gaan...

Страница 6: ...Druk op de Modus knop om de Afspeel modus te openen en door de foto en video bestanden te zoeken speel een video af die door de camera is opgenomen Afspelen film Druk op de Sluiterknop om het afspelen...

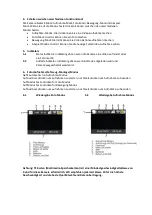
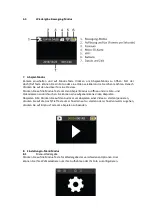
Страница 7: ...enu te verlaten Systeem modus menu 8 3 Instellen datum en tijd Druk op de Modus knop om het menu te openen druk nogmaals tot u het icoontje hee gevonden druk op de Sluiterknop om uw keuze te openen Dr...

Страница 8: ...de camera niet te bewegen Z o d ra u alle opnems hee gemaakt importeert u deze in uw video editor so ware als Frame Squence A ankelijk van de so ware die u gebruikt dient u de a eeldingen op een bepa...

Страница 9: ...en door middel van de applica e Om terug te keren naar de U disk modus MSDC drukt u nogmaals op de Aan Uit knop Note Voor de webcam modus PCCAM is een driver niet noodzakelijk voor Windows XP SP3 of e...

Страница 10: ...nt u nog 3 optie zien hoofd weergave galerij en opties In de Opties modus kunt de instellingen van de camera configureren voordat u de opname start Zoals afgebeeld op de rechter afbeelding Note Deze s...

Страница 11: ...Beeldsensor SONY 179 Func e modus Opname Beweging Foto Afspelen LCD Scherm 2 0 LCD Scherm Foto Resolu e 16M 4608 3456 12M 4000 3000 8M 3264 2448 5M 2560 1936 2M 1600 1200 Video Resolu e 4K 3840 2160 3...

Страница 12: ...qu es dans le manuel peuvent tre di rents de ceux de l appareil photo num rique actuel 2 Pr cautions Pour cet appareil photo une carte m moire classe 4 ou sup rieur est n cessaire Nous vous recommando...

Страница 13: ...ment l effacement 3 formatage ou la lecture Il est recommand de sauvegarder les donn es importantes sur d autres supports comme une disquette un disque dur ou un CD Entretien de la cam ra Gardez la da...

Страница 14: ...Disque dur Espace libre sup rieure 2GB Autres Un port USB 1 1 ou USB 2 0 standard 4 Pr sentation 5 Enlever la batterie de la cam ra 6 Premi re Utilisation...

Страница 15: ...n ral la batterie peut se charger compl tement en environs 4 heures Notification lorsque la cam ra est en marche elle ne se chargera pas jusqu ce que la cam ra soit teinte 2 Comment utiliser la carte...

Страница 16: ...e enregistrement pour enregistrer des vid os Mode photo pour prendre des photos Mode enregistrement mouvement sp cialement pour enregistrer des vid os en mouvement Mode lecture pour lire les vid os et...

Страница 17: ...che la cam ra vous pouvez appuyer sur la touche Mode pour entrer le mode Lecture Appuyez sur la touche Haut Bas pour choisir une photo ou vid o vous voulez lire puis appuyez sur la touche de l obturat...

Страница 18: ...n gurer les diverses op ons de votre vid o ou photo Menu Enregistrement et Photo 8 2 Menu Configuration Syst me Apr s avoir ouvert le menu en appuyant sur la touche Marche Arr t appuyez sur la touche...

Страница 19: ...e ou appuyez sur la touche Marche Arr t pour annuler le r glage et sor r Lorsque ce r glage est termin appuyez sur la touche Marche Arr t pour qui er le mode r glage 8 4 R glage mode Intervalle Pour c...

Страница 20: ...her le WiFi 1 Connexion avec l ordinateur 10 1 Lorsque vous avez tabli une connexion avec l ordinateur vous entrez en mode disque amovible un nouveau disque amovible sera ajout dans la fen tre de mon...

Страница 21: ...Press up to exit WIFI...

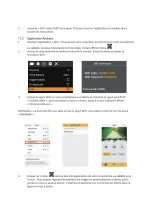
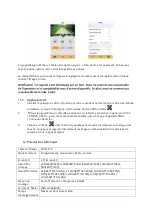
Страница 22: ...ce que l appareil a che Connexion R ussie 3 Cliquez sur l ic ne dans la liste des applica ons de votre smartphone ou table e pour l ouvrir Vous pouvez regarder directement les images en pr visualisa...

Страница 23: ...rce d alimentation Batterie lithium 3 7V rechargeable int gr e Langue Menu Anglais Espagnol Economie d nergie 1min 3min 5min d sactiver Configuration Syst me minimale Windows XP Vista 7 8 Mac 10 8 Dim...

Страница 24: ...User manual ACP550...

Страница 25: ...ory card You can use the built in format tool in the camera Before inserting or removing the memory card please first disconnect power supply of the camera When the card has been used for a long perio...

Страница 26: ...cleanser to clean the lens Do not use any organic solvent Do not touch the lens surface with your fingers 3 System requirements When operating or using the digital camera please take minimum system r...

Страница 27: ...om the camera 6 Start to use 1 Charge the built in lithium battery The camera is equipped with built in 3 7V lithium battery Please ensure you have power available for the camera and charge it in time...

Страница 28: ...1 Turning on press the POWER key for 3 second the camera will show startup screen and enter into POWER ON state 3 2 Turning off press the POWER key for 3 second when the camera is under idle mode to t...

Страница 29: ...tomatically into recording mode Press shutter to start recording and press shutter again to stop recording Press mode key to photo mode Press mode key to movement mode Press shutter to start recording...

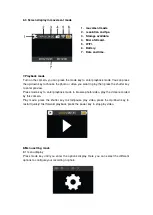
Страница 30: ...ou want to play then press the shutter key to enter preview Press mode key to enter playback mode to browse photo video play the video recorded by this camera Play movie press the shutter key to start...

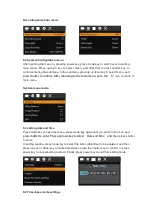
Страница 31: ...menu go to the X icon to return to main menu System menu mode 8 3 setting date and time Press mode key to open the menu press mode key again until you arrive to the icon and press shutter to enter Pre...

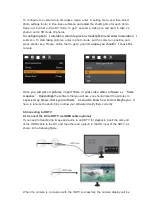
Страница 32: ...you shouldn t move the camera Once you will get all pictures import them in your video editor software as frame sequence Depending on the software that you will use you should import the pictures in...

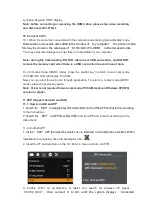
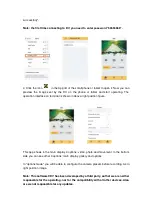
Страница 33: ...cam mode PCCAM the LCD will display PCCAM Now you can start the web cam through application To return to U disk mode MSDC mode press the power key again Note Driver is not required for web cam mode P...

Страница 34: ...above right position figure This app shows in the main display 3 options video photo and movement In the bottom side you can see other 3 options main display gallery and options In options mode you w...

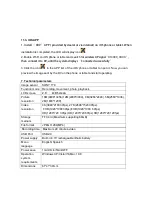
Страница 35: ...age sensor SONY 179 Function mode Recording movement photo playback LCD screen 2 0 LCD Screen Picture resolution 16M 4608 3456 12M 4000 3000 8M 3264 2448 5M 2560 1936 2M 1600 1200 Video resolution 4K...

Страница 36: ...Produktserien k nnte die von Ihnen gekau e Kamera geringf gig von den Beschreibungen in der Anleitung abweichen 2 Warnungen TF Karten Mul media Speicherkarten mit einer Mindestgeschwindigkeitsklasse...

Страница 37: ...Unterbrechung der Stromversorgung oder Entfernung der Speicherkarte w hrend aufnehmen entfernen formatieren oder Lesen der Daten Wir raten Ihnen einen Backup wichtiger Daten auf einem anderen Speiche...

Страница 38: ...brig USB1 1 oder USB2 0 Anschluss 4 Produktumschreibung 5 Entfernung Batterie aus Kamera...

Страница 39: ...gem den Hinweisen 2 2 M chten Sie die Speicherkarte entfernen Dr cken Sie vorsichtig aufs Ende der Karte sie wird automatisch rausgehen 3 Ein und ausschalten 3 1 Einschalten Dr cken Sie 3 Sekunden au...

Страница 40: ...r ein Foto macht 5 2 Auflade Indikator Indikator geht an wenn Batterie aufgeladen wird und Kamera ausgeschaltet worden ist 6 Foto Aufnahme Fahrzeug Montage Modus Geht automatisch in Aufnahme Modus Auf...

Страница 41: ...die Foto und Videodateien zu durchsuchen Sie k nnen eine aufgenommene Video abspielen Abspielen Film Dr cken Sie auf den Ausl ser um abspielen einer Video zu starten pausieren dr cken Sie auf die Hoc...

Страница 42: ...men dr cken Sie auf X um das Hauptmen zu verlassen System Modus Men 8 3 Einstellen Datum und Zeit Dr cken Sie auf die Modus Taste um das Men zu ffnen dr cken Sie nochmals bis Sie die Ikone gefunden ha...

Страница 43: ...me m ssen Sie die Kamera nicht bewegen Sobald Sie alle Aufnahmen gemacht haben importieren Sie sie in Ihre Video Editor Software als Frame Sequence Abh ngig von der Software die Sie verwenden m ssen S...

Страница 44: ...cken Sie nochmals auf die An Aus Taste um zum U Disk Modus MSDC zur ck zu kehren Achtung F r das Webcam Modus PCCAM ist ein Treiber nicht notwendig f r Windows XP SP3 oder eine h here Version 11 APP U...

Страница 45: ...Sie noch 3 Optionen Hauptansicht Galerie und Optionen Im Optionen Modus k nnen Sie die Einstellungen der Kamera konfigurieren bevor Sie die Aufnahme starten s Abbildung rechts Achtung Diese Software X...

Страница 46: ...ikationen Bildsensor SONY 179 Funktion Modus Aufnahme Bewegung Foto Abspielen LCD Schirm 2 0 LCD Schirm Foto Aufl sung 16M 4608 3456 12M 4000 3000 8M 3264 2448 5M 2560 1936 2M 1600 1200 Video Aufl sun...

Отзывы: