Salora ACE500 Скачать руководство пользователя страница 3

The  recorded  date  may  be  damaged,  in  case  one  of  the  following  situations  with 
regard to the memory card : 

  Improper use of the memory card; 

  Disconnection of the power supply or taking the memory card out during recording, 

deleting (formatting) or reading; 

You are recommended to backup important data on an 

other media like soft disk, hard disk, CD. 


Camera Maintenance 

Keep it in a dry and dark place when not in use; 

Use proper protective cover to avoid lens and display scratched; 

Keep the camera into a protection case to avoid scratches on the lens and screen; 

In case of cleaning the surface of camera lens, first blow the dust off the surface, use 
a  cloth  or  paper  available  to  optical  equipment  to  wipe  the  lens  gently.  Use  the 
professional camera cleanser to clean the lens. Do not use any organic solvent; 

Do not touch the lens surface with your fingers. 


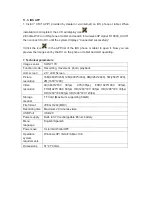
3.  System requirements 

When operating or using the digital camera, please take minimum system requirements 
for the computer of the camera into consideration. You are strongly recommended to use 
high  quality  computer  equipment  operating  the  camera  for  best  results.  The  minimum 
system requirements are indicated below: 
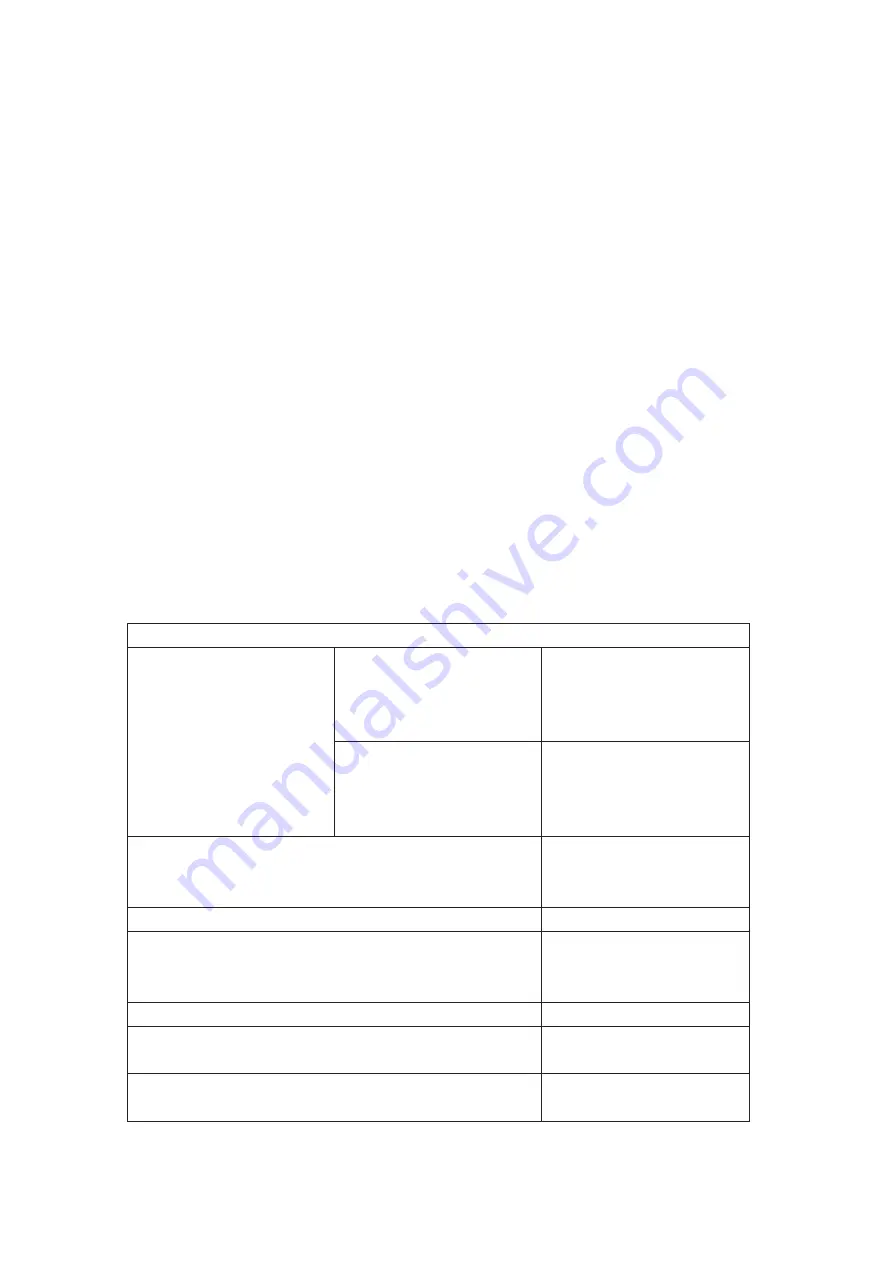
System Requirements 

Operating System 

PCCAM 

Microsoft 

Window 

XP(SP3), Vista,7,8 Mac OS 
X  ver:10.8.0  or  higher 
version   

MSDC 

Microsoft 

Window 

2000  ,XP,  Vista,7,8  Mac 
OS  X  ver:10.0.0  or  higher 
version 

CPU 

Intel Pentium of more than 
1GHz  or  other  CPU  with 
equivalent performance 

Internal Memory 

Larger than 1GB 

Sound card and Display card 

The  sound  card  and  video 
card shall support DirectX8 
or higher version 

CD Driver 

Speed of 4 times or faster 

Hard Disk 

Free  space  of  more  than 
2GB 

Others 

One  standard  USB1.1  or 
USB2.0 port 


Содержание ACE500

Страница 1: ...澳 澳 澳 澳 澳 澳 澳 澳 濉濧濙濦澔 澔 濡濕濢濩濕濠澔 澔 澳 澳 澳 澳 澳 澳 澳 澳 澳 澳 澳 澳 澳 澳 澳 澳 澳 澳 澳 澳 澳 澳 澳 澳 ACE500 ...

Страница 2: ...card You can use the built in format tool in the camera 瀣 Before inserting or removing the memory card please first disconnect power supply of the camera 瀣 When the card has been used for a long period of time performance of the memory card will be reduced In case of reduced performance you will need to purchase a new memory card 瀣 The memory card is a precise electronic device Please don t bend i...

Страница 3: ...al camera cleanser to clean the lens Do not use any organic solvent 瀣 Do not touch the lens surface with your fingers 3 System requirements When operating or using the digital camera please take minimum system requirements for the computer of the camera into consideration You are strongly recommended to use high quality computer equipment operating the camera for best results The minimum system re...

Страница 4: ...rom the camera 6 Start to use 1 Charge the built in lithium battery The camera is equipped with built in 3 7V lithium battery Please ensure you have power available for the camera and charge it in time in case of a low battery ...

Страница 5: ... 1 Turning on press the POWER key for 3 second the camera will show startup screen and enter into POWER ON state 3 2 Turning off press the POWER key for 3 second when the camera is under idle mode to turn off 3 3 Auto turn off the camera will be turned off automatically when the camera is under idle mode for a certain time to save power The default time for auto turn off is 3 min 3 4 Turning off u...

Страница 6: ...utomatically into recording mode Press shutter to start recording and press shutter again to stop recording Press mode key to photo mode Press mode key to movement mode Press shutter to start recording and press shutter again to stop recording 6 1 Screen display in photo mode 6 2 Screen display in recording mode 1 Photo Mode 1 Recording mode 2 Resolution 2 Resolution and fps 3 Photos available 3 S...

Страница 7: ...you want to play then press the shutter key to enter preview Press mode key to enter playback mode to browse photo video play the video recorded by this camera Play movie press the shutter key to start pause play video press the Up Down key to restart quickly fast forward playback press the power key to stop play video 8 Menu setting mode 8 1 menu display Press mode key until you enter the options...

Страница 8: ... menu go to the X icon to return to main menu System menu mode 8 3 setting date and time Press mode key to open the menu press mode key again until you arrive to the icon and press shutter to enter Press up down key to select date and time and then press shutter to enter In setting window press mode key to select the items date time to be adjusted and then press up key or down key to make adjustme...

Страница 9: ...e you shouldn t move the camera Once you will get all pictures import them in your video editor software as frame sequence Depending on the software that you will use you should import the pictures in a special way please check your software s manual to know how to do it Maybe you ll have to rename the photo files to allow your software identify them correctly 9 Connecting to HDTV 9 1 Connect the ...

Страница 10: ...witch to web cam mode PCCAM the LCD will display PCCAM Now you can start the web cam through application To return to U disk mode MSDC mode press the power key again Note Driver is not required for web cam mode PCCAM mode on Windows XP SP3 version or higher 11 APP Support Android and ISO 11 1 How to install an APP 1 Search for XDV in Google play for Android OS to find the APP and install it accord...

Страница 11: ...n above right position figure This app shows in the main display 3 options video photo and movement In the bottom side you can see other 3 options main display gallery and options In options mode you will be able to configure the camera presets before recording As in right position image Note This software XDV has been developed by a third party so that we are neither responsible for the operating...

Страница 12: ...meters Image sensor SONY 179 Function mode Recording movement photo playback LCD screen 2 0 LCD Screen Picture resolution 16M 4608 3456 12M 4000 3000 8M 3264 2448 5M 2560 1920 2M 1600 1200 Video resolution 4K 3840 2160 30fps 2 7K 30fps FHD 1920 1080 30fps FHD 1920 1080 60fps HD 1280 720 30fps HD 1280 720 30fps HD 1280 720 60fps HD 1280 720 120fps Storage medium TF Card Maximum supporting 64GB File...

Отзывы: