


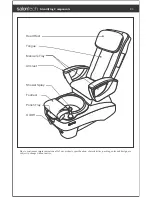


Discharge
Pump
Wall of Base
Fastener
On/Off Switch
Base
Fig.1
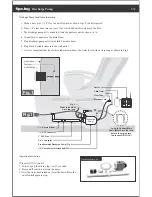
Fig. 3
White tube must
have the loop
1-1/4" Drain Elbow
1-1/4" EZ Connector
1" PVC Pipe
3/4" x 1 Adapter
Pre Assembled Discharge Pump ( Fig. 2)
1/2" Check Valve (Provided by MFG)
*Loop to Connect Main
Drain (Must have the loop
before the main drain
to prevent AIRLOCK)
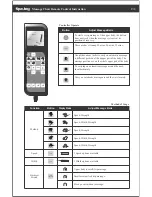
Outlet
2 Min Timer
Clear Tube
Electrical Cord
Discharge Pump Installation Instruction
1. Make a hole (size 1-3/8”) for the on/off switch as shown Fig1. Pre drill required.
2. Place 1/8” clear hose into the rear of the switch and on/off switch into the hole.
3. The discharge pump kit is made to fit into the pedicure unit as shown in
Fig2.
4. Connect EZ
connector to the drain elbow.
5. Plug discharge pump outlet into black 2 minute timer.
6. Plug black 2 minute timer into the wall outlet.
7. It is very important that tip of white tube remain above the water level with one big loop as shown in Fig3.
Operation Instruction
*Please DO NOT run dry
1. Turn to open the drain plug -wait 2 seconds.
2. Press on/off switch to activate the timer.
3. After the water has drained out from the basin. Press the
on/off switch again to stop.
Discharge Pump Kit
Fig.1
Discharge Pump
P.12
Содержание Spa Joy
Страница 1: ...2014 by Salontechspa All Rights Reserved Printed in USA Whirlpool Pedicure Spa Manual AK Products Inc...
Страница 6: ...SIDE VIEW Dimension WALL 41 14 1 4 14 1 2 FRONT VIEW 25 1 4 29 3 4 15 P 5 24 1 2 30 1 2 51 54 1 4...
Страница 7: ...SIDE VIEW REAR VIEW 6 37 5 5 Back of the pedicure spa P 6 14 1 2 3 4 5 8 3...


