background image

- 5 -

EN

GLISH

DE

U

T

S

C

H

ESPAÑ

OL

IT

A

L

IA

N

O

N

E

DE

RL

A

N

DS

P

O

RT

UG

U

Ê

S

FR

A

N

Ç

A

IS

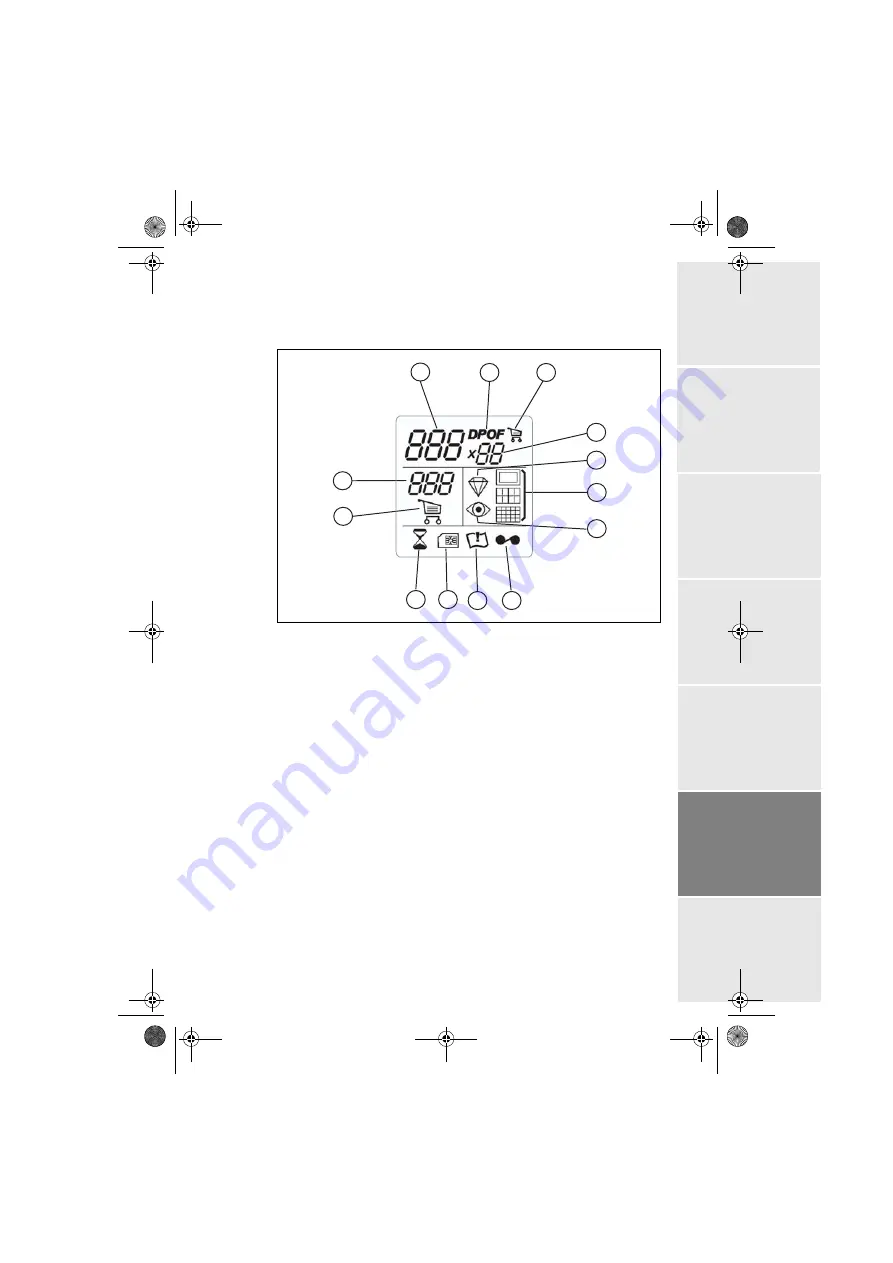
Beschrijving van het scherm 

Onderstaande gegevens worden op het scherm weergegeven:

1.

Nummer van de geselecteerde foto

2.

DPOF modus

3.

Aanduiding dat de geselecteerde foto aan het winkelwagentje is
toegevoegd

4.

Aantal af te drukken exemplaren

5.

Pictogram van de CRYSTAL IMAGE functie

6.

Afdrukformaat

7.

Pictogram van de functie rode ogen correctie

8.

Lintfout

9.

Papierfout

10. Pictogram verbruikskaart (chipkaart)
11. Zandloperpictogram, knippert terwijl de printer actief is
12. Winkelwagentje functie
13. Aantal af te drukken vellen

1

2

3

4

5

6

7

8

9

10

11

12

13

Liasse AZUR_NL.book  Page 5  Mardi, 19. avril 2005  11:34 11

Содержание PHOTO EASY 160

Страница 1: ...51 985 569A PHOTO EASY 160 6 langues Couvertures PDG PHOTO EASY 160 fm User guide Livret d utilisation Bedienungsanleitung Manual del usuario Manuale dell utente Gebruiksaanwijzing Manual do utilizado...

Страница 2: ...Notes fm Page 100 Mercredi 29 septembre 2004 10 40 10...

Страница 3: ...memory card 15 Create a contact sheet index 17 Prepare a series of photographs for printing print basket function 18 Print in DPOF Digital Print Order Format mode 21 6 PRINTING FROM A DIGITAL CAMERA P...

Страница 4: ...II 12 MAINTENANCE 34 Cleaning the print head 34 Paper jam 35 Problems 36 Error messages 38 Technical data 40 13 ENVIRONMENT 41 14 GUARANTEE 42 Liasse AZUR_GB book Page II Jeudi 21 avril 2005 4 09 16...

Страница 5: ...ith Crystal Image you can also correct red eye on photos taken with a flash This user guide takes you in easy steps through Setting up your photo printer Printing photos from a flash card Printing fro...

Страница 6: ...ns adapters act as a disconnecting mechanism for the 230V power supply They should be placed near the device and should be easily accessible Never open the cover of the film cartridge compartment duri...

Страница 7: ...w 1 Photo printer 2 User manual 3 CD ROM 4 Ink ribbon consumable 5 Photo paper consumable 6 Paper tray 7 Power supply unit 8 Mains cable depending on model 1 6 4 2 7 8 5 S Use r guid e Livr et d utili...

Страница 8: ...3 Next photo selection button 4 Number of copies to print button 5 Photo format button 6 Print button 7 Cancel button C 8 Print basket button 9 Crystal Image button Automatic print quality enhancemen...

Страница 9: ...d photo in the print basket 4 Number of copies to be printed 5 Crystal Image function icon 6 Print format 7 Red eye correction function icon 8 Ribbon error 9 Paper error 10 Consumable card icon smart...

Страница 10: ...the power supply Connect the power supply to the printer as shown in the illustration below Plug the other end of the power supply mains lead into a wall socket Press and hold the On Off button x on t...

Страница 11: ...Remove the protective foam 3 Take the new ribbon out of its packaging and make sure that the film is stretched after removing the card A 4 Install the ribbon in the position shown in the illustration...

Страница 12: ...e SIM card 3 Take the new ribbon out of its packaging and make sure that the film is stretched after removing the card A 4 Open the external flap located on the right hand side of the printer 5 Lift t...

Страница 13: ...your fingers Make sure the cartridge is completely inserted into the printer Check that the green locking lever is correctly lowered Remark In the event of any difficulty check that there are no fore...

Страница 14: ...tray that is towards you 3 Remove the protection sheet 4 Line up the tray with its compartment and push it in slowly until the locking system clicks Your photo printer is now ready to print your digi...

Страница 15: ...Refer to paragraph Technical data page 40 Use only the manufacturer consumables designed for this printer The paper tray should never contain more than 20 sheets at any one time Warning Make sure tha...

Страница 16: ...correct slot and with the right orientation Warning Printing of picture by ascending order relatively to the date of the pictures on the memory board will be achieved if parameters dates and hour have...

Страница 17: ...TSCH ESPA OL ITALIANO NEDERLANDS PORTUGU S FRAN AIS Card Location Smart Media SM Memory Stick MS Standard Digital SD Multi Media Card MMC Carte xD CompactFlash Liasse AZUR_GB book Page 13 Jeudi 21 avr...

Страница 18: ...rinting do not tear these edges abruptly fold along the dotted line several times and then gently tear off the edges Idea The edges can be removed on a number of photos at a time by superimposing them...

Страница 19: ...d Idea Using the pre printed reverse side postcard you can quickly send your photograph to friends family etc Idea Hold the key down for 3 seconds to reinitialise the printer and return to the default...

Страница 20: ...igure 4 is displayed that is 4 copies Press the key until the 4 images page graphic is selected The figure 1 should be displayed as the number of sheets necessary for the printing operation Press the...

Страница 21: ...played on screen Select the format photographs per sheet format using the key In the above example you will be using 1 sheet for 5 printable photos Press the take out he key to initiate printing Idea...

Страница 22: ...Remark Printing format remains fixed for series printing Select photograph 3 using the key press the key until the figure 4 corresponding to the quantity desired is displayed Press the key to add the...

Страница 23: ...key to add this to the shopping trolley The required number of sheets is displayed to the right of the print basket icon Press the key to start printing Remark If you notice that you have made an err...

Страница 24: ...trolley select the photograph with the lowest number and press and hold down the shopping trolley key Photographs will be automatically added to the shopping trolley one by one until the shopping trol...

Страница 25: ...n the documentation of your camera Place the memory card in the appropriate slot to launch data transfer to your photo printer the logo on the printer screen is activated and the number of printable p...

Страница 26: ...rint a photo Select photos and printing them several times on the same paper Print from a DPOF standard file Monitor printing and especially the beginning progress and end of the printing process Also...

Страница 27: ...ort of your camera and the other end to the master USB port of the printer reference A of the illustration on page 6 After the analysis and recognition phase the following screen appears The printer i...

Страница 28: ...or a list of compatible devices go to www sagem com INFRARED TRANSFER Warning If you have started transfer by Bluetooth you will not be able to transfer photos by infrared if you have not before hand...

Страница 29: ...printer At the end of each transfer the total number of photographs stored is displayed on the printer screen the one with the highest number being the last one transferred The same operations as desc...

Страница 30: ...ke Ensure that all hardware units are powered Never force installation of connectors on hardware as the cable and the connector could be damaged Remark For a list of compatible devices go to www sagem...

Страница 31: ...reen You can now Start printing the transferred photograph after setting the print format and number of copies if required Transfer another photograph which will be added to those already stored in th...

Страница 32: ...e exposure defects will also be corrected e g under exposed photos are made brighter or parts of a photo presenting strong contrasts will be compensated The red eye correction function corrects the re...

Страница 33: ...l program restarting the computer and performing the final printer installation Do not connect the printer to the PC before installing the printer driver After you have installed the software a messag...

Страница 34: ...photo printer USB port B to PC using an USB cable Recognition between the two devices is automatic Using your printer Your printer can operate in two different modes Print mode selected by default Me...

Страница 35: ...ge retouch software supplied with the printer Disconnect the device link then remove the memory card from its slot Your printer can operate in two different modes Print mode selected by default Memory...

Страница 36: ...mode again hold down the key until the screen shown above disappears Remark When changing mode Windows messages indicating the detection disconnect of a USB peripheral may be displayed Liasse AZUR_GB...

Страница 37: ...but also on our internet site www sagem com or by using the consumables order form supplied with your printer nature of supplies dependent on the model Use of any consumable items other than SAGEM PL...

Страница 38: ...the paper tray 3 Turn the printer upside down to remove the lower hatch 4 Clean the heating line of the print head carefully using a cotton bud 5 Replace the lower hatch turn the printer right side u...

Страница 39: ...printer by pressing button and disconnect the mains cable Turn the printer upside down 1 Remove the lower cover 2 Gently and carefully remove the sheet causing the jam Under no circumstances touch the...

Страница 40: ...paper is jammed carry out the procedure Refer to paragraph Paper jam page 35 Restart printing No photograph is printed on a sheet Are you using sheets that meet the technical specifications Refer to p...

Страница 41: ...be printed from memory cards e g a 320 x 240 image equivalent to 76 800 pixels However these photos can be printed from a PC or via direct infrared link or bluetooth link with the optional adapter Th...

Страница 42: ...rectly inserted and that the locking lever is locked Err 21 None Memory card File damaged or incorrect File illegible Try to print others If error persists check the file source or try with a differen...

Страница 43: ...lace the consumable Err 82 SIM card Card illegible Ins rer votre carte puce dans l autre sens Err 83 to Err 88 SIM card Card illegible or incompatible Use the smart card supplied with the consumable E...

Страница 44: ...Up to 12 million pixels Image size supported Up to 6 MB JPEG compressed image Consumable items Photo quality paper Film cartridge with three colours yellow magenta cyan and protective coating 40 print...

Страница 45: ...To facilitate recycling please respect the sorting rules set up locally for this kind of waste BATTERIES If your product contains batteries they must be disposed of at appropriate collection points TH...

Страница 46: ...ment which specifically provides for repairs to be carried out at the customer s premises the repairs will not be carried out on the equipment at the customer s premises The following sentence applies...

Страница 47: ...coverage by radio transmitters interference or poor line quality the local network fault wiring servers workstations or the failure of the transmission network the normal servicing as defined in the u...

Страница 48: ...Notes fm Page 100 Mercredi 29 septembre 2004 10 40 10...

Страница 49: ...os photos 14 Impression rapide 14 Exemple d impression rapide depuis une carte m moire 15 Cr er une planche contact index 17 Pr parer une s rie photos pour l impression Fonction panier 18 Imprimer par...

Страница 50: ...EASY 160 6 langues Fran ais_OK_3 Liasse AZUR_FRTDM fm 12 ENTRETIEN 34 Nettoyage de la t te d impression 34 Bourrage papier 35 Incidents 36 Messages d erreurs 37 Caract ristiques techniques 39 13 ENVI...

Страница 51: ...us permet galement de retoucher les ventuels yeux rouges de vos clich s pris avec le flash correction yeux rouges Ce livret d utilisation vous guidera par des tapes simples Mettre en marche votre impr...

Страница 52: ...on 230 V Ils doivent tre situ s proximit de l appareil et tre ais ment accessibles Ne jamais ouvrir la trappe du ruban en cours d impression vous risquez la rupture du film et par la suite un dysfonct...

Страница 53: ...to 2 Livret d utilisation 3 CD ROM 4 Ruban consommable 5 Papier photo consommable 6 Bac papier 7 Bloc alimentation secteur 8 Cordon d alimentation secteur Acess rios conforme modelo 1 6 4 2 7 8 5 S Us...

Страница 54: ...he s lection photo suivante 4 Touche nombre de copies imprimer 5 Touche format photo 6 Touche d impression 7 Touche d annulation C 8 Touche panier 9 Touche CRYSTAL IMAGE Am lioration automatique de la...

Страница 55: ...ns le panier 4 Nombre de copies imprimer 5 Ic ne de la fonction CRYSTAL IMAGE 6 Format d impression 7 Ic ne de la fonction correction des yeux rouges 8 Erreur ruban 9 Erreur papier 10 Ic ne carte cons...

Страница 56: ...cteur du bloc l alimentation pr vu cet effet Raccordez la prise du bloc alimentation sur l imprimante comme indiqu sur l illustration ci dessous Branchez l autre extr mit du cordon secteur du bloc ali...

Страница 57: ...sur la partie droite de l imprimante 2 Retirez la mousse de protection 3 Sortez le ruban neuf de son emballage et assurez vous que le film est tendu apr s avoir retir la pi ce cartonn e A 4 Pr sentez...

Страница 58: ...uban neuf de son emballage et assurez vous que le film est tendu apr s avoir retir la pi ce cartonn e A 4 Ouvrez la trappe ext rieure situ e sur la partie droite de l imprimante 5 Soulevez le loquet d...

Страница 59: ...m du ruban avec les doigts Bien ins rer le ruban compl tement dans l imprimante V rifiez que le loquet de fermeture vert est bien abaiss Remarque en cas de probl me v rifier qu aucun corps tranger n e...

Страница 60: ...vers vous 3 Retirez la feuille de protection situ e sur le dessus du paquet de feuilles 4 Pr sentez le tiroir devant son logement de l imprimante Ins rez le lentement jusqu au d clenchement du syst me...

Страница 61: ...reportez vous au paragraphe Caract ristiques techniques page 39 N utilisez que les consommables constructeur pr vus pour cette imprimante Ne mettez pas plus de 20 feuilles la fois dans le bac papier...

Страница 62: ...dans la bonne fente et dans le bon sens d introduction Attention pour r aliser une impression dans l ordre croissant des photos pr sentes sur la carte m moire les param tres date et heure doivent tre...

Страница 63: ...PA OL ITALIANO NEDERLANDS PORTUGU S 13 FRAN AIS Carte Repr sentation Smart Media SM Memory Stick MS Standard Digital SD Multi Media Card MMC Carte xD CompactFlash Liasse AZUR_FR book Page 13 Jeudi 21...

Страница 64: ...ne d chirez pas ces bords d un seul coup effectuez plusieurs fois le pliage sur les pointill s afin de d tacher d licatement les bords Astuce Les bords peuvent tre d coup s par petits paquets en super...

Страница 65: ...arr t e en appuyant sur la touche Id e le dos pr imprim carte postale vous permet d envoyer rapidement votre photo des amis de la famille Astuce l appui sur la touche pendant 3 secondes permet de r i...

Страница 66: ...valide s affiche l cran S lectionnez la photo 3 l aide de la touche 4 appuis Appuyez sur la touche jusqu l affichage du chiffre 4 soit 4 exemplaires Appuyez sur la touche jusqu l obtention du graphism...

Страница 67: ...de feuille n cessaire l impression Appuyez sur la touche pour lancer l impression CR ER UNE PLANCHE CONTACT INDEX Apr s introduction de la carte m moire la quantit de photos valides s affiche l cran A...

Страница 68: ...carte m moire choisissez les photos imprimer en fonction du num ro attribu chacune d entre elles PR PARER UNE S RIE PHOTOS POUR L IMPRESSION FONCTION PANIER Apr s introduction de la carte m moire la...

Страница 69: ...e que la photo active t s lectionn e Le nombre affich au dessus de l ic ne en bas gauche indique le nombre de photos qui seront imprim es S lectionnez la photo 8 l aide de la touche appuyez sur la tou...

Страница 70: ...oix pr c dent et seulement celui ci Vous pouvez aussi d s lectionner toutes les photos pr sentes dans le panier en s lectionnant ALL l aide de la touche et en appuyant 2 fois sur la touche Astuce Pour...

Страница 71: ...s dans la notice de votre appareil photo Placez la carte m moire dans la fente ad quate le transfert de donn es dans votre imprimante photo est lanc le logo DPOF est activ sur l cran de l imprimante e...

Страница 72: ...au standard DPOF Suivre l impression et notamment le d but la progression et la fin de l impression Mais galement les messages d erreurs pouvant intervenir pas de papier bourrage pas d encre capot non...

Страница 73: ...se d analyse et de reconnaissance l cran suivant appara t L imprimante est pilot e par l appareil photo num rique Aucun appui sur les touches de l imprimante n est requis Retirez le c ble USB pour sor...

Страница 74: ...ssent sur l cran Remarque pour conna tre la liste des p riph riques compatibles consulter le site www sagem com TRANSFERT INFRAROUGE Attention si vous avez commenc transf rer par Bluetooth vous ne pou...

Страница 75: ...primante A la fin de chaque transfert le nombre total de photos stock es est indiqu sur l cran de l imprimante celle ayant le num ro le plus lev tant la derni re transf r e Vous pouvez ce moment effec...

Страница 76: ...istants personnels les ordinateurs ou autres Assurez vous que les quipements sont sous tension Ne forcez jamais la mise en place des connecteurs sur les quipements vous risquez la fois de d t riorer l...

Страница 77: ...informations suivantes sont affich es en alternances l cran Vous pouvez Soit d clencher l impression de la photo transf r e apr s avoir ventuellement modifi le format d impression et le nombre de copi...

Страница 78: ...possible Par ailleurs les d fauts d exposition seront corrig s par exemple les photos sous expos es seront claircies ou les portions de photo pr sentant de forts contrastes seront compens es La foncti...

Страница 79: ...n du programme d installation le red marrage de l ordinateur puis l installation finale de l imprimante Ne connectez pas l imprimante au PC avant l installation du pilote d impression En fin d install...

Страница 80: ...figure ci dessous au PC en utilisant un c ble USB La reconnaissance entre les quipements est automatique Utiliser l imprimante Votre imprimante peut fonctionner sous 2 modes diff rents Mode Impressio...

Страница 81: ...aide du logiciel de retouche d image fourni avec l imprimante D connectez la liaison avec le p riph rique puis retirez la carte m moire de son logement Votre imprimante peut fonctionner sous 2 modes d...

Страница 82: ...on re appuyez longuement sur la touche jusqu disparition de l cran ci dessus Remarque A chaque changement de mode des messages Windows de d tection d connexion de p riph rique USB peuvent appara tre L...

Страница 83: ...ou imprimantes mais galement sur notre site internet www sagem com ou utilisez le bon de commande consommables fourni avec votre imprimante fourniture selon mod le Utilisez seulement les consommables...

Страница 84: ...hant 1 Ouvrez la trappe ruban appuyez sur le loquet de maintien et retirez le ruban 2 Retirez le bac papier 3 Retournez l appareil pour retirer la trappe inf rieure 4 Nettoyez avec pr caution la ligne...

Страница 85: ...imprimante attendez 10 secondes que la t te d impression se rel ve Mettez votre imprimante hors tension en appuyant sur le bouton Marche Arr t situ sur le dessus de votre appareil et d branchez le cor...

Страница 86: ...une feuille de papier est bloqu e reportez vous au paragraphe Bourrage papier page 35 Relancez l impression Aucune photo n est imprim e sur la feuille Utilisez vous des feuilles conformes aux sp cific...

Страница 87: ...ac chargeur Err 02 Papier Bourrage papier Retirez le papier bloqu dans l imprimante ne pas r utiliser cette feuille de papier Err 11 Ruban Ruban absent Mettez un nouveau ruban ou remplacez le ruban ac...

Страница 88: ...la carte ins r e et ins rez une carte puce valide Erreur affich e Icone affich e Type d erreur D signation Action Err 81 Carte puce Quantit d impression atteinte La quantit d impression est atteinte...

Страница 89: ...ga octets R solution d image support e jusqu 12 Millions de pixels Taille d image support e jusqu 6 Mega octets image compress e JPEG Consommables papier photo ruban trois couleurs jaune magenta cyan...

Страница 90: ...mises en place localement pour ce type de d chets LES PILES ET BATTERIES Si votre produit contient des piles ou des batteries ces derni res doivent tre d pos es dans les points de collecte d sign s LE...

Страница 91: ...de la garantie a Les pannes ou dysfonctionnements dus au non respect des consignes d installation et d utilisation une cause ext rieure au mat riel foudre incendie choc des modifications de mat riels...

Страница 92: ...Notes fm Page 100 Mercredi 29 septembre 2004 10 40 10...

Страница 93: ...en 14 Schnelldruck 14 Beispiel f r den schnelldruck von einer speicherkarte aus 15 Einen bersichtsbogen bzw Indexprint erzeugen 17 Eine Fotoserie f r den Ausdruck vorbereiten Korbfunktion 18 Fotodruck...

Страница 94: ...31 doc DOC 31 En cours Travaux en cours URD30 Photo LUs LU AZUR 251 985 569A PHOTO EASY 160 6 langues Allemand_OK_2 Liasse AZUR_ALLTDM fm Technische Daten 40 13 UMWELT 41 14 GARANTIE 42 Liasse AZUR_AL...

Страница 95: ...uch eventuell durch Blitz hervorgerufene rote Augen in Ihren Aufnahmen retuschieren Rote Augen Korrektur Diese Bedienungsanleitung erl utert in einfachen Schritten folgende Funktionen Einschalten des...

Страница 96: ...daher in der N he des Ger ts und leicht zug nglich sein ffnen Sie w hrend des Ausdrucks niemals die Klappe zum Farbband Dies kann zum Rei en des Films und anschlie end zu Funktionsst rungen Ihres Dru...

Страница 97: ...ucker 2 Bedienungsanleitung 3 CD ROM mit Treiber Anwendungen 4 Farbband Verbrauchsmaterial 5 Fotopapier Verbrauchsmaterial 6 Papierfach 7 Netzleitung 8 Netzteil 1 6 4 2 7 8 5 S Use r guid e Livr et d...

Страница 98: ...iges Foto 3 Auswahltaste n chstes Foto 4 Taste Anzahl auszudruckender Kopien 5 Taste Fotoformat 6 Ausdrucktaste 7 Abbruchtaste C 8 Korbtaste 9 Taste CRYSTAL IMAGE Automatische Verbesserung der Ausdruc...

Страница 99: ...te Foto im Korb befindet 4 Anzahl auszudruckender Exemplare 5 Symbol der Funktion CRYSTAL IMAGE 6 Ausdruckformat 7 Symbol der Funktion Rote Augen Korrektur 8 Farbbandst rung 9 Papierstau 10 Symbol Spe...

Страница 100: ...30 V Netzleitung in den daf r vorgesehenen Anschluss des Netzteils Stecken Sie den Stecker des Netzteils in den Drucker wie auf der nachfolgenden Abbildung gezeigt Stecken Sie den 230 V Eurostecker in...

Страница 101: ...ernen Sie den Schaumstoffschutz 3 Nehmen Sie das neue Farbband aus seiner Verpackung und Stellen Sie sicher dass der Film gespannt ist nachdem Sie das Pappteil A entfernt haben 4 Beachten Sie die Posi...

Страница 102: ...int 40 End oder 120 End am Bildschirm 2 Herunternehmen die SIM Karte 3 Nehmen Sie das neue Farbband aus seiner Verpackung und Stellen Sie sicher dass der Film gespannt ist nachdem Sie das Pappteil A e...

Страница 103: ...Die Kassette muss vollst ndig in den Drucker eingef hrt werden Achten Sie darauf dass der gr ne Sperrhebel nach dem Einlegen des Farbbandes heruntergedr ckt worden ist Anmerkung berpr fen Sie bei Pro...

Страница 104: ...ie 4 Bringen Sie die Papierkassette mit der offenen Kante vor Legen Sie die Bl tter ins Papierfach ein F hren Sie die Kassette langsam bis zum Einrasten in den daf r vorgesehenen Schacht des Druckers...

Страница 105: ...he Abschnitt Technische Daten Seite 40 Verwenden Sie nur f r diesen Drucker vorgesehenes Hersteller Verbrauchsmaterial Legen Sie nicht mehr als 20 Bl tter gleichzeitig in das Papierfach ein Anmerkung...

Страница 106: ...eraus und stellen Sie sicher dass Sie den richtigen Einschub w hlen und die Karte in der korrekten Richtung einf hren Anmerkung Damit die auf der Speicherkarte befindlichen Fotos in chronologische Rei...

Страница 107: ...TSCH ESPA OL ITALIANO NEDERLANDS PORTUGU S FRAN AIS Karte Lage Smart Media SM Memory Stick MS Standard Digital SD Multi Media Card MMC Carte xD CompactFlash Liasse AZUR_ALL book Page 13 Mardi 19 avril...

Страница 108: ...ondern knicken Sie die Perforierung mehrmals hin und her um die R nder behutsam zu l sen Anmerkung Die R nder k nnen in kleinen Paketen ausgeschnitten werden in dem man mehrere Bl tter aufeinanderlegt...

Страница 109: ...rte vorgedruckte R ckseite um Ihre Fotos an Freunde Familienangeh rige usw zu verschicken Anmerkung Durch Dr cken auf die Taste 3 Sekunden wird der Drucker neu initialisiert Er kehrt in den Ausgangsst...

Страница 110: ...rscheint d h 4 Exemplare Dr cken Sie auf die Taste bis das Symbol 4 Bilder Seite erscheint Die f r den Ausdruck erforderliche Kopienanzahl m ssen Sie z B durch die Wahl der Zahl 1 definieren Dr cken S...

Страница 111: ...die Anzahl g ltiger Fotos auf dem Display angezeigt Dr cken Sie auf die Taste bis ALL auf dem Display erscheint W hlen Sie mit der Taste das Format Fotos pro Bogen aus Im oben gezeigten Beispiel verwe...

Страница 112: ...ger Fotos auf dem Display angezeigt Sie m chten das Foto 3 in vier Exemplaren das Foto 8 in einem Exemplar und das Foto 16 in zwei Exemplaren ausdrucken Anmerkung Serienausdrucke erfolgen alle mit dem...

Страница 113: ...Sie auf die Taste um es im Warenkorb abzulegen die Vorgabemenge ist 1 W hlen Sie mit der Taste das Foto 16 aus und dr cken Sie auf die Taste bis die Zahl 2 erscheint d h die gew nschte Menge Dr cken S...

Страница 114: ...bgelegt bis Sie die Warenkorb Taste wieder loslassen FOTODRUCK VON EINEN KOMPARTIBLEN ANGESCHLO ENEN GER T DROF Mit dieser Funktion k nnen Sie die Fotos in der digitalen Kamera oder in der Speicherkar...

Страница 115: ...den Ausdruck ausgew hlte Fotos enth lt Starten Sie den Ausdruck durch Dr cken auf die Taste Dr cken Sie zum Verlassen des DPOF Modus auf die Taste Zur R ckkehr in den DPOF Modus dr cken Sie auf die Ta...

Страница 116: ...s Fotos Auswahl von Fotos und deren mehrfacher Ausdruck auf einem Blatt Papier Ausdruck einer Datei im DPOF Standard Verfolgen des Ausdrucks d h Anzeige des Druckbeginns fortschritts und endes Au erde...

Страница 117: ...B Port der Kamera und an den Master USB Port des Druckers an Pos A in der Abbildung auf Seite 6 Nach einer Phase der Analyse und des Erkennens Der folgende Bildschirm erscheint Der Drucker wird von de...

Страница 118: ...g Auf der Website www sagem com finden Sie eine Liste mit den kompatiblen Peripherieger ten INFRAROT BERTRAGUNG Anmerkung Wenn Sie die bertragung mit Bluetooth begonnen haben k nnen Sie die Fotos erst...

Страница 119: ...inzugef gt wird Nach jeder bertragung wird die Gesamtanzahl gespeicherter Fotos auf dem Display des Druckers angegeben das Foto mit der h chsten Nummer ist das letzte bertragene Foto Sie k nnen jetzt...

Страница 120: ...ger verwandelt werden damit Fotos aus Ger ten ausgedruckt werden k nnen die mit der Bluetooth Technologie versehen sind Dazu z hlen zum Beispiel Handys Palms Computer und andere Ger te Stellen Sie sic...

Страница 121: ...tragung beginnt und w hrend ihrer Dauer blinkt die Meldung bt auf dem Display des Druckers Am Ende der bertragung erscheinen abwechselnd folgende Informationen am Bildschirm Sie k nnen Entweder das be...

Страница 122: ...hler ausgeglichen zum Beispiel werden unterbelichtete Fotos aufgehellt oder Bereiche mit starken Kontrasten im Foto werden kompensiert Die Rote Augen Korrektur retuschiert die bei Blitzaufnahmen entst...

Страница 123: ...der Installation des Druckers Schlie en Sie den Drucker nicht an den PC an solange der Druckertreiber noch nicht installiert ist Am Ende der Installation fordert Sie eine Meldung zum Neustart des PCs...

Страница 124: ...den Abbildung ber ein USB Kabel an den PC an Die Ger te erkennen sich gegenseitig automatisch Benutzen des Druckers Der Drucker kann in 2 verschiedenen Modi betrieben werden Druckmodus standardm ig ak...

Страница 125: ...uf der Speicherkarte mit Hilfe der Bildbearbeitungs Software des Druckers bearbeiten Unterbrechen Sie die Verbindung mit dem Peripherieger t und ziehen Sie die Speicherkarte aus dem Reader Der Drucker...

Страница 126: ...assen und in den Druckmodus zur ckzukehren m ssen Sie erneut so lange auf die Taste dr cken bis der oben gezeigte Bildschirm verschwindet Anmerkung Beim Wechseln zwischen den Modi k nnen Windows Meldu...

Страница 127: ...r aber ber Internet auf unserer Webseite www sagem com oder ber den Stellcoupon f r Verbrauchsg ter der zu Ihrem Drucker geliefert wurde Lieferungen je nach Modell Bitte verwenden Sie ausschlie lich d...

Страница 128: ...Sie auf den gr nen Sperrhebel und ziehen Sie die Farbband Kassette heraus 2 Ziehen Sie das Papierfach heraus 3 Drehen Sie das Ger t um die untere Verschlussklappe zu entfernen 4 Reinigen Sie die Heiz...

Страница 129: ...den Drucker aus und wieder ein Warten Sie 10 Sekunden bis sich der Druckkopf anhebt Schalten Sie Ihren Drucker aus und ziehen Sie den Netzstecker Drehen Sie das Ger t um damit die Unterseite des Druc...

Страница 130: ...in Papierbogen blockiert ist siehe Abschnitt Papierstau Seite 35 Starten Sie den Ausdruck neu Es wird kein Foto auf dem Bogen ausgedruckt Verwenden Sie B gen die mit den technischen Daten bereinstimme...

Страница 131: ...spiel ein Bild der Gr e 320 x 240 gleich 76 800 Pixel wird nicht im Index aufgenommen Solche Fotos k nnen jedoch aus einem PC oder ber eine direkte Infrarot Verbindung bzw ber die optionale Bluetooth...

Страница 132: ...aus Err 14 Farbband Farbband fehlt oder ist falsch eingelegt berpr fen Sie ob das Farbband korrekt eingelegt und der Sperrhebel verriegelt ist Err 21 Kein Speicher karte Datei besch digt oder falsch D...

Страница 133: ...Sie eine g ltige SIM Karte ein Err 81 SIM Karte Die Ausdruckmenge ist erreicht Die Ausdruckmenge ist erreicht Wechseln Sie bitte das Verbrauchsmaterial aus Err 82 SIM Karte Karte nicht lesbar Chipkar...

Страница 134: ...fl sung bis 12 Millionen Pixel Unterst tzte Bildgr e bis 6 Megabyte komprimiertes JPEG Bild Verbrauchsmaterialien Fotopapier dreifarbiges Farbband gelb magenta cyan und ein Siegellack 40 Drucke pro Fa...

Страница 135: ...Verbessern des Recycling bitte die rtlichen Sortierungsregeln f r diesen Abfalltyp ein BATTERIEN UND AKKUMULATOREN Wenn Ihr Produkt Batterien oder Akkumulatoren enth lt m ssen diese an den ausgewiesen...

Страница 136: ...zlichen Sachm ngelgew hrleistungsfrist ist die SAGEM SA bis zu maximal zwei Jahren ab Lieferung ausschlie lich verpflichtet das fehlerhafte Ger t zu den oben genannten Bedingungen kostenlos zu reparie...

Страница 137: ...rger usche Zusammenbruch oder schlechte Qualit t der Telefon leitungen Fehler der rtlichen Leitungen Verkabelung Server Benutzerger te bzw Fehler des bertragungsnetzes Arbeiten zwecks General berholu...

Страница 138: ...Notes fm Page 100 Mercredi 29 septembre 2004 10 40 10...

Страница 139: ...12 Imprima sus fotos 14 Impresi n r pida 14 Ejemplo de impresi n r pida desde una tarjeta de memoria 15 Crear una plancha de contacto ndice 17 Preparar una serie fotos para impresi n Funci n canasta 1...

Страница 140: ...PHOTO EASY 160 6 langues Espagnol_OK_ 3 Liasse AZUR_ESPTDM fm 12 MANTENIMIENTO 34 Limpieza del cabezal de impresi n 34 Atasco de papel 35 Incidentes 36 Mensajes de error 38 Caracter sticas t cnicas 40...

Страница 141: ...tal Image tambi n le permite retocar los ojos rojos de sus fotos tomadas con flash correcci n de ojos rojos Este folleto de uso le guiar por etapas simples en Poner en marcha su impresora de fotos Imp...

Страница 142: ...ci n de 230 V stos deben situarse cerca del aparato y ser f cilmente accesibles Nunca abra la tapa de la cinta durante la impresi n puede romper la pel cula y ocasionar un funcionamiento inadecuado de...

Страница 143: ...3 CD ROM con sus aplicaciones 4 Cinta consumible 5 Papel foto consumible 6 Bandeja de papel 7 Transformador de alimentaci n el ctrica 8 Cable de alimentaci n el ctrica Suministro seg n modelo 1 6 4 2...

Страница 144: ...selecci n de la foto siguiente 4 Tecla del n mero de copias a imprimir 5 Tecla de formato de la foto 6 Tecla de impresi n 7 Tecla de anulaci n C 8 Tecla canasta 9 Tecla CRYSTAL IMAGE mejora autom tic...

Страница 145: ...canasta 4 N mero de copias a imprimir 5 Icono de la funci n CRYSTAL IMAGE 6 Formato de impresi n 7 Icono de la funci n correcci n de ojos rojos 8 Error de cinta 9 Error de papel 10 Icono de tarjeta co...

Страница 146: ...necte el enchufe del transformador de alimentaci n a la impresora tal como se indica en la ilustraci n siguiente Conecte el otro extremo del cable de alimentaci n del bloque de alimentaci n a un enchu...

Страница 147: ...o la parte derecha de la impresora 2 Retire la espuma de protecci n 3 Saque la cinta nueva de su embalaje y aseg rese de que el film est tenso despu s de haber retirado la pieza de cart n A 4 Colocar...

Страница 148: ...impresora al final del procedimiento aparece en la pantalla 40 End o 120 End 2 Retire la tarjeta SIM 3 Sacar la cinta nueva de su embalaje y aseg rese de que el film est tenso despu s de haber retira...

Страница 149: ...despu s del cambio de la cinta pulsando la tecla Atenci n Nunca toque la pel cula de la cinta con los dedos Introduzca completamente el cartucho en la impresora Verifique que la palanca verde de cierr...

Страница 150: ...el es decir hacia usted 3 Retire hoja de protecci n 4 Presente la bandeja delante de su alojamiento en la impresora Introd zcala lentamente hasta que se accione el sistema de bloqueo Ahora su impresor...

Страница 151: ...onsulte el apartado Caracter sticas t cnicas p gina 40 S lo use los consumibles del constructor previstos para esta impresora Nunca ponga m s de 20 hojas a la vez en la bandeja de papel Atenci n Verif...

Страница 152: ...oduce en la ranura correcta y en el buen sentido Atenci n Para realizar una impresi n en orden creciente de las fotos inclu das en la tarjeta de memoria los parametros fecha y hora deben ser ingresado...

Страница 153: ...ESPA OL ITALIANO NEDERLANDS FRAN AIS PORTUGU S TARJETA REPRESENTACI N Smart Media SM Memory Stick MS Standard Digital SD Multi Media Card MMC Carte xD CompactFlash Liasse AZUR_ESP book Page 13 Jeudi 2...

Страница 154: ...re estos bordes de un solo golpe efect e varias veces el plegado en el punteado a fin de separar delicadamente los bordes Los bordes pueden ser recortados por peque os paquetes superponiendo varias ho...

Страница 155: ...pidamente su foto a sus amigos familia etc Si pulsa la tecla durante 3 segundos se inicializa la impresora y se vuelve al estado por defecto existente antes de la introducci n de una tarjeta EJEMPLO...

Страница 156: ...ualizaci n de la cifra 4 es decir 4 ejemplares Pulse la tecla hasta obtener el gr fico 4 im genes p gina Debe obtener la cifra 1 en cantidad de hojas necesarias para la impresi n Pulse la tecla para l...

Страница 157: ...i n de la tarjeta de memoria se muestra en la pantalla la cantidad de fotograf as v lidas Pulse la tecla hasta la aparici n de ALL en la pantalla Seleccione el formato fotos por hoja con la tecla En e...

Страница 158: ...SI N FUNCI N CANASTA Despu s de la introducci n de la tarjeta de memoria se muestra en la pantalla la cantidad de fotograf as v lidas Deseamos imprimir la foto 3 en 4 ejemplares la foto 8 en 1 ejempla...

Страница 159: ...a izquierda indica el n mero de fotos que se imprimir n Seleccione la foto 8 con la tecla pulse la tecla para a adirla al carrito la cantidad por defecto es 1 Seleccione la foto 16 con la tecla pulse...

Страница 160: ...las fotos se a adir n autom ticamente en el carrito hasta que suelte la tecla IMPRIMIR A PARTIR DE UN PERIF RICO COMPATIBLE DPOF Esta funci n le permite seleccionar las fotos que desea imprimir en su...

Страница 161: ...eta de memoria que contiene 15 fotos seleccionadas para ser impresas Pulse la tecla para lanzar la impresi n Para salir del modo DPOF pulse la tecla Para volver al modo DPOF pulse y mantenga pulsada l...

Страница 162: ...ccionar fotograf as e imprimirlas varias veces en la misma hoja de papel Imprimir desde un archivo seg n norma DPOF Controlar la impresi n en particular el comienzo la progresi n y el fin de la misma...

Страница 163: ...fica y el otro extremo con el puerto USB maestro de la impresora referencia A de la ilustraci n p gina 6 Despu s de una fase de an lisis y reconocimiento la pantalla siguiente aparece La impresora es...

Страница 164: ...antalla Observaci n Para conocer la lista de los perif ricos compatibles consulte el sitio www sagem com TRANSFERENCIA POR INFRARROJOS Atenci n Si ha comenzado a tranferir por bluetooth no podr transf...

Страница 165: ...a Al final de cada transferencia la cantidad total de fotos almacenadas se indica en la pantalla de la impresora la que tiene el n mero m s elevado es la ltima transferida En este momento puede efectu...

Страница 166: ...or Bluetooth lo que permite la impresi n de fotos desde estos equipos dotados de la tecnolog a Bluetooth como los tel fonos m viles los asistentes personales ordenadores u otros Aseg rese de que los e...

Страница 167: ...nsferencia se inicia y durante ella el mensaje bt parpadea en la pantalla de la impresora Al final de la transferencia se visualizan las informaciones siguientes de manera alternativa en la pantalla P...

Страница 168: ...corrigen los defectos de exposici n por ejemplo las fotos subexpuestas ser n aclaradas o las porciones de foto que tengan grandes contrastes ser n compensadas La funci n de correcci n de los ojos roj...

Страница 169: ...olla en tres fases la ejecuci n del programa de instalaci n el reinicio del ordenador y luego la instalaci n finale de la impresora No conecte la impresora al PC antes de instalar el controlador de im...

Страница 170: ...siguiente al PC utilizando un cable USB El reconocimiento entre los equipos es autom tico Uso de su impresora Su impresora puede funcionar bajo 2 modos diferentes Modo Impresi n activada por defecto M...

Страница 171: ...de Windows Acceda a este lector para a adir copiar desplazar grabar o eliminar im genes Puede tratar las fotos directamente en la tarjeta de memoria con el software de retoque de imagen suministrado...

Страница 172: ...de memoria Observaci n Ninguna impresi n ninguna transferencia infrarroja o Bluetooth es posible en este modo Para salir de este modo y volver al modo Imprimir efect e nuevamente un pulsado largo la t...

Страница 173: ...impresoras de los supermercados y en nuestra Web www sagem com Tambi n puede utilizar la orden de pedido de consumibles suministrada con su impresora suministro seg n el modelo Use s lo consumibles d...

Страница 174: ...le la vuelta al aparato para retirar la tapa inferior 4 Limpie con precauci n la l nea de calentamiento del cabezal de impresi n con un batoncillo de algod n 5 Vuelva a colocar la tapa inferior dele l...

Страница 175: ...su impresora pulsando y desconectar el cable de red Voltee el aparato para acceder a la parte inferior de la impresora 1 Retire la tapa inferior 2 Retire delicada mente la hoja atascada no toque en ni...

Страница 176: ...se de inicializaci n se termine Si una hoja de papel est atascada Consulte el apartado Atasco de papel p gina 35 Relance la impresi n Ninguna foto se imprime en la hoja Usa hojas conformes con las esp...

Страница 177: ...emoria ejemplo una imagen de tama o 320 x 240 equivalente a 76 800 p xeles no ser indicada en el ndice Sin embargo estas fotos pueden ser impresas a partir de un PC o por un enlace directo infrarrojo...

Страница 178: ...chivo es ilegible Trate de imprimir las otras fotos Si el error persiste verifique la fuente del archivo o trate con otra fuente las fotos Err 22 Ninguno Tarjetade memoria Error de descompresi n JPEG...

Страница 179: ...rr 82 Tarjeta SIM Tarjeta ilegible Inserte su tarjeta chip en el otro sentido Err 83 Err 88 Tarjeta SIM Tarjeta incompatible Usar la tarjeta chip suministrada con el consumible Err 89 Tarjeta SIM Tran...

Страница 180: ...tos Resoluci n de imagen soportada hasta 12 Millones de p xeles Tama o de la imagen soportado hasta 6 Mega octetos imagen compactada JPEG Consumibles papel foto cinta tres colores amarillo magenta cya...

Страница 181: ...ciclaje por favor respete las reglas de clasificaci n implementadas localmente para este tipo de desechos LAS PILAS Y LAS BATER AS Si su producto contiene pilas o bater as estas ltimas se deben desech...

Страница 182: ...mar la sustituci n del equipo o la devoluci n del precio pagado con restituci n del equipo averiado a SAGEM SA Los gastos de sustituci n o devoluci n correr n a cargo de SAGEM SA Para la sustituci n o...

Страница 183: ...ctricos interferencias zonas oscuras fallos o mala calidad de las l neas telef nicas los defectos propios de la red local cableado servidor de ficheros terminales y o los defectos de la red de transmi...

Страница 184: ...Notes fm Page 100 Mercredi 29 septembre 2004 10 40 10...

Страница 185: ...MEMORIA 12 Inserimento di una scheda di memoria 12 Stampa delle fotografie 14 Stampa rapida 14 Esempio di stampa rapida da un supporto di memorizzazione 15 Creazione di un foglio di prove fotografich...

Страница 186: ...R 251 985 569A PHOTO EASY 160 6 langues italien_OK_2 Liasse AZUR_ITTDM fm 12 CURA DELLA STAMPANTE 34 Pulizia della testina di stampa 34 Inceppamento carta 35 Problemi 36 Messaggi d errore 38 Caratteri...

Страница 187: ...copia delle foto impeccabile Crystal Image consente inoltre di eliminare l effetto occhi rossi delle foto scattate con il flash correzione occhi rossi Questo manuale d uso contiene delle semplici proc...

Страница 188: ...t dell apparecchio ed essere facilmente accessibili Non aprire l alloggiamento della cartuccia durante la stampa si rischia la rottura del nastro d inchiostro ed un disfunzionamento della stampante Ut...

Страница 189: ...e dell utente 3 CD ROM 4 Nastro consumabile 5 Carta fotografica consumabile 6 Vassoio per la carta 7 Blocco alimentazione rete 8 Cavo di alimentazione rete Suministro seg n modelo 1 6 4 2 7 8 5 S Use...

Страница 190: ...e 3 Tasto di selezione foto successiva 4 Tasto del numero di copie da stampare 5 Tasto formato foto 6 Tasto di stampa 7 Tasto di annullamento C 8 Tasto carrello 9 Tasto CRYSTAL IMAGE ottimizzazione au...

Страница 191: ...ata nel carrello 4 Numero di copie da stampare 5 Icona della funzione CRYSTAL IMAGE 6 Formato di stampa 7 Icona della funzione eliminazione effetto occhi rossi 8 Errore nastro 9 Errore carta 10 Icona...

Страница 192: ...imentazione previsto a questo scopo Collegare la presa del blocco di alimentazione alla stampante come indicato nella seguente figura Collegare l altra estremit del cavo settore del blocco di alimenta...

Страница 193: ...stampante 2 Togliere la spugna di protezione 3 Estrarre il nastro nuovo dall imballo e assicurarsi che la pellicola sia ben tesa dopo aver rimosso la parte cartonata A 4 Inserire il nastro rispettand...

Страница 194: ...il nastro nuovo dall imballaggio e assicurarsi che la pellicola sia ben tesa dopo aver rimosso la parte cartonata A 4 Aprire lo sportello esterno situato sulla parte destra della stampante 5 Sollevare...

Страница 195: ...con le dita Inserire il consumabile completamente nella stampante Verificare che il blocco di chiusura verde sia abbassato N B in caso di problema assicurarsi che nessun corpo estraneo sia presente n...

Страница 196: ...Togliere la pellicola di protezione 4 Inserir lentamente il consumabile fino ad attivare il sistema di blocco La stampante fotografica ora pronta per la stampa di fotografie digitali Attenzione Manipo...

Страница 197: ...imandiamo al paragrafo Caratteristiche tecniche pagina 40 Utilizzare unicamente i consumabili originali previsti per questa stampante Collocare un massimo di 20 fogli per volta nel vassoio per la cart...

Страница 198: ...nell unit corrispondente e che sia stata introdotta nel senso giusto Attenzione Per effettuare una stampa in ordine crescente delle foto presenti sulla carta di memoria necessario regolare i parametr...

Страница 199: ...SPA OL ITALIANO NEDERLANDS PORTUGU S FRAN AIS SCHEDA RAPPRESENTAZIONE Smart Media SM Memory Stick MS Standard Digital SD Multi Media Card MMC Carte xD CompactFlash Liasse AZUR_IT book Page 13 Mardi 19...

Страница 200: ...rdi in una sola volta effettuare pi volte una piegatura lungo le linee pre tagliate quindi rimuovere con cura i bordi Idea E possibile sovrapporre pi fogli facendo dei piccoli pacchetti per poi ritagl...

Страница 201: ...Idea Il retro pre stampato cartolina permette di inviare rapidamente la fotografia ad amici parenti Idea Premendo il tasto che per 3 secondi possibile reinizializzare la stampante e tornare allo stat...

Страница 202: ...16 Selezionare la fotografia 3 mediante il tasto premere 4 volte Premere il tasto fino a visualizzare la cifra 4 ossia 4 copie Liasse AZUR_IT book Page 16 Mardi 19 avril 2005 12 10 12...

Страница 203: ...gina Si deve ottenere la cifra 1 come quantit di fogli necessari alla stampa Premere il tasto per avviare la stampa CREAZIONE DI UN FOGLIO DI PROVE FOTOGRAFICHE INDICE CON MINIATURE Dopo l introduzion...

Страница 204: ...di seguito si utilizzer 1 foglio per 5 foto stampabili Premere il tasto per avviare la stampa Idea Il provino un modo semplice per visualizzare un anteprima globale delle foto memorizzate nella sched...

Страница 205: ...emplare e la fotografia 16 in 2 esemplari N B le stampe in serie vengono effettuate tutte con lo stesso formato di stampa Selezionare la fotografia 3 mediante il tasto e quindi premere il tasto fino a...

Страница 206: ...di fogli necessaria per stampare appare a destra dell icona carrello Premere il tasto per avviare la stampa N B in caso di errore di selezione dopo aver convalidato mediante il tasto possibile tornare...

Страница 207: ...it PictBridge o la scheda di memoria Procedere alla selezione delle fotografie volute sulla macchina fotografica osservando le istruzioni per l uso della macchina fotografica Inserire la scheda di mem...

Страница 208: ...are una fotografia Selezionare delle fotografie e stamparle pi volte sullo stesso foglio di carta Stampare a partire da un file standard DPOF Seguire la stampa ed in particolare l inizio la progressio...

Страница 209: ...ctBrigde Collegare un estremit del cavo USB alla porta USB della fotocamera e l altra estremit alla porta USB master della stampante punto A della figura a pag 6 La stampante gestita dalla fotocamera...

Страница 210: ...tre trattini N B per conoscere l elenco delle periferiche compatibili consultare il sito www sagem com TRASFERIMENTO A INFRAROSSI Attenzione se si gi iniziato un trasferimento tramite Bluetooth per po...

Страница 211: ...a stampante Al termine di ogni trasferimento il numero totale di fotografie archiviate indicato sul display della stampante quella avente il numero pi elevato l ultima trasferita A questo punto possib...

Страница 212: ...siano sotto tensione Non forzare mai il collegamento dei connettori alle attrezzature Vi un rischio di deteriorare il cavo ed il connettore N B per conoscere l elenco delle periferiche compatibili con...

Страница 213: ...display possibile Attivare la stampa della fotografia trasferita dopo aver eventualmente modificato il formato di stampa ed il numero di copie Oppure trasferire un altra fotografia questa viene aggiu...

Страница 214: ...ti di esposizione ad esempio le foto sottoesposte saranno schiarite oppure le foto con porzioni che presentano forti contrasti saranno compensate La funzione di eliminazione dell effetto occhi rossi r...

Страница 215: ...gramma di installazione la reinizializzazione del computer e l installazione finale della stampante Non connettersi al PC prima di installare il driver di stampa Al termine dell installazione appare u...

Страница 216: ...amite un cavo USB Il riconoscimento delle apparecchiature automatico Utilizzo della stampante La stampante pu funzionare in 2 modalit diverse Modalit Stampa attivata per impostazione predefinita Modal...

Страница 217: ...cheda di memoria tramite il software per ritoccare immagini fornito con la stampante Scollegare la stampante e il PC quindi rimuovere la scheda di memoria dal rispettivo alloggiamento La stampante pu...

Страница 218: ...re da questa modalit e tornare in modalit Stampa premere nuovamente a lungo il tasto finch la schermata illustrata qui sopra scompare N B ad ogni passaggio da una modalit all altra possono venire visu...

Страница 219: ...o o stampanti ma anche sul nostro sito internet www sagem com oppure usufruendo del buono d ordine cartucce fornito assieme alla stampante forniture a seconda del modello Utilizzare esclusivamente con...

Страница 220: ...pressione su blocco verde per togliere la cassetta del nastro d inchiostro 2 Togliere il cassetto per la carta 3 Capovolgere l apparecchio per rimuovere il vano inferiore 4 Pulire con cautela il condo...

Страница 221: ...e riaccendere la stampante attendere 10 secondi finch la testina di stampa si solleva Disattivare la stampante premendo il pulsante O sull interruttore posto sul retro dell apparecchio quindi scolleg...

Страница 222: ...o al paragrafo Inceppamento carta pagina 35 Riavviare la stampa Sul foglio non viene stampata nessuna fotografia Si utilizzano fogli conformi alle specifiche tecniche vi rimandiamo al paragrafo Caratt...

Страница 223: ...di memoria esempio un immagine di 320 x 240 equivalente a 76 800 pixel non apparir nell indice in compenso possibile stampare queste foto a partire da un PC o tramite collegamento diretto a infraross...

Страница 224: ...tituirlo Err 14 Cartuccia Cartuccia assente o inserita in modo errato Verificare che la cartuccia sia inserita correttamente e che il blocco di chiusura sia bloccato Err 21 Nessuna Scheda di memoria F...

Страница 225: ...SIM scaduta La carta SIM gi stata usata Togliere la carta inserita e inserire una carta SIM valida Err 81 Carta SIM Quantit di stampa raggiunta La quantit massima di stampa stata raggiunta procedere a...

Страница 226: ...ta fino a 12 milioni di pixel Dimensioni immagini supportate fino a 6 MB immagine compressa JPEG Consumabili carta fotografica cartuccia inchiostro tre colori giallo magenta ciano e un coating 40 stam...

Страница 227: ...riciclaggio rispettare le regole di raccolta differenziata in vigore localmente per questo tipo di rifiuti PILE E BATTERIE Se il prodotto contiene pile o batterie queste devono essere smaltite negli a...

Страница 228: ...del Cliente L apparecchio in ogni caso coperto da garanzia legale per difetti o vizi occulti ai sensi degli articoli 1490 e seguenti del Codice Civile italiano B Sono esclusi dalla garanzia avarie o...

Страница 229: ...ifetti della rete di trasmissione L esecuzione degli interventi di revisione generale come indicati nel libretto d istruzioni unito all apparecchio e le disfunzioni conseguenti alla mancata esecuzione...

Страница 230: ...Notes fm Page 100 Mercredi 29 septembre 2004 10 40 10...

Страница 231: ...en 14 Voorbeeldsnel afdrukken vanaf een geheugenkaart 15 Een fotoindex maken 17 Een reeks af te drukken foto s voorbereiden Winkelwagentje Functie 18 Afdrukken vanaf een DPOF compatibel randapparaat 2...

Страница 232: ...avril 2005 OSN01001 Be31 doc DOC 31 En cours Travaux en cours URD30 Photo LUs LU AZUR 251 985 569A PHOTO EASY 160 6 langues N erlandais_OK_2 Liasse AZUR_NLTDM fm Liasse AZUR_NL book Page II Mardi 19...

Страница 233: ...eit van uw foto s Met behulp van Crystal Image kunt u bovendien eventuele rode ogen op uw met flits gemaakte foto s retoucheren rode ogen correctie Deze gebruiksaanwijzing geeft een eenvoudige beschri...

Страница 234: ...bij het toestel op een makkelijk bereikbare plaats Het klepje voor het vervangen van het afdruklint mag nooit worden geopend terwijl de printer aan het afdrukken is hierdoor zou de film kunnen breken...

Страница 235: ...ebruiksaanwijzing 3 Cd Rom 4 Afdruklint verbruiksartikel 5 Fotopapier verbruiksartikel 6 Papierlade 7 Netvoedingsadapter 8 Netvoedingskabel levering afhankelijk van het model 1 6 4 2 7 8 5 S Use r gui...

Страница 236: ...e foto selecteren 3 Volgende foto selecteren 4 Aantal af te drukken exemplaren 5 Fotoformaat 6 Afdrukken 7 Annuleren C 8 Winkelwagentje 9 CRYSTAL IMAGE Automatische verbetering van de afdrukkwaliteit...

Страница 237: ...n het winkelwagentje is toegevoegd 4 Aantal af te drukken exemplaren 5 Pictogram van de CRYSTAL IMAGE functie 6 Afdrukformaat 7 Pictogram van de functie rode ogen correctie 8 Lintfout 9 Papierfout 10...

Страница 238: ...n op de netvoedingsadapter Sluit de kabel van de netvoedingsadapter aan op de printer volgens de afbeelding hieronder Steek het andere uiteinde van de kabel van de netvoedingsadapter in een stopcontac...

Страница 239: ...uit 2 Open de klep rechts aan de buitenkant van de printer 3 Haal het nieuwe lint uit de verpakking en zorg dat de film gespannen is nadat u het kartonnenonderdeel A hebt verwijderd 4 Houd het lint in...

Страница 240: ...lm gespannen is nadat u het kartonnen onderdeel A hebt verwijderd 4 Zet de printer aan Wacht 10 seconden totdat de printerkop te voorschijn komt en voer de volgendehandeling uit 5 Schuif het sluitklep...

Страница 241: ...nooit met uw vingers aanraken Installeer de afdruklint volledig in de printer Controleer dat het groene schuifje goed naar beneden zit Opmerking Als dit niet lukt controleer dan of zich iets in de af...

Страница 242: ...oe 3 Trek de beschermvel bovenop 4 Houd de lade voor de desbetreffende opening in de printer Schuif de lade langzaam in de printer totdat het systeem blokkeert De Fotoprinter is nu klaar om uw digital...

Страница 243: ...graaf Technische eigenschappen op pagina 39 Gebruik uitsluitend de voor deze printer bestemde verbruiksartikelen van de fabrikant Plaats niet meer dan 20 vellen papier tegelijk in de papierlade Voorzi...

Страница 244: ...al deze er dan weer uit en kijk goed of u de kaart wel in het juiste slot steekt en of de juiste kant naar boven is gericht Voorzichtig Om de foto s van de memory card in chronologische volgorde te ku...

Страница 245: ...SCH ESPA OL ITALIANO NEDERLANDS PORTUGU S FRAN AIS Kaart Lokatie Smart Media SM Memory Stick MS Standard Digital SD Multi Media Card MMC Carte xD CompactFlash Liasse AZUR_NL book Page 13 Mardi 19 avri...

Страница 246: ...jkanten niet in een keer afscheuren maar ze eerst op de perforatielijn meerdere malen omvouwen om ze voorzichtig los te maken Handig Door een aantal vellen op elkaar te leggen kunt u de randen in klei...

Страница 247: ...te drukken kunt u de foto snel naar vrienden familie enz opsturen Handig Door de toets 3 seconden ingedrukt te houden kunt u de printer herinstalleren en keert u terug naar de standaard status terwijl...

Страница 248: ...at het cijfer 4 verschijnt voor 4 kopie n Druk op de toets totdat de afbeelding 4 afbeeldingen per vel verschijnt Het aantal afdrukvellen moet het cijfer 1 aangeven Druk op de toets om het afdrukken t...

Страница 249: ...al geldige foto s op het scherm Druk op de toets totdat ALL op het scherm verschijnt Selecteer met de toets en het formaat format foto s per vel afdrukk In het hierboven ge llustreerde voorbeeld gebru...

Страница 250: ...foto s op het scherm We willen foto 3 viermaal afdrukken foto 8 eenmaal en foto 16 tweemaal Opmerking Bij het afdrukken van reeksen wordt voor alle foto s hetzelfde afdrukformaat gebruikt Selecteer f...

Страница 251: ...n het winkelwagentje toe te voegen het standaard aantal is 1 Selecteer foto 16 met de toets druk op de toets tot dat het cijfer 2 voor het gewenste aantal verschijnt Druk op de toets om de selectie aa...

Страница 252: ...n automatisch aan het winkelwagentje toegevoegd totdat u de toets met het winkelwagentje loslaat AFDRUKKEN VANAF EEN DPOF COMPATIBEL RANDAPPARAAT Met deze functie kunt u de foto s selecteren die u van...

Страница 253: ...RTUGU S FRAN AIS Start het afdrukken door op de toets te drukken Om de functie DPOF te verlaten drukt u op toets Om terug te keren naar de functie DPOF houdt u de toets 3 seconden ingedrukt C C Liasse...

Страница 254: ...vanuit een bestand De afdruk volgen met name het begin en het einde van de afdruk U kunt ook foutberichten zien papier op papier vastgelopen inkt op deksel niet gesloten geen cartridge fatale fout Ond...

Страница 255: ...kenningsfase wordt Het volgende beeldscherm verschijnt De printer wordt bestuurd door het digitale fototoestel U hoeft op geen enkele knop van de printer te drukken De USB kabel verwijderen om het Pic...

Страница 256: ...t u op de Aan Uit knop totdat er drie streepjes op het scherm verschijnen Opmerking De lijst van compatibele randapparaten kunt u raadplegen op onze website www sagem com INFRAROOD OVERDRACHT Voorzich...

Страница 257: ...n het einde van elk downloadproces wordt het aantal opgeslagen foto s op het printer scherm weergegeven de foto met het hoogste nummer werd als laatste gedownload Op dit moment kunt u de handelingen u...

Страница 258: ...obiele telefoons zakcomputers Pc s e d Zorg dat de apparatuur is ingeschakeld Forceer nooit de aansluitingen van de apparatuur u kunt dan zowel de kabel als de connector beschadigen Opmerking De lijst...

Страница 259: ...ijnen onderstaande gegevens afwisselend op het scherm U kunt Of de gedownloade foto afdrukken nadat u eventueel het afdrukformaat en het aantal kopie n heeft gewijzigd Of een andere foto downloaden di...

Страница 260: ...r worden belichtingsfouten gecorrigeerd zo worden onderbelichte foto s helderder gemaakt of sterk gecontrasteerde gedeelten van de foto gecompenseerd De functie rode ogen correctie retoucheert rode og...

Страница 261: ...het installatieprogramma uitvoeren de computer opnieuw opstarten en de printer installeren Sluit de printer pas op de pc aan na de printer driver te hebben ge nstalleerd Na de installatie wordt u midd...

Страница 262: ...B op onderstaande afbeelding aan op de PC De apparatuur wordt automatisch gesignaleerd Gebruik van uw printer Uw printer kan op 2 verschillende manieren gebruikt worden Modus Afdrukken die standaard a...

Страница 263: ...bewerken met behulp van de met de printer meegeleverde software voor het retoucheren van beelden Koppel de verbinding met het randapparaat los en neem de geheugenkaart uit de gleuf Uw printer kan op...

Страница 264: ...te verlaten en terug te keren naar de modus Afdrukken houdt u de toets ingedrukt tot bovenstaand scherm verdwijnt Opmerking Elke keer dat u een andere modus activeert kunnen er Windows meldingen over...

Страница 265: ...cht maar tevens op onze internetsite www sagem com U kunt ook de bestelbon gebruiken die bij uw printer is geleverd benodigdheden afhankelijk van het model Gebruikt u enkel en alleen toebehoren van he...

Страница 266: ...e papierlade 3 Draai het apparaat om om de onderste klep te verwijderen 4 Maak met een wattenstaafje voorzichtig de verwarmingsbuis van de printkop schoon 5 Plaats de onderste klep draai de printer om...

Страница 267: ...die zich op de achterkant van het apparaat bevindt en trek de stekker uit het stopcontact Draai het apparaat om zodat u bij de onderkant van de printer kunt 1 Verwijder de onderklep 2 Haal voorzichti...

Страница 268: ...pier met de schijnende kant naar boven De foto wordt afgedrukt met een streep over de lengte of met meerdere vlekken Reinig de afdrukkop volgens de aanwijzingen zie paragraaf De printkop reinigen op p...

Страница 269: ...uifje dichtzit Err 21 Geen Geheugen kaart Beschadigd of verkeerd bestand Het bestand is onleesbaar Probeer andere bestanden af te drukken Als de fout aanhoudt controleer dan de bron van het bestand of...

Страница 270: ...n bereikt Vervang het verbruiksartikel Err 82 SIM kaart Kaart kan niet worden Voer uw chipkaart andersom in Err 83 Err 88 SIM kaart Kaart kan niet compatibel Gebruik de met het verbruiksartikel meegel...

Страница 271: ...t Maximaal 1 6 megabyte MB Ondersteunde beeldresolutie Maximaal 12 miljoen pixels Ondersteunde beeldgrootte Maximaal 6 megabyte MB met JPEG beeldcompressie Toebehoren Fotopapier driekleuren lint geel...

Страница 272: ...de regels voor het sorteren van dit soort afval BATTERIJEN EN ACCU S Als uw artikel batterijen of accu s bevat moeten deze op de daartoe aangewezen inzamelpunten worden ingeleverd HET PRODUCT De op he...

Страница 273: ...stallatieproces correct uit te voeren of de gebruiksinstructie s correct op te volgen een externe oorzaak bliksem brand stoot aanpassingen die aan het apparaat zijn gemaakt zonder schriftelijke toeste...

Страница 274: ...Notes fm Page 100 Mercredi 29 septembre 2004 10 40 10...

Страница 275: ...o de mem ria 12 Imprimir as suas fotos 14 Impress o r pida 14 Exemplo de impress o r pida a partir de um cart o de mem ria 15 Criar um ndice 17 Preparar uma s rie de fotos para imprimir fun o selec o...

Страница 276: ...O EASY 160 6 langues Portugais_OK_3 Liasse AZUR_PORTTDM fm 12 MANUTEN O 34 Limpar a cabe a de impress o 34 Congestionamento de papel 35 Incidentes 36 Mensagens de erro 38 Caracter sticas t cnicas 40 1...

Страница 277: ...m remover o efeito olhos vermelhos das fotografias tiradas com flash correc o olhos vermelhos Este guia de utiliza o ajuda lo atrav s de passos simples a Colocar em funcionamento a sua impressora fot...

Страница 278: ...r facilmente acess veis Nunca abra a tampa da fita quando a impressora estiver a imprimir a pel cula poder romper se e provocar um disfuncionamento da impressora Utilize s e exclusivamente consum veis...

Страница 279: ...o 3 CD ROM 4 Fita consum vel 5 Papel foto consum vel 6 Bandeja para papel 7 Adaptador de alimenta o 8 Cabo de alimenta o Acess rios conforme modelo 1 6 4 2 7 8 5 S Use r guid e Livr et d utili sati on...

Страница 280: ...a selec o foto seguinte 4 Tecla n mero de c pias a imprimir 5 Tecla formato foto 6 Tecla de impress o 7 Tecla de anula o C 8 Tecla de selec o 9 Tecla CRYSTAL IMAGE Melhoramento autom tico da qualidade...

Страница 281: ...4 N mero de c pias para imprimir 5 S mbolo da fun o CRYSTAL IMAGE 6 Formato de impress o 7 S mbolo da fun o de correc o do efeito olhos vermelhos 8 Erro fita 9 Erro papel 10 S mbolo do cart o consum...

Страница 282: ...alimenta o previsto para esse efeito Ligue a tomada do adaptador de alimenta o impressora como indicado na ilustra o mais abaixo Ligue a outra extremidade do cabo do adaptador de alimenta o a uma fic...

Страница 283: ...exterior situada na parte direita da impressora 2 Remova a espuma de protec o 3 Tire a fita nova da sua embalagem e assegure se de que a pel cula est esticada depois de ter removido a parte em papel o...

Страница 284: ...art o SIM 3 Retire a fita nova da sua embalagem e certifique se de que a fita est convenientemente esticada depois de ter removido a parte de papel o A 4 Abra a tampa exterior situada na parte direita...

Страница 285: ...da fita com os dedos Insira completamente a fita dentro impressora Verifique que o trinco verde esteja devidamente fechado Nota Em caso de problema verifique que nenhum corpo estranho se tenha introd...

Страница 286: ...seja virado para si 3 Remova a folha de protec o que se encontra por cima do bloco de folhas 4 Apresente a bandeja frente ao seu compartimento Insira o lentamente at ficar bloqueado A sua impressora f...

Страница 287: ...o refere se ao par grafo Caracter sticas t cnicas p gina 40 Utilize apenas os consum veis do construtor previstos para esta impressora N o colocar mais de 20 folhas juntas na bandeja de papel Cuidado...

Страница 288: ...a colocar na fenda certa e no sentido correcto Cuidado Para realizar na ordem crescente das fotos presentes no cart o de mem ria os par metros data e hora devem estar definidos no seu aparelho antes d...

Страница 289: ...H ESPA OL ITALIANO NEDERLANDS PORTUGU S FRAN AIS Cart o Representa o Smart Media SM Memory Stick MS Standard Digital SD Multi Media Card MMC Carte xD CompactFlash Liasse AZUR_PT book Page 13 Jeudi 21...

Страница 290: ...est o picotadas Ap s a impress o n o rasgue essas bordas de uma vez dobre pelo picotado v rias vezes para separar mais facilmente as bordas Ideia As bordas podem ser cortadas juntando v rias folhas I...

Страница 291: ...orma de postal permite lhe enviar rapidamente a sua foto aos seus amigos fam lia Ideia Pressionando a tecla durante 3 segundos poder reiniciar a impressora e voltar ao estado predefinido aquando da in...

Страница 292: ...ione a foto 3 com a tecla 4 press es Pressione a tecla at aparecer o n mero 4 ou seja 4 exemplares Pressione a tecla at obter o grafismo 4 imagens p gina Liasse AZUR_PT book Page 16 Jeudi 21 avril 200...

Страница 293: ...o 1 em quantidade de folha necess ria impress o Prima a tecla para lan ar a impress o CRIAR UM NDICE Ap s a introdu o do cart o de mem ria a quantidade de fotos v lidas aparece no visor Pressione a te...

Страница 294: ...n mero atribuido a cada uma delas PREPARAR UMA S RIE DE FOTOS PARA IMPRIMIR FUN O SELEC O Ap s a introdu o do cart o de mem ria a quantidade de fotos v lidas aparece no visor Queremos imprimir a foto...

Страница 295: ...tado na parte de cima do s mbolo no canto inferior esquerdo indica o n mero de fotos que ser o impressas Seleccione a foto 8 com a tecla prima a tecla para a acrescentar selec o a quantidade predefini...

Страница 296: ...at largar a tecla IMPRIMIR A PARTIR DE UM PERIF RICO COMPAT VEL DPOF Esta fun o permite seleccionar as fotos que pretende imprimir na sua sua impressora foto a partir da sua m quina fotogr fica digit...

Страница 297: ...RLANDS PORTUGU S FRAN AIS Lan ar a impress o pressionando na tecla Para sair do modo DPOF pressione a tecla Para voltar ao modo DPOF mantenha pressionada a tecla durante 3 segundos C C Liasse AZUR_PT...

Страница 298: ...mir a partir de um ficheiro de padr o DPOF Seguir a impress o e nomeadamente o in cio a progress o e o final da impress o Mas tamb m as mensagens de erro que podem ocorrer falta de papel congestioname...

Страница 299: ...a fase de an lise e de reconhecimento aparece o seguinte no visor A impressora dirigida pela m quina fotogr fica digital N o necess rio pressionar as teclas da impressora Retire o cabo USB para sair d...

Страница 300: ...tra os no ecr Nota para conhecer a lista dos perif ricos compat veis consulte o site www sagem com TRANSFER NCIA INFRA VERMELHA Cuidado Se iniciou a transfer ncia por Bluetooth n o poder transferir as...

Страница 301: ...sua impressora No fim de cada transfer ncia o n mero total de fotos armazenadas aparece indicado no ecr da impressora sendo a que tiver o n mero maior a ltima tranferida Pode neste momento efectuar a...

Страница 302: ...mite transformar a impressora foto em receptor Bluetooth autorizando a impress o de fotos a partir dos equipamentos equipados com a tecnologia Bluetooth como os telem veis os assistentes pessoais os c...

Страница 303: ...e longamente a tecla A transfer ncia come a e durante o processo a mensagem bt fica intermitente no visor da impressora No final da transfer ncia as informa es seguintes s o apresentadas alternadament...

Страница 304: ...si o ser o corrigidos por exemplo as fotos sub expostas ficar o mais claras ou as partes da foto que apresentarem fortes contrastes ser o compensadas A fun o correc o do efeito olhos vermelhos retoca...

Страница 305: ...a instala o final da impressora N o ligue a impressora ao PC antes da instala o do piloto de impress o No fim da instala o uma mensagem indicar lhe para reiniciar o PC depois de o reiniciar poder lig...

Страница 306: ...um cabo USB O reconhecimento entre os equipamentos autom tico Utilizar a impressora A sua impressora pode funcionar em 2 modos diferentes Modo Impress o modo pr definido Modo de leitura de cart o de...

Страница 307: ...t o de mem ria com o software de retoque de imagem fornecido com a impressora Desligar a liga o com o perif rico e remover o cart o de mem ria A sua impressora pode funcionar em 2 modos diferentes Mod...

Страница 308: ...press o pressionar longamente a tecla at desaparecer a mensagem mais acima referida Nota cada vez que mudar de modo poder o aparecer mensagens Windows de detec o desconex o de perif ricos USB Liasse A...

Страница 309: ...fia ou s impressoras mas tamb m no site internet www sagem com ou poder utilizar o tal o de encomenda de consum veis fornecido com a impressora access rios conforme modelo Utilize apenas e exclusivame...

Страница 310: ...ara remover a tampa inferior 4 Limpe com cuidado a linha de aquecimento da cabe a de impress o com ajuda da cotonete 5 Coloque de novo a tampa inferior volte a impressora ligue de novo a ficha tomada...

Страница 311: ...ionando o interruptor situado por cima do seu aparelho e desligue o cabo da tomada Volte o aparelho para aceder parte de baixo da impressora 1 Tire a tampa inferior 2 Remova delicadamente a folha pres...

Страница 312: ...grafo Congestionamento de papel p gina 35 Lance novamente a impress o N o ficou nenhuma foto impressa na folha Utilizou folhas em conformidade com as espacifica es t cnicas refere se ao par grafo Cara...

Страница 313: ...exemplo uma imagem de tamanho 320 x 240 equivale a 76 800 p xeis ficar de fora do ndice No entanto as fotos podem ser impressas a partir de um PC ou de uma liga o directa infravermelha ou Bluetooth e...

Страница 314: ...to O ficheiro ileg vel Tente imprimir os outros Se o erro persistir verifique a fonte do ficheiro ou tente com outra fonte Err 22 Aucune Cart o mem ria Erro de decompress o JPEG O ficheiro ileg vel Te...

Страница 315: ...o do consum vel Err 82 Cart o SIM Cart o ileg vel Inserir o cart o no outro sentido Err 83 Err 88 Cart o SIM Cart o ileg vel Utilizar o cart o fornecido com o consum vel Err 89 Cart o SIM Transfer nci...

Страница 316: ...solu o de imagem suportada at 12 Milh es de pixeis Tamanho de imagem suportado at 6 Mega bits imagem comprimida JPEG Consum veis papel de fotografia fita de tr s cores amarelo magenta cian e um verniz...

Страница 317: ...riagem feitas localmente para este tipo de detritos PILHAS E BATERIAS Se o seu produto cont m pilhas ou baterias estas dever o ser depositadas em pontos de recolha designados O PRODUTO O s mbolo de in...

Страница 318: ...di es normais e para o seu uso A t tulo de garantia o seu material ser reparado ou substitu do gratuitamente conforme o procedimento indicado pelo seu revendedor Nenhum material emprestado ser forneci...

Страница 319: ...u acrescentados sem o acordo da SAGEM 7 As falhas devidas utiliza o de produtos ou acess rios n o compat veis com o material OS DIREITOS LEGAIS A BENEFICIO DOS CONSUMIDORES A TITULO DE DISPOSI ES LEGA...

Страница 320: ...Notes fm Page 100 Mercredi 29 septembre 2004 10 40 10...

Страница 321: ...Notes fm Page 100 Mercredi 29 septembre 2004 10 40 10...

Страница 322: ...nc 75512 PARIS CEDEX 15 FRANCE http www sagem com 251985569A Livret utilisateur Document non contractuel User Guide Data subject to change without notice Bedienungsanleitung Dokument ohne vertragschar...

Отзывы: