background image

Maintenance

6-11  

Op

eration

Set

ting

s

Quick usage

Directory

Mainte

nanc

e

Safety

Contents

Installation

Date en cours : 7 mai 2003
\\Sct31nt3\BE31-DOC\DOC 31 - En cours\Travaux en cours\MFL-MFC-MFK\MFC 251274544A_LU MF3610-3620

SMS_Sagem_GB\Maintenance.fm

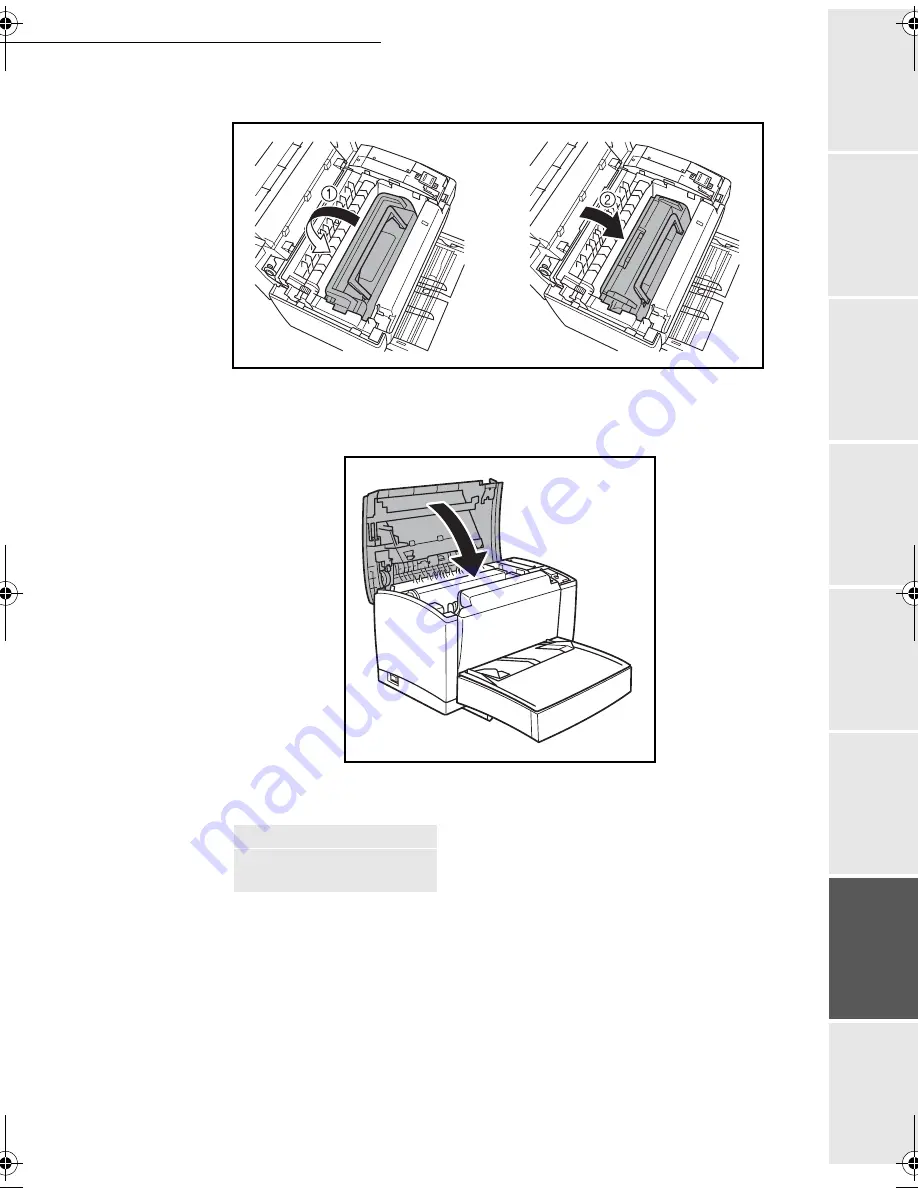
The toner cartridge will click into position once it is correctly installed.

8 - Shut the top flap by pressing it down gently but firmly until it locks into position. Turn the 
printer back on using the switch located on its left-hand-side.

+

Press 

O

K

 on the scanner keypad. The display shows:

 INSERT GAUGE CARD


LIASSE 251274544A.book  Page 11  Mercredi, 7. mai 2003  4:01 16

Содержание MF 3610 SMS

Страница 1: ...t anonyme directoire et conseil de surveillance au capital de 36 044 360 e 562 082 909 R C S PARIS 27 rue Leblanc 75512 PARIS CEDEX 15 FRANCE http www sagem com 251274544 Non contractual document User...

Страница 2: ...cover Document feeder Adjustable paper guide Printer top cover release button Manual feed tray Control panel Scanning cover Scanned document tray Chipcard reader Support option Flat scanner window Fla...

Страница 3: ...ter paper jam icon 6 spare Toner icon On No toner left Blinking toner near end 7 Contrast indicator 8 Colour scanner mode indicator depending on model 9 On indicator Green machine turned on Red proble...

Страница 4: ...send to traditional fax machines via the Internet at a reduced cost thanks to the F x to Fax service This service even gives you the possibility of receiving E mail attachments thanks to its attachmen...

Страница 5: ...RGHO 606 1 11 RQQHFWLRQV 1 12 3ULQWHU FRQQHFWLRQ 1 12 7HOHSKRQH DQG 1 FRQQHFWLRQ 1 13 3RZHU OLQH FRQQHFWLRQ DQG VZLWFK RQ 1 13 8SGDWLQJ WKH FRQVXPDEOHV 1 13 48 86 2 1 1DYLJDWLRQ PHWKRGV 2 1 3UHVHQWDWL...

Страница 6: ...DWH FRQQHFWLRQ WR WKH QWHUQHW 3 16 3URJUDPPHG FRQQHFWLRQ 3 17 HDFWLYDWH WKH QWHUQHW IXQFWLRQ 3 17 7KH 606 VHUYLFH 3 17 LVSOD RI 606 VHQGHU V 3 17 QLWLDOLVDWLRQ SDUDPHWHUV 3 18 6HQGLQJ DQ 606 WR D PREL...

Страница 7: ...DFVLPLOH WHUPLQDO WR D VHUYLFH 5 8 7UDQVPLVVLRQ ZDLWLQJ TXHXHV 5 9 RQVXOW RU PRGLI WKH ZDLWLQJ TXHXH 5 9 PPHGLDWHO SHUIRUP WUDQVPLVVLRQ IURP WKH ZDLWLQJ TXHXH 5 10 3ULQWLQJ D GRFXPHQW LQ ZDLWLQJ RU LQ...

Страница 8: ...1 5HSODFLQJ WKH FRQVXPDEOHV 6 1 5HSODFLQJ FDUWULGJHV 6 2 OHDQLQJ 6 13 OHDQLQJ WKH VFDQQHU V UHDGLQJ GHYLFHV 6 13 OHDQLQJ WKH SULQWHU 6 13 6HUYLFH 6 14 6FDQQHU FDOLEUDWLRQ 6 15 QFLGHQWV 6 15 RPPXQLFDWL...

Страница 9: ...1 1 167 7 21 35 17 5 813 1 7 35 17 5...

Страница 10: ...the plastic bag and peel off the shipping tape from the back of the printer Take the paper cassette out of the plastic packaging and remove the adhesive strip which serves as a protection for the cove...

Страница 11: ...rds in the paper feed inlet as well as the adhesive tape Carefully push the paper cassette as far as it will go into the printer shaft by inserting it into the guide rails on the left and the right se...

Страница 12: ...ay 2 cover Tray 2 Top cover Power switch Second paper cassette unit option Face up Face down selection switch Power cord socket Printer s port connector Drum cartridge Toner cartridge 250 sheet paper...

Страница 13: ...Choose an area where there is no possibility of the printer being splashed with water or other liquids Make sure that the surrounding area is clean dry and free of dust 2SHUDWLRQDO 3UHFDXWLRQV Note t...

Страница 14: ...ectrical shock Do not allow water or other liquids to spill on or near the printer Fire or electrical shock can occur should water or liquid come into contact with the printer Should liquid or any pie...

Страница 15: ...ette with the side to be printed facing upwards Press the paper guides together so that they are close to the edge of the paper and then replace the cover of the paper cassette QVHUWLQJ SDSHU LQWR WKH...

Страница 16: ...ion a If the paper output is to take place at the back of the printer e g if you want to print documents of larger size set the switch to the bottom position b Make sure that the switch is always set...

Страница 17: ...c packaging and all transportation guards Place the printer on top of the base unit Make sure to align the coupling pins of the base unit with the holes located underneath the printer Remove the cover...

Страница 18: ...167 7 21 6HWWLQJ WKH GHWDFKDEOH LWHPV QVWDOODWLRQ RI WKH RXWOHW WUD IRU RXWJRLQJ GRFXPHQW Scanner Outlet tray for out going document Mainpower cord Printer connection cord Printer main power connectio...

Страница 19: ...be found under the scanner unit on the left Raise the scanner unit a little Pull out the unlocking flap see illustration A Remark If it is necessary to transport the scanner unit it is recommended to...

Страница 20: ...lug end of the connection cord 3 into the jack of the fax machine F and the other end into the printer s jack C Plug end of the main power cord 2 into its jack on the fax machine A and the other end i...

Страница 21: ...ur fax machine and the other end into your local network port dedicated to your fax machine 32 5 1 211 7 21 1 6 7 21 Caution Refer to safety procedures in the Safety Chapter Plug end of the main power...

Страница 22: ...dications appear on the screen of the scanner unit Press the OK key and the following will appear on the display As soon as the reading operation is over remove the card The operation is over the card...

Страница 23: ...1 8 86 1 9 7 21 0 7 2 6 35 6 17 7 21 The navigator gives you access to the menus visible on screen 7KH QDYLJDWRU This navigator has 5 keys and allows you to move around within the menus of your machin...

Страница 24: ...xt line in the menu 6 Select the previous line in the menu 5 Go to the following menu OK Return to the previous menu C Confirm and exit from the current menu Exit without confirming from the current m...

Страница 25: ...access 6WHS E VWHS IXQFWLRQ DFFHVV You may print the function list key to know the number of a function The following example describes how to enter your name so that it prints out as a header on your...

Страница 26: ...4 4 MENU 14 CANCEL Name deletion in the directory p 4 5 MENU 15 PRINT Print directory p 4 5 MENU 16 SAVE LOAD Save load directory on microcard 161 SAVE Save directory on microcard p 4 1 162 LOAD Load...

Страница 27: ...echnical parameters p 3 7 MENU 20 GEOGRAPHIC Geographical settings p 3 2 201 COUNTRY Choice of country p 3 2 202 NETWORK Choice of network p 3 3 203 LANGUAGE Choice of language p 3 3 1 Option MAIN MEN...

Страница 28: ...p 5 23 MENU 73 PRINT Print the contents of a Mailbox p 5 22 MENU 74 CANCEL Suppress an empty mailbox p 5 22 MENU 75 PRINT LIST Print list of MBX p 5 22 MAIN MENU 8 ADVANCED FUNCTIONS XQFWLRQV XQFWLRQ...

Страница 29: ...dress 923 SERVERS Setting the SMTP POP3 and DNS p 3 12 9231 SMTP SERVER STMP Server 9232 POP3 SERVER POP3 Server 9233 PRIMARY DNS Primary DNS 9234 SECONDARY DNS Secondary DNS MENU 93 IMMED ACCESS Imme...

Страница 30: ...2 8 Quick usage...

Страница 31: ...ter another the numbers of the required time and date for example for November 8 2003 at 9h33 press 0 8 1 1 0 3 0 9 3 3 then validate by pressing key OK RXU ID QXPEHU Your fax offers to print out your...

Страница 32: ...or PSTN then validate your choice with OK HRJUDSKLFDO VHWWLQJV These settings will enable you to use your terminal in different preset countries and in different languages RXQWU By choosing a country...

Страница 33: ...ramming your fax with the local prefix consists of two steps defining the minimal size or equal of the company s outside numbers defining the outgoing local prefix of the company s telephone network T...

Страница 34: ...n to off peak hours and thus reduce the cost of your communications The economy period giving you a more advantageous rate via the telephone network at off peak hours is preset by default from 6 00 P...

Страница 35: ...the code 4 digits and validate with the key OK FWLYDWH RU GHDFWLYDWH WKH DQVZHULQJ PDFKLQH MENU 382 FAX FAX TAD ACTIVATION Select the required option WITH or WITHOUT and validate your choice with OK I...

Страница 36: ...be transmitted and the relay list number The remote machine will then transmit the document on its own to all subscribers which are on the specified relay list As soon as the relay broadcast has been...

Страница 37: ...w and press OK 3DUDPHWHU 6HWWLQJ 6LJQLILFDWLRQ 1 SCANNING MODE 1 NORMAL 2 FINE 3 SFINE 4 PHOTO Default value of the scan mode resolution for the documents to be transmitted 2 SENDING HEADER 1 WITH 2 W...

Страница 38: ...e 20 CORRECTION MODE 1 WITH 2 WITHOUT ON this parameter helps correct the calls made on disturbed telephone lines It is used when the lines are weak or too noisy Transmission times may be longer 70 IN...

Страница 39: ...n computer configuration If that is administrated by anyone in your company we recommend you ask that person for the settings described below 74 ERASE MAILBOX valid if there is no F x to Fax subscript...

Страница 40: ...you should carry out a manual configuration see below 0DQXDO FRQILJXUDWLRQ To configure you Internet F x manually you should obtain the usual information used to set a peripheral device IP address su...

Страница 41: ...erver or computer system which allows you to connect to the Internet and your mailbox through your telephone line In addition the F x to Fax1 service lets you save money when sending faxes through the...

Страница 42: ...connection IDENTIFIER 1 press OK Enter connection PASSWORD press OK MENU 922 INTERNET INIT MESS SERVICE Enter Email IDENTIFIER press OK Enter Email PASSWORD press OK Enter E MAIL ADDRESS press OK FFHV...

Страница 43: ...ress OK An Internet connection is established every day at 9 00 12 00 and 17 00 default values Modify periodic connection period MENU 943 INTERNET SETTINGS PERIOD Having selected the PERIODIC mode ent...

Страница 44: ...If the device is used by more than one person it is recommended to enter the E mail address of the administrator who is responsible for the fax machine If no special address is defined the address ent...

Страница 45: ...O PC TRANS and press OK select your option from the table below and validate with OK At each connection the number of E mails still present in your mailbox are displayed on the screen WR D You must su...

Страница 46: ...validate your transmission instead of key 17 51 7 211 7 21 An Internet connection is made with an ISP It allows both document sending and reception while connected A connection takes place the follow...

Страница 47: ...t Message Service is used for communication with mobile phones Caution The SMS service is subject to special charges The key on your terminal lets you send this type of short messages to a mobile phon...

Страница 48: ...ur entry Choose the recipient mobile phone number using one of these methods dial the number by means of the numerical keypad enter the first letters of the recipient name press the key until the requ...

Страница 49: ...el transmission refer to paragraph Transmission waiting queues page 5 9 To check the SMS has been sent properly you may print the transmission reception log MENU 52 PRINT LOGS p 2 6 To send an SMS to...

Страница 50: ...3 20 Settings...

Страница 51: ...utor and purchase the optional kit Save This gives you access to functions 161 and 162 refer to paragraph Functions list page 2 4 5 7 1 68 6 5 5 5 25 6 For each subscriber record you are not required...

Страница 52: ...send your correspondents faxes and confirm your choice by pressing the OK key 5 7 1 68 6 5 56 676 A subscriber list is made from the subscriber records already stored For each list fill in the follow...

Страница 53: ...ou must fill in the ID numbers assigned to the subscriber records included in this list There are three ways detailled in the table below to choose and add one or more subscribers to your list Then va...

Страница 54: ...Y SEE OR MODIFY The directory appears in alphabetical order Select the subscriber record or subscriber list L you wish to modify and valildate with OK Modify the line or lines in the subscriber record...

Страница 55: ...ctory including all the existing subscriber record or subscribers lists To print the directory MENU 15 DIRECTORY PRINT The directory is printed in alphabetical order 03257 1 5 725 You can import a tel...

Страница 56: ...d is mandatory the name should not include the field separator character Fax number Your contact s fax number without spaces or dots Can be up to 30 characters long including any and characters This f...

Страница 57: ...smithdirectory01 csv jonesdirectory csv or simply directory csv Create an e mail addressed to your LAN fax s e mail address attach the file to it and send your message via your mail server Your LAN f...

Страница 58: ...he directory MENU 18 DIRECTORY EXPORT Key in the e mail address of the PC or other fax machine to which you want to export the directory You may export a directory to several fax machines simultaneous...

Страница 59: ...ns which take place via the public telephone network are in black and white You can send black and white documents in the TIFF format or colour documents in the JPEG format via the Internet 326 7 21 1...

Страница 60: ...cuments without drawings or small details Document tray Paper guide Place your original documents in the document feeder face down first page under the stack Set the paper guide to the document width...

Страница 61: ...document is too light or too dark If the document is light you must raise the contrast and if it is dark you must reduce it To set the contrast Press as many times as necessary to choose the desired...

Страница 62: ...he machine is parametered to send from the memory refer to paragraph Document feed types page 3 4 Enter the fax or E mail address or use the Directory or key refer to above paragraphs Press key and en...

Страница 63: ...ed and will be sent at the new time 6HQGLQJ LQ WKH FR PRGH This function enables you to send a document automatically when the telephone charges are less expensive low rate times To check the defined...

Страница 64: ...sion report refer to paragraph Main settings page 3 1 for this one the reduced copy of the document first page will not be printed and it notifies you that the communication is manual 75 160 66 21 9 7...

Страница 65: ...e to an E mail mailbox You can also add an attachment to this keypad message the attachment is a scanned paper document Access by the menu MENU 95 INTERNET SEND E MAIL Direct access Press key Then to...

Страница 66: ...me as it will be shown in the application of the recipient the extension will be added automatically If you do not enter a name here a numerical code will be automatically allocated to the attachment...

Страница 67: ...nchangeable immediately perform a transmission from the waiting queue print a document in storage waiting to be transmitted or in deposit print the waiting queue to have the status of each document in...

Страница 68: ...with OK 1 1 75 160 66 21 1 352 5 66 Cancelling a transmission in progress is possible whatever the type of transmission but varies depending on whether the transmission is a single call number or a m...

Страница 69: ...f your machine 5 37 21 9 7 17 51 7 Whatever the document received reception is automatic at each Internet connection You can receive black and white as well as colour documents Incoming documents othe...

Страница 70: ...ory you can perform a calibration To do so refer to paragraph Scanner calibration page 6 15 Moreover a high number of controls let you improve the copy quality Setting parameters for the scanner s 1 E...

Страница 71: ...s you to reduce or magnify a determined part of a document by 25 to 400 Enter the desired zoom value with the numeric keypad ZOOMING Validate your setting by pressing key OK If you wish you can change...

Страница 72: ...n make it lighter Set the desired brightness with keys 3 or 4 Validate your setting by pressing OK 3DSHU Select the type of paper NORMAL or THICK with keys 3 or 4 Validate your setting by pressing key...

Страница 73: ...of the ingoing or outgoing document subscriber s number or E mail address transmission mode Std Fine SFine or Photo number of pages sent or received call duration incoming or outgoing results noted C...

Страница 74: ...ess key MENU then F1 you enter in the menus From this moment all the key pressings are memorized in the key F1 If you are still in the menus press the F1 key to save the sequence When you leave the me...

Страница 75: ...GES received pages MENU 824 ADVANCED FUNCTIONS COUNTERS RECEIVED PAGES 326 7 1 32 1 You may deposit a document in your fax and keep it available to one or more subscribers who can obtain a fax of this...

Страница 76: ...rk You can poll several documents using the key Depending on type of poll you should 0HQX 3URFHGXUH SIMPLE Select FEEDER or MEMORY Select the black and white mode and validate with OK If necessary adj...

Страница 77: ...CK LOCKING CODE Enter your four digit interlock code on the keypad Validate by pressing OK Confirm the interlock code by entering the code one more time Press OK to validate Remark When a code is alre...

Страница 78: ...lways possible for you to transmit documents to an e mail address MENU 95 and for you to connect and go online MENU 93 To access the internet parameters locking menu MENU 814 ADVANCED FUNCTIONS LOCK L...

Страница 79: ...veral documents with a star next to the MBX When the contents of an MBX have been printed it becomes empty delete an MBX only if the MBX is initialised and empty print the MBX fax list You may receive...

Страница 80: ...er menu 3ULQW WKH FRQWHQWV RI D 0 MENU 73 MAILBOXES PRINT Select one MBX out of the 31 MBX or enter directly the number of this MBX validate your choice with OK Enter the code of this MBX if there is...

Страница 81: ...d press OK If you wish to modify the document feed type select one of the options FEEDER or MEMORY and press OK If you wish you may enter the number of pages of your document before transmitting Valid...

Страница 82: ...5 24 Operation...

Страница 83: ...t the machine from direct sunlight Do not attempt to oil the machine Always gently close the cover and avoid vibrations Do not open the cover while printing Never try to dismantle the machine Do not u...

Страница 84: ...LGJH To replace the toner cartridge proceed as shown below When the display shows 1 Turn the printer off using the switch located on its left hand side 2 Fold open the tray on the top cover 3 Press th...

Страница 85: ...printer may become very hot during operation Avoid any contact with it or you may injure yourself 4 Remove the old toner cartridge Caution In order to protect the environment do not throw away the sp...

Страница 86: ...Holding the cartridge by its handle slide it into the printer Ensure that the four pins two on either side are properly aligned with the grooves in the printer Remark Use the colour coded stickers ma...

Страница 87: ...The cartridge will click into position once it is correctly installed 7 Shut the top flap by pressing it down gently but firmly until it locks into position Turn the printer back on using the switch...

Страница 88: ...awing below The display of the scanner keypad shows the following assuming black toner cartridge Press OK The display shows Once the SmartCard has been read the display shows Remove the SmartCard RENE...

Страница 89: ...eck whether the right side of the microchip card was inserted green arrow 5HSODFLQJ WKH GUXP FDUWULGJH To replace the drum cartridge proceed as shown below When the display shows 1 Turn the printer of...

Страница 90: ...ntenance 3 Press the latch of the top cover to open it Caution the fusing unit located inside the printer may become very hot during operation Avoid any contact with it or you may injure yourself Fusi...

Страница 91: ...e toner cartridge from its housing compartment and place it safely out of the way 5 Remove the old drum cartridge and take the new cartridge out from its cardboard box Caution Warning In order to prot...

Страница 92: ...ly aligning the colour labels Ensure that you insert the drum cartridge as far as possible into the printer 7 Holding the toner cartridge by its handle slide it into the printer Ensure that the four p...

Страница 93: ...he toner cartridge will click into position once it is correctly installed 8 Shut the top flap by pressing it down gently but firmly until it locks into position Turn the printer back on using the swi...

Страница 94: ...black toner cartridge Press OK on the scanner keypad The display shows Once the SmartCard has been read the display shows Remove the SmartCard Caution If the following message appears check whether th...

Страница 95: ...surfaces and inside the printer can interfere with printer performance Clean the printer regularly Caution Use a soft cloth to clean the printer Never use abrasives or corrosive detergents The fusing...

Страница 96: ...ean the rubber area of the paper feed roller with a soft cloth Caution The fusing unit inside the printer can become very hot during operation Do not touch the area to avoid injury 6 Reinstall the dru...

Страница 97: ...ce between waiting until the transmission takes place at the given time restarting the transmisssion immediately by pressing the document still present abandoning transmission by pressing To eject the...

Страница 98: ...et is jammed Code 06 Printer default An incident occurred in the printer part no paper paper jam opened cover In the reception mode this incident appears only if the reception parameter no paper is sw...

Страница 99: ...ber has stopped The communication has been stopped by your subscriber Example a fax wanted to poll your fax but there is no document deposited Code 1A Disconnected The transmission has not started The...

Страница 100: ...VVDJHV If the colour printer has one of the problems described below the signal On flashes red and you can t use your fax temporarily The corresponding message is displayed on the screen 0HVVDJH FWLRQ...

Страница 101: ...d open the top cover Remove the toner cartridge and the drum cartridge Clear the paper misfeed using one of the following procedures depending upon the location of the paper misfeed PAPER JAM INTERNAL...

Страница 102: ...e and the toner cartridge refer to paragraph Replacing cartridges page 6 2 Close the top cover and press it down gently but firmly until it locks into place Outside of the printer In the vicinity of t...

Страница 103: ...he cassette and the paper compartment option 6 11 5 1 176 6KHHW IHHG VFDQQHU SDSHU MDP When a paper jam occurs the following message appears on the control panel screen REMOVE DOCUMENT If jams often o...

Страница 104: ...and during scanning REMOVE DOCUMENT appears on the screen and the On signal is red Remove the document or press key Check the thickness of the document 50 sheets of paper of 80 g m2 Iron out the sheet...

Страница 105: ...30 W standby 75 W operation 500 W during printing Operating temperature 10 C to 35 C Operating humidity 20 to 80 RH non condensing Original document size Width 216 mm max Height 297 mm Thickness 0 05...

Страница 106: ...nternet general specifications TCP IP PPP protocols SMTP POP3 MIME protocols for e mail TIFF F file format black and white documents JPEG colour documents Imaging toner cartridge The standard toner ca...

Страница 107: ...instructions Depending on the model the unit s mains plug may be the only way to disconnect the unit from the power network Therefore you must respect the following Your unit must be connected to a ma...

Страница 108: ...7 2 Safety...

Отзывы: