background image

54

Appendix

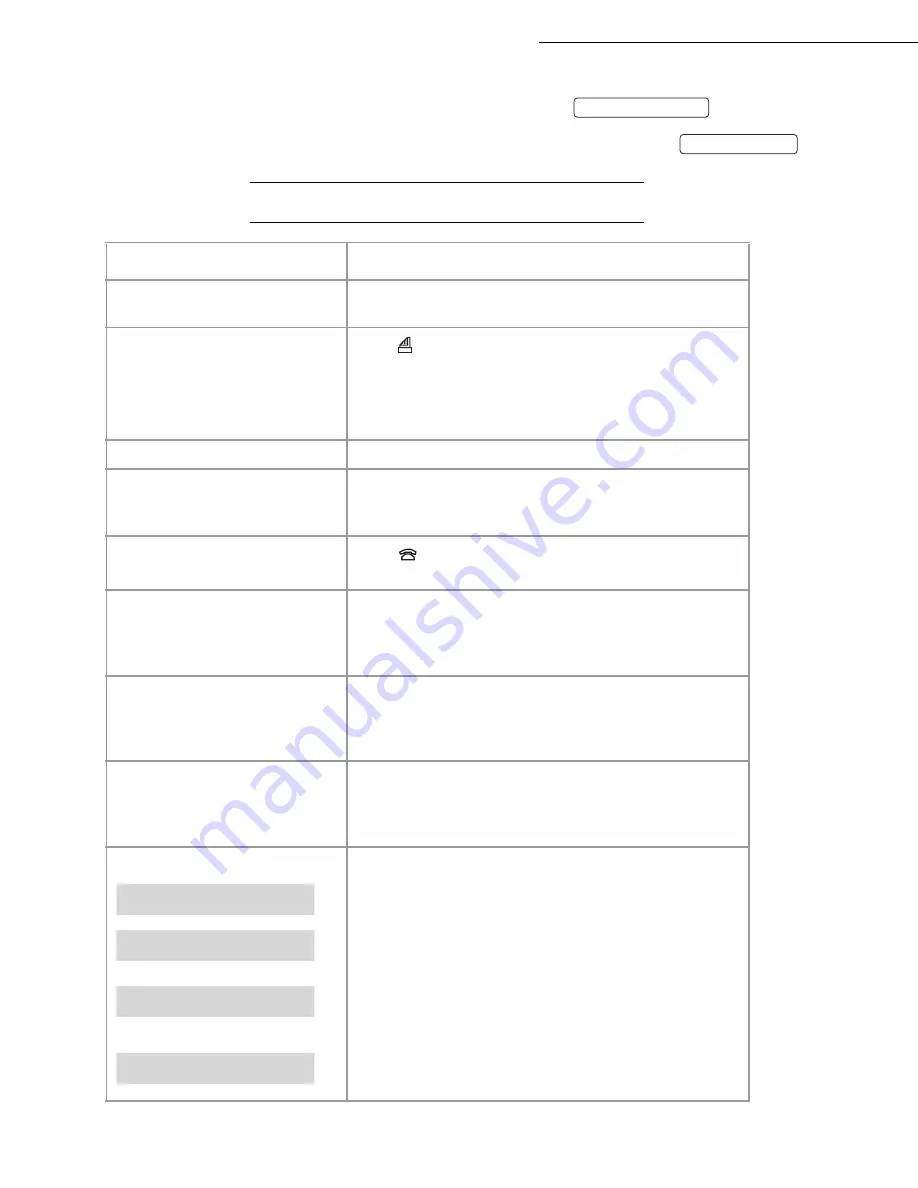
The gauge card displays on the screen, after each printing, the percentage of remaining ink ribbon. If the

gauge is not installed or not properly installed, the unit displays: 

.

If you forgot to change the gauge at the same time as the ribbon, the unit displays: 

.

7

528%/(6+227,1*

MISSING GAUGE

GAUGE EMPTY

)DLOXUHV

5HPHGLHV

• The screen remains blank.

• Check  that  the  power  cord is  correctly connected on both its

sides.

• The machine does not answer the

call.

• The 

 icon may be off: check the reception mode.

• Check the number of rings (please refer to § Number of rings

for the auto mode on page 15).

• Configure the machine on "private network" (please refer to

§ Type of network on page 14).

• The printed photocopy is blank.

• The document was placed upside down in the document feeder.

• The telephone exchange does not

recognise the number you have
called.

• Check that the telephone line cord is correctly connected to the

device.

• Check the telephone line and the phone outlet.

• The machine does not ring.

• The 

 icon flashes: restore ringing (please refer to § Ringing

melody on page 13).

• The telephone does not work.

• Check that the power cord is correctly connected on both its

sides.

• There may be a power failure.
• Check the telephone line and the phone outlet.

• One or several vertical black strips

appear on the documents copied or
received by your party.

• Open the front cover and clean the scanning device (analysis)

located in front of the white roller with a soft lint-free rag
soaked with alcohol. After cleaning, close the front cover and
make a copy to check that the black strips have disappeared.

• The gauge card housing has

unclipped.

• You may easily put it back into place: approach the gauge card

housing, striations downwards, and position both axes towards
the slots of the housing lower part, then push until clipping
(please refer to § Replacement of consumables on page 51).

The screen displays:

• Put paper into the paper feeder.

• Close the rear cover.

• Open the rear cover to access to the paper path and remove the

sheet of paper. Make sure the rear cover is properly closed
afterwards.

• The last printed documents show a lot of black smears, the

printer temperature is too high. Wait a few moments for it to
cool.

OUT OF PAPER

PRINTER COVER

PAPER JAM

OVERHEATING

A

Содержание Internet Phonefax 2390@

Страница 1: ...User s manual 17 51 7 3 21 70 7 20...

Страница 2: ...2YHUYLHZ Rear cover PC connector DECT kit module Telephone line connector Handset connector Front cover Control panel Rear cover Handset OR PC connector Access door to paper and Document feeder QWHUQ...

Страница 3: ...n or local copy 14 INTERNET key transmission via the Internet 15 STOP key stop of the operation in progress or activation of the secret mode 16 LOUDSPEAKER key hands free mode or speaker mode 17 key m...

Страница 4: ...ORDGLQJ WKH GLUHFWRU 6 77 1 6 0 18 DWH 7LPH 1XPEHU 1DPH 5LQJLQJ PHORG DQG NH EHHSV 1HWZRUN 1LJKW PRGH 1XPEHU RI ULQJV IRU WKH DXWR PRGH RUGOHVV SKRQH 3URWHFWLRQ RI RXU PDFKLQH 0 18 QVHUWLQJ WKH GRFXPH...

Страница 5: ...QWHUQHW VXEVFULSWLRQ 7UDQVPLVVLRQ 5HFHSWLRQ RQ WKH LQWHUQHW 6HWWLQJV 237 216 LVSOD 8VLQJ WKH 5 NH RQQHFWLRQ WR D 3 33 1 5HSODFHPHQW RI FRQVXPDEOHV 7URXEOHVKRRWLQJ RGHV RI WKH WUDQVPLVVLRQ UHSRUW 7HFKQ...

Страница 6: ...NAME Enter your number and name 13 M 23 OK MELODIES BEEPS Choose the ring melody and key beeps 13 M 231 OK MELODY Choose the ring melody M 232 OK BEEPS Choose the key beeps M 233 OK ALARM Switch alar...

Страница 7: ...44 OK DELETE MSG Delete the voice messages 25 M 45 OK TYPE Select the type of TAD 24 M 46 OK FILTERING Select the call filtering feature 26 M 47 OK PRIVIL ACCES Select the privileged access mode 26 M...

Страница 8: ...smission to a fax machine via the Internet Translation of the attachments 39 M 83 OK CARD CODE Register the Services card 39 3UHVV XQFWLRQ FDOOHG XQFWLRQ GHVFULSWLRQ 6HH SDJH M 91 OK PROVIDER Choose t...

Страница 9: ...Quick reference guide menu guide...

Страница 10: ...NOTE POUR L IMPRIMEUR Ins rer ici les consignes de s curit R f 23226033 4 voir sp cification technique du LU 23260056 2...

Страница 11: ......

Страница 12: ...u make please refer to the section entitled INTERNET MENU 9 on page 41 The installation of your machine and the operation of all of its functions and features require a telephone socket and a mains so...

Страница 13: ...ality you should observe the following basic instructions use perfectly new paper without folds or rolled edges do not reload the paper tray while printing is in progress always remove all the pages l...

Страница 14: ...cover 3 Prepare a stack of plain paper 100 sheets maximum Place the paper stack into the feeder 4 Close the feeder cover 3 To open the cover 1 use notch 2 on the side Lift the paper support bracket 3...

Страница 15: ...call is a fax call it automatically switches to the fax reception mode if the call is a voice call the caller will be able to leave a message on your TAD You can set the number of rings before your ma...

Страница 16: ...RQV Press the M key 6XE PHQXV DFFHVV WR IXQFWLRQ VHWWLQJV Press the key to select the previous menu line Press the key to select the next menu line Press the OK key to confirm and go on to the next me...

Страница 17: ...Press the M 5 1 and OK keys or the F3 and OK keys The menus are classified in their order of function number please refer to the section entitled QUICK REFERENCE GUIDE MENU GUIDE The functions are cl...

Страница 18: ...eys to adjust the volume Press the key again to de activate loudspeaker listening DQGV IUHH PRGH RQ KRRN OLVWHQLQJ Dial your party s number Press the key the machine dials automatically You can use th...

Страница 19: ...y Press that key again to resume your conversation 5 25 1 During a handset call you can record the conversation Press the M and keys recording starts To stop recording press 5 5287 1 To reroute a call...

Страница 20: ...r fax number Press the OK key to confirm If your fax machine is in the premises of a company it may be connected to a private automatic branch exchange PABX Some of these telephone exchanges require t...

Страница 21: ...ys Then you can pick up the handset or press to call them or place a document in the document feeder and press to fax the document or place a document in the document feeder and press to send them an...

Страница 22: ...er associated to the record is a phone number Press OK select the ringing melody you want to associate to the calls of this party using the or keys and press OK again to confirm Choose FAX CALL if the...

Страница 23: ...12 Directory Menu 1...

Страница 24: ...mber and press OK to confirm and go on to the next field Enter your name and press OK to confirm 5 1 1 0 2 1 36 You can choose between 4 melodies or NO MELODY and adjust the volume of the selected mel...

Страница 25: ...operation WITH prefix or PSTN operation WITHOUT prefix To set the local prefix PRESS M 2 4 2 OK Select the WITH option using the or key and press OK to confirm Enter the number used by your PABX to ac...

Страница 26: ...6 A number specific to each handset appears on its display screen 5 67 5 1 25 66 3 21 PRESS M 2 7 2 OK The main unit s screen displays the numbers for the registered handset Enter the number correspo...

Страница 27: ...voice messages Type 0 or if you have a personal mailbox enter its number please refer to the section entitled ADVANCED FUNCTIONS MENU 7 on page 33 and press the OK key Enter the remote interrogation c...

Страница 28: ...document feeder The last sheet in the stack will be sent out first The document feeder 1 receives up to 15 pages Insert the document printed face down into the document feeder If necessary adjust the...

Страница 29: ...ax number of the first addressee or select it from the directory Press the OK key to confirm Dial the fax number of the next addressee or select it from the directory Press the OK key to confirm Repea...

Страница 30: ...M 3 4 OK Select the required option using the or WITH a transmission report is printed if there has been no transmission problem or if it is defi nitively aborted i e after 6 unsuccessful attempts So...

Страница 31: ...ve are printed at once if there is paper in the feeder Press OK to confirm 5 027 66 2 7 16 5 1 0 1 If you are away and have a fax machine where you are set to the tone dialling mode you can retrieve a...

Страница 32: ...it This requires that your machine be set to the automatic mode PRESS M 3 3 OK Select one of these two options using the or key SINGLE POLLING the document will be deleted from the memory as soon as i...

Страница 33: ...ing the operating mode on page 4 Press the key to print the document 23 5 7 21 7 3 21 You can connect a SAGEM cellphone GSM to your machine which will enable you to send or receive faxes via your cell...

Страница 34: ...ring recording machine the answering recording machine s greeting message is pre recorded You can change it by recording your own greeting message 16 5 1 5 25 1 0 1 5HFRUGLQJ WKH JUHHWLQJ PHVVDJH PRES...

Страница 35: ...Press the key For each message being listened to the screen displays the sequence number together with the date and time of reception While listening to the messages you can press the following keys...

Страница 36: ...tion is not available to interrogate your TAD remotely you should first enter a remote access code which is shared with the fax answering machine so that you can also print out the faxes received Plea...

Страница 37: ...se a code which you will give to those persons who may call you at a given moment e g your collaborators during a meeting or your close relatives from a certain time 6HWWLQJ WKH FRGH PRESS M 4 8 OK En...

Страница 38: ...pressing Listen to the same message by pressing Go back to the previous message by pressing twice Delete the received messages by pressing then Record your greeting message by pressing then and stop...

Страница 39: ...28 TAD Menu 4...

Страница 40: ...ommunications 5 725 PRESS M 5 3 OK Prints the directory 6 77 1 6 PRESS M 5 4 OK Prints the list of your machine s settings 7 67 75 160 66 21 5 3257 PRESS M 5 5 OK 2 23 3 272 23 Insert the document to...

Страница 41: ...The ribbon gauge shows the percentage of ribbon available 35 17 1 7 6 7 5 725 PRESS M 5 8 OK Prints the Web site directory For any information on the Web site directory please refer to Creating and au...

Страница 42: ...X POL ACTIVE POLLING TO A MAILBOX Select the required command using the or key Press the OK key to execute it 02 1 25 2168 7 1 7 48 8 PRESS M 6 2 OK Select the command you want to consult or modify us...

Страница 43: ...each pending document the sequence number of the pending operation the addressee s name the scheduled transmission time the type of pending operation the number of pages in the document and its size...

Страница 44: ...emotely and or protect it FWLYDWLQJ WKH DFFHVV FRGH Using the or key choose between WITH to protect your mailbox by means of the access code WITHOUT to disable protection Press OK to confirm 5HFRUGLQJ...

Страница 45: ...ur message and press OK to confirm 3ROOLQJ D SDUW V PDLOER If your party has a compatible machine you can poll the documents he she has received in his her mailbox To do so follow this procedure PRESS...

Страница 46: ...fax you receive 11 RX LOCKUP lock up the fax reception speed 20 REDUCE MODE choose the printing reduction mode received faxes local copies automatic or manual 21 REDUCE RATE set the printing reductio...

Страница 47: ...d your machine did so before you and is playing your TAD s greeting message press then 0 to switch off the TAD 6 7 1 72 5 37 21 02 If you take the line from an extension set and you cannot hear anyone...

Страница 48: ...tory It contains addresses to specific Web sites selected by your machine news travelling culture leisure sport weather This directory is automatically created as you first connect to the Internet ple...

Страница 49: ...nt to print out the page using the and keys Press the key Your fax connects and automatically prints out the relevant Web page PPHGLDWHO SULQWLQJ D HE SDJH LQ WKH PDQXDO PRGH Press the key and type th...

Страница 50: ...t the required Web site using the and keys and press OK to confirm Press OK to confirm deletion Internet Printing is a free of charge service you will only be charged for calls SAGEM SA reserves the r...

Страница 51: ...40 Services Menu 8...

Страница 52: ...l feature your Internet mailbox through which you will be able to get connected to the Internet XQFWLRQV DYDLODEOH YLD WKH QWHUQHW The advantage to send your faxes and messages via the Internet is pla...

Страница 53: ...4 sets of 3 digits max e g 193 252 13 0 which identify the servers of your access provider on the Internet SMTP servers used for sending your messages POP3 server for receptions in your mailbox server...

Страница 54: ...r voice messages deposited in your Internet mailbox PPHGLDWH FRQQHFWLRQ You have two immediate connection alternatives available Access through the menu PRESS M 9 2 OK Access through the keys Press th...

Страница 55: ...l address PRESS M 9 4 OK Type the e mail address and press OK to confirm Pick up the handset and record your voice message Hang up the handset after the recording To enter the character press the Ctrl...

Страница 56: ...our TAD 6 77 1 6 35 17 1 287 17 51 7 6 77 1 6 The Internet settings can be printed out through two menus PRESS M 9 5 4 OK or PRESS M 5 4 OK this will print out all the machine settings 855 17 6 77 1 6...

Страница 57: ...n your fax machine PRESS M 9 6 OK Then choose one of the following three options using the or key and press OK to confirm F X ONLY all mail is received by your fax machine PC ONLY all mail is kept in...

Страница 58: ...nter the remote access code of the fax voice answering machine if not already done and press OK to confirm If you choose WITH RELAY and press OK to confirm all your messages will be relayed to an e ma...

Страница 59: ...48 Internet Menu 9...

Страница 60: ...all details can be reviewed from the base station and from the handset To review the list from the base station Press M then The display shows details of the last call Use the and keys to scroll throu...

Страница 61: ...is displayed 86 1 7 5 5 If your machine is connected to a private network PABX this key usually enables you to transfer a call refer to the automatic switchboard documentation 211 7 21 72 3 When conne...

Страница 62: ...bbon enables the unit to print on normal paper Only use the ink ribbon matching the manufacturer s specifications To use other types of ink ribbon could damage the unit and invalidate the guaranty Doc...

Страница 63: ...rip 2 Position the right hand white end of the main roller onto the retractable axis Position the left hand green end of the main roller onto the left axis OR Pull off the adhesive strip 2 from the in...

Страница 64: ...ing 7 Push downward on the gauge card housing to unlock it it opens automatically letting you access the worn gauge card Remove the worn gauge card 8 from its housing Remove the new pre cut gauge 9 fr...

Страница 65: ...please refer to Ringing melody on page 13 The telephone does not work Check that the power cord is correctly connected on both its sides There may be a power failure Check the telephone line and the p...

Страница 66: ...Active polling You tried an active polling while the remote terminal had no polled document Code 0B Difference between the number of pages forecast at transmission and the number of pages sent Check...

Страница 67: ...the POP3 server is impossible Establishing a communication with the POP3 server recovering the mail is impossible the service is momentarily unavailable If the failure is systematic check the Internet...

Страница 68: ...available in packets of 500 sheets SAGEM series 300 paper Reference 23273604 9 5LEERQ SDSHU ORW To simplify your orders a lot grouping one TTR815 ribbon and 250 SAGEM series 300 sheets of paper has b...

Отзывы: