the
Quick Touch
™
Crisp
Instruction Book - BMO700
Страница 1: ...the Quick Touch Crisp Instruction Book BMO700...
Страница 2: ...s shown on the rating label on the underside of the appliance If you have any concerns please contact your local electricity company Your Sage by Heston Blumenthal appliance includes a BS 13 amp mould...
Страница 3: ...a 13 amp fuse should be used Remove and safely discard any packaging material and promotional labels before using the Sage microwave oven for the first time To eliminate a choking hazard for young chi...
Страница 4: ...any parts Do not place or store anything on top of the microwave oven Always ensure the microwave oven is turned off at the power outlet and the cord is unplugged from the power outlet before attempti...
Страница 5: ...e any item on top of the oven when in use and when stored Do not touch hot surfaces Appliance surfaces including the door and outer surface of the oven are hot during and after operation To prevent bu...
Страница 6: ...above and persons with reduced physical sensory or mental capabilities or lack of experience and knowledge if they have been given supervision or instruction concerning use of the appliance in a safe...
Страница 7: ...the power outlet and remove the power cord if detachable from the appliance and allow all parts to cool Do not place this appliance on or near a heat source such as hot plate oven or heaters Position...
Страница 8: ...ion of the turntable and result in food being unevenly cooked Liquids or other foods must not be heated in sealed containers since they are liable to explode Some containers and or plates may appear s...
Страница 9: ...ven To avoid burns or scalding after heating the contents should be stirred or shaken and the temperature checked before serving Always ensure the temperature of food or drink which has been heated or...
Страница 10: ...at the power outlet Keep the door closed to stifle any flames Do not attempt to operate the microwave oven by any method other than those described in this instruction book Do not disconnect the micro...
Страница 11: ...and that there is no damage to the 1 Door bent 2 Hinges and latches broken or loosened 3 Door seals and sealing surfaces Do not put any foreign material between the door and door jam of the microwave...
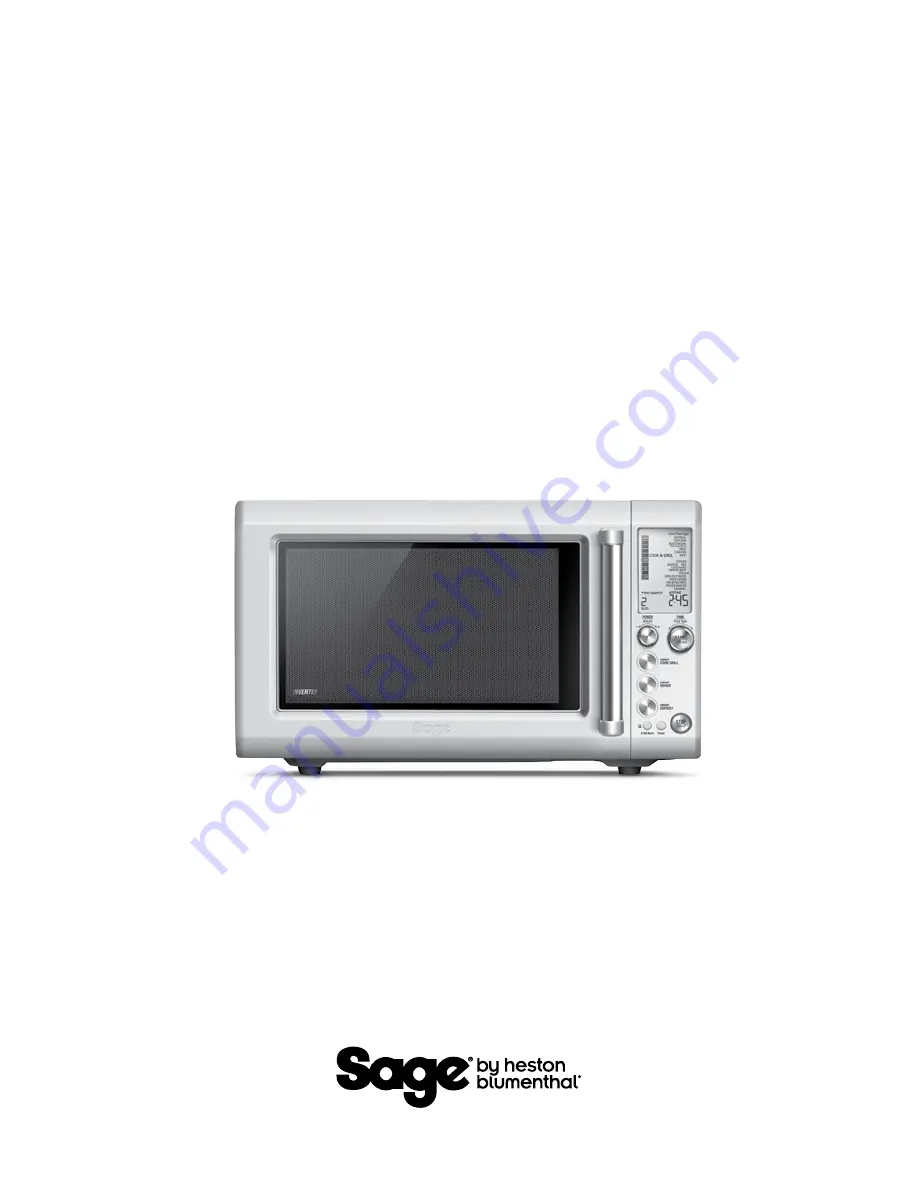
Страница 12: ...ICROWAVE INPUT POWER 1450W MICROWAVE OUTPUT POWER 900W 2450MHz OUTSIDE DIMENSIONS 306mm H 513mm W 443mm D with handle 397mm D without handle TURNTABLE DIAMETER 315mm CRISPER PAN DIAMETER 300mm NET WEI...
Страница 13: ...to choose from a range of common food types with predetermined times and power levels for selected weights I STOP CLEAR button Press once to pause without cancelling the program Press twice to clear...
Страница 14: ...urntable on top of the turntable roller matching the indents of turntable roller at the centre area INSTALLATION AND TURNING ON THE MICROWAVE OVEN 1 Select a level surface that provides enough open sp...
Страница 15: ...s are hot during and after operation This accessory is only to be used with the BMO700 WARNING To avoid an electrical circuit overload it is recommended that no other appliances are plugged into the s...
Страница 16: ...E A Bit More Timer SMART DEFROST SMART REHEAT SMART COOK GRILL The minute digits will flash indicating they can be changed Turn the TIME dial to adjust the minutes and press START to confirm Amount PO...
Страница 17: ...ll sound the BEEP VOL selected Press START button to confirm Amount POWER Food Type TIME SMART DEFROST SMART REHEAT SMART COOK GRILL NOTE If you forget to press START to confirm BEEP VOL the volume le...
Страница 18: ...the clock has been set STANDBY will not be displayed on the LCD screen Stand by mode when the clock is set To wake up the microwave press any button turn any dial or open the door INDEPENDENT KITCHEN...
Страница 19: ...timer press STOP CLEAR button once Press START to resume timer To clear the timer and return to the default screen press STOP CLEAR button twice Amount POWER Food Type TIME A Bit More Timer SMART DEF...
Страница 20: ...he LCD for 2 seconds then disappear MANUAL POWER TIME ADJUSTMENT SMART SETTINGS SHORTCUT SETTINGS Smart Settings and Shortcut settings have pre determined cook times and power levels to give the best...
Страница 21: ...ating icon will no longer be displayed and the words FAN ONLY will flash on the screen Heating Cooling Fan STOP CLEAR Press STOP CLEAR once to pause the current function Press twice to clear and retur...
Страница 22: ...is turned the arrow shifts and points to what food type is selected Amount POWER Food Type TIME SMART DEFROST SMART REHEAT SMART COOK GRILL Amount POWER Food Type TIME A Bit More Timer SMART DEFROST S...
Страница 23: ...been selected the PREHEAT PAN option will appear Turn the TIME FOOD dial to toggle between yes or no Press START to confirm your selection Amount POWER Food Type TIME A Bit More Timer SMART DEFROST S...
Страница 24: ...nce the pan has completed preheating or if preheating phase is skipped the microwave will prompt you to place food on pan Amount POWER Food Type TIME SMART DEFROST SMART REHEAT SMART COOK GRILL Turn A...
Страница 25: ...safe bowl Do not cover the bowl Add corresponding water amount E g if you are cooking 100g of oats you will need 500ml water For creamy oats use 1 part oats to 5 parts water See Oats table on this pag...
Страница 26: ...sition by following the prompts in the SMART COOK MEAT setting Once the pan has completed preheating carefully remove the hot crisper pan from the microwave using ovenproof mitts Arrange meat on the p...
Страница 27: ...plastic lid or vented microwave safe plastic wrap but do not seal Turn the AMOUNT dial to select weight and press START to begin cooking During the cook program the microwave will beep and will flash...
Страница 28: ...TART to continue At the end of the cooking cycle allow potatoes to stand for 5 minutes in the crisper pan before removing and serving Veg Fresh The SMART COOK FRESH VEG setting is suitable for all typ...
Страница 29: ...AMOUNT dial to select weight and press START to begin cooking Halfway through the cook program the oven will beep and will flash stir turn food Pause and carefully pull out the crisper pan Stir nuts r...
Страница 30: ...sh gently in a sieve to remove any grit and dirt Shake to remove excess water and pat dry with a paper towel Line crisper pan with 2 layers of paper towel measure herbs and place onto the crisper pan...
Страница 31: ...cook program the oven will beep and will flash stir turn food Pause and carefully pull out the crisper pan Re arrange food so that the food in the centre of the pan is moved to the outside and vice ve...
Страница 32: ...REHEAT SMART COOK GRILL Amount POWER Food Type TIME A Bit More Timer SMART DEFROST SMART REHEAT SMART COOK GRILL After selecting FOOD TYPE turn AMOUNT dial to adjust quantity or weight Amount POWER Fo...
Страница 33: ...thicker ends are positioned towards the outer edges of the crisper pan Place crisper pan in the centre of the turntable in the upper position Halfway through the reheat program the oven will beep and...
Страница 34: ...r even reheating place food onto a microwave safe plate or into a bowl Cover food with a vented microwave safe lid or vented microwave safe plastic wrap Halfway through the reheat program the oven wil...
Страница 35: ...Label the packs with type and cut of meat date and weight Remove any packaging and bags from frozen meats before defrosting Shield thin ends of chops steaks or chicken with foil to prevent overheatin...
Страница 36: ...refrigerate until completely thawed Soup The SMART DEFROST SOUP setting is suitable for defrosting frozen homemade or store bought soups directly from the freezer approx 18 C Remove soup from any pack...
Страница 37: ...ILL REHEAT SMART DEFROST or shortcut setting For example 1 User presses the SMART REHEAT button Amount POWER Food Type TIME A Bit More Timer SMART DEFROST SMART REHEAT SMART COOK GRILL 2 Using the TIM...
Страница 38: ...reheat defrost or shortcut setting At the press of a button your favourite program can be duplicated time after time 1 Set the microwave to your favourite setting 2 Press and hold the FAVOURITE FAVOUR...
Страница 39: ...in the centre of the turntable in the upper position 5 Turn the TIME dial to the grill time and press START to begin cooking Beverage The shortcuts BEVERAGE setting is suitable to reheat hot drinks s...
Страница 40: ...0 400g in weight Cook times are based on potatoes at room temperature approx 20 C 1 Wash potatoes to remove dirt and residue from the surface Pat dry and prick 4 5 times with a fork 2 Arrange potatoes...
Страница 41: ...d and the bread is crisp and golden This setting is suitable for any type of bread such as sliced white bread or thick grained sourdough For best results liberally apply butter or your spread of choic...
Страница 42: ...od Pause and carefully remove the cooking bowl from the microwave using oven proof mitts CAUTION Melted sugar is extremely hot and will burn if it comes into contact with the skin Always practice extr...
Страница 43: ...ll beep and will flash Stir turn food Pause and stir chocolate and press START button to continue NOTE At the end some of the chocolate may still hold their shape stir until completely melted and smoo...
Страница 44: ...rgy creates heat in the outer layer this then moves to the centre by conduction as it does with conventional cooking SOME IMPORTANT TIPS FOR MICROWAVE COOKING To help equalize energy in the food so th...
Страница 45: ...etc used in the microwave oven should always be microwave safe Check if stated on the underside of the utensil or contact the manufacturer To test if a container plate or dish is microwave safe place...
Страница 46: ...the microwave with a soft damp cloth The turntable roller may be washed in mild soapy water rinse in clean water and dry thoroughly When removing the turntable roller from the cavity floor for cleani...
Страница 47: ...or switched on Fuse blown or circuit breaker problem Trouble with outlet Unplug put the plug in again and switch on Replace the fuse or reset circuit breaker Have a professional check that the outlet...
Страница 48: ...Registration also makes it easier to get support and advice on any questions or issues that you might have in the future If you wish we can also send you free recipes and additional hints and tips on...