


Whole House Filter Installation Overview
General:
When installing a water softener and a filter together, always install the filter first. Be sure to test the
water since you will need this information to properly program the control valve.
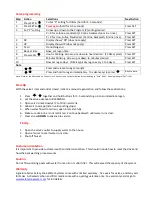
Installation procedures
1.
Locate the main water line, and install the unit before the water heater
and near a 110 volt power source (for automatic models).
2.
Determine where the drain is to be located and install the drain using ¾” or
1” PVC or ½” drain line tubing. If ½” tubing is used do not extend the
length past 15 feet, which may restrict the flow. (Automatic models only.)
No drain needed with non-electric models.
3.
Close inlet and outlet on the valve.
4.
Valves have been programmed. Check settings for your application.
5.
Put the valve into a manual regeneration to make sure the cycles are
functioning correctly. (Press arrow
UP
and
DOWN
together and hold for 3
to 5 seconds to go into an immediate manual regeneration.
6.
This will start you up in
backwash.
7.
Open the inlet slowly. Once water runs to drain, open the inlet fully.
8.
Continue backwash until the drain water runs clear.
(This may take some time.)
Press arrow
DOWN
to advance to service.
9.
When the valve goes into service, open outlet on the valve to supply water
to the house.
Valve Programming
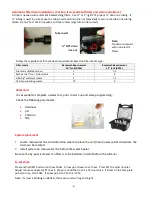
Safety Zone Water® Signature Series filter valve
The Safety Zone Signature Series filter valve is designed to
backwash carbon filters, Iron filters, sediment filters and acid
neutralizers. Valves are available in 1”, 1-1/4”, 1-1/2” and 2”
sizes. Residential tank sizes include 10x44 (1 cube), 10x54
(1.5 cube); 12x52 (2 cube) and 14x65 (3 cube). Standard
system components include the valve, by-pass valve; upper
basket; riser tube; bottom distributor; drain line flow control
button, media and gravel under bedding for even flow
distribution.
Automatic Valve Settings
System
Media
(Cu. Ft.)
Tank Size
Backwash Duration
(Minutes)
R
Backwash Frequency
(Days)
WHF-100-A
1
10x44
8
3 to 5
WHF-150-A
1.5
10x54
10
3 to 5
HWF-200-A
2
12x52
15
3 to 5
WHF-300-A
3
14x65
20
3 to 5
Note: Settings may be adjusted depending in water source, water usage and other factors.
-2-