background image

25

Locking Latch Plate

Emergency Locking 

Retractor with a 

Sliding Latch Plate

Emergency Locking Retractor Lap Only Belt

Infl atable Seat Belts

Never Use With This Child Restraint

4

Check the Latch Plates

Latch plates are the part of
the seat belt that goes into the
buckle.

To see if the latch plate locks:

Buckle the vehicle belt.

Then firmly tug the lap portion of the 
seat belt while pulling it up. 

If the vehicle belt does not slide 
through the latch plate, it’s locked.

If the latch plate slides up and down 
the vehicle belt, it is a 

sliding latch 

plate

.

Sliding latch plates easily slip between 
the lap and shoulder portions of the 
belt. 

If you have an Emergency Locking
Retractor with a Sliding Latch Plate, 
you must use a locking clip.

Please contact us for one. 

See page 77.

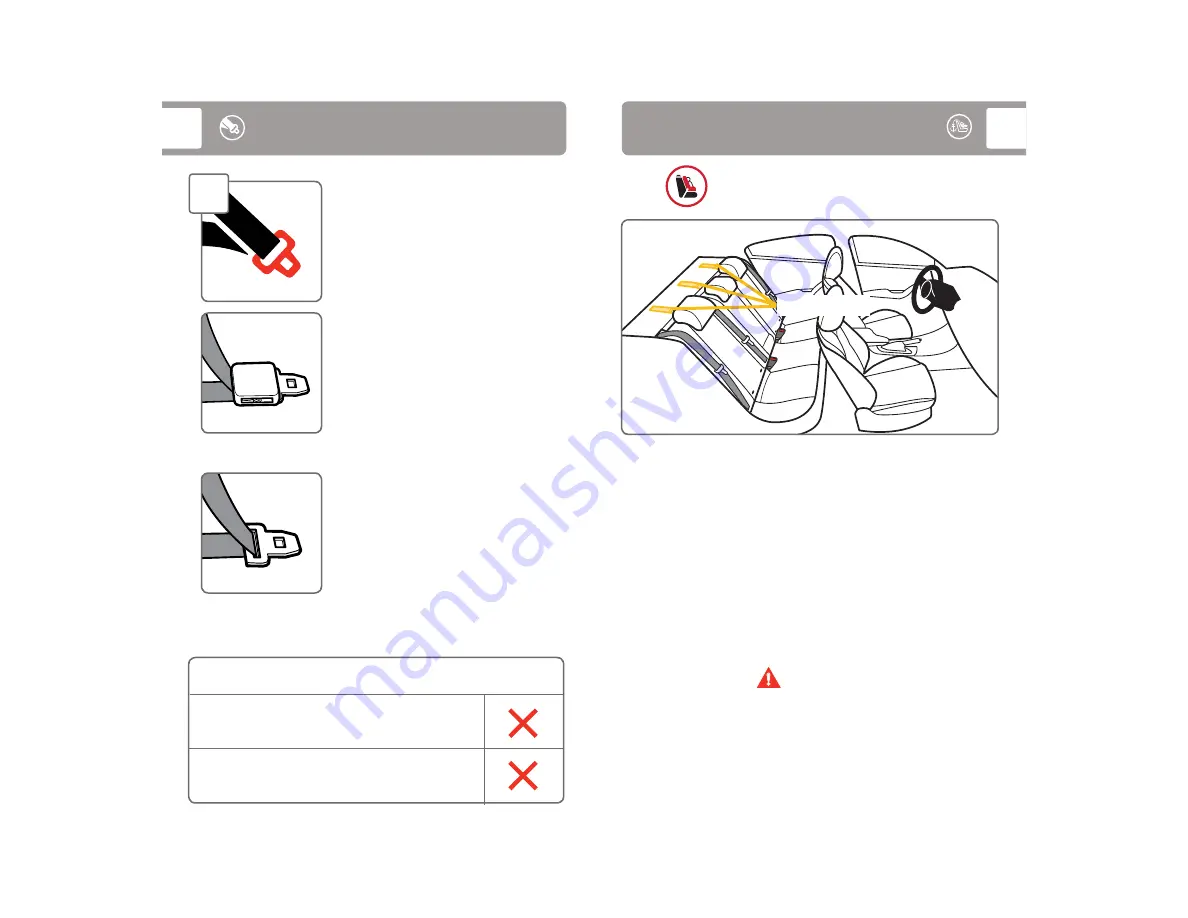
Tether Use

26

Your vehicle’s features may be considerably different 

than those pictured here. 

You

 must always


attach, adjust, and secure the top anchorage 

(tether) strap

 when installing the child restraint forward-facing 

with internal harness. Tethers improve the installation and stability 
of child restraints and reduce the risk of injury. 

Attach the tether hook to the tether anchor designated by your 
vehicle manufacturer for that seating position. Check your vehicle 
owner’s manual for more information. 

If the seating position does not have a tether anchor, use a different 
seating position or see your dealer or a qualified mechanic and 
have one installed. 

WARNINGS

Using this child restraint without the tether strap anchored as 
recommended by the manufacturer would be a misuse of the 
child restraint and, in a sudden stop or crash, could result in 
serious injury or death. 

Do not fasten multiple tether hooks on the same tether anchor 
in the vehicle.

For Forward-Facing Mode Only

 Tether Anchors

continued on next page

Содержание Grow and Go Comfort Cool

Страница 1: ...673 2 6 19 KEEP INSTRUCTIONS FOR FUTURE USE Read all instructions before using this car seat WARNING Failure to follow the warnings on the labels and in the instruction manual can result in serious in...

Страница 2: ...ase feel free to reach out to us REAR FACING 5 40 lb 2 3 18 kg and 19 40 in 48 101 6 cm PAGE 6 BOOSTER SEAT 40 100 lb 18 1 45 4 kg and 43 52 in 110 1 132 1 cm PAGE 6 Rear Facing Child Fit PAGE 9 Forwa...

Страница 3: ...chor Install 34 Forward Facing Mode 39 Forward Facing Vehicle Belt Tether Install 40 Forward Facing LATCH Lower Anchor Tether Install 44 Securing Child in Car Seat 49 Booster Seat Booster Seat Mode 52...

Страница 4: ...Detail Recline Handle Forward Facing Belt Path Rear Facing Level Line Base Rear Facing Belt Path Adjustable Headrest Tether Strap Tether Storage Instruction Manual Storage See pages 3 5 for Accessory...

Страница 5: ...part and pull them off of the harness strap For Use in Rear Facing or Forward Facing Mode Buckle Cover To remove buckle cover slide the ends out of the buckle strap slot in pad Pull up and off of the...

Страница 6: ...SEAT MODE 40 100 lb 18 1 45 4 kg and 43 52 in 110 1 132 1 cm For Use in Rear Facing Mode Only Body Pillows The body pillows are two separate pieces back and bottom When using upper harness slots To r...

Страница 7: ...umb and pull apart 1 2 3 Place Harness Straps Out of the Way The In and Out Harness Holders can be used two ways 1 You can secure the harness straps around them as shown 2 Or the buckle tongues can be...

Страница 8: ...ated shoulder height is 16 5 in 42 cm To measure your child s seated shoulder height have them sit on the oor with their back at against a wall Then measure from the oor up to the top of their shoulde...

Страница 9: ...d through the recline handle Fully Loosen Harness Straps Push down on harness release lever through opening in pad while pulling out on harness straps as shown 1 2 3 1 Changing Headrest Harness Height...

Страница 10: ...rough Buckle Slot in Shell From Top of Seat Pull Buckle Out of Shell and Pad Insert Buckle s Metal Retainer into Slot Closest to Child Buckle must face out Rear Facing Mode You must use the 1st or 2nd...

Страница 11: ...uckle in the 1st Slot Fully Recline the Car Seat If you need to move the buckle to the 1st slot see pages 12 14 Pull Up Front of Car Seat Pad If you cannot achieve a snug harness t for your child make...

Страница 12: ...harness straps sewn end Pull Harness Straps Out of Upper Shoulder Harness Slots Attach 2nd Harness Strap Loops to Splitter Plate As Shown Sewn ends of the harness strap loops must face towards you Do...

Страница 13: ...t or booster seat flush against the vehicle seat back Vehicle seat back must be upright LATCH Lower Anchor Use 20 Vehicle Seat Bight Lower Anchor Bars For Use in Rear Facing or Forward Facing Mode You...

Страница 14: ...s not installed in a vehicle the lower anchor belt must be properly stored in its storage location Thread lower anchor belt through rear facing belt path then attach connectors to storage attachments...

Страница 15: ...tractor This retractor always locks It will automatically lock after slowly pulling the seat belt out at least halfway and letting the belt go back into the retractor an inch or two If the retractor d...

Страница 16: ...icle s features may be considerably different than those pictured here You must always attach adjust and secure the top anchorage tether strap when installing the child restraint forward facing with i...

Страница 17: ...of a vehicle equipped with an active frontal airbag Do not use the tether for rear facing mode Secure tether strap to its storage location Do not use the lower anchor belt along with the vehicle lap o...

Страница 18: ...ery important because not all vehicle belts will work with child restraints Review pages 22 25 and your vehicle owner s manual to determine what kind of vehicle belt you have and how to lock a child r...

Страница 19: ...w 10 Tighten Belt Place hand in child restraint Firmly push child restraint down and back towards the vehicle seat back while pulling the shoulder belt or the free end of lap belt parallel with the be...

Страница 20: ...Finished Check the tightness of the install often to make sure it has not loosened 11 34 2 Before you begin installing the seat into your vehicle did you check Your child s weight and height 5 40 lb 2...

Страница 21: ...pad in front of the buckle and go out through the other belt path opening Do not twist belt 1 2 continued on next page 35 4 5 3 Finished Lower Anchor Belt Routing Place Car Seat Rear Facing in Back S...

Страница 22: ...n 38 Finished Check the tightness of the install often to make sure it has not loosened Recheck Rear Facing Level Line For children who cannot sit up unassisted the level line must be parallel with th...

Страница 23: ...us injury or death The American Academy of Pediatrics recommends that children remain rear facing until they are at least 2 years old Please talk to your doctor about the best option for your child 22...

Страница 24: ...eving a flush car seat fit check your vehicle owner s manual to see if it can be removed adjusted or if there are other possible seating locations 42 7 8 Tighten Belt Place hand in child restraint Fir...

Страница 25: ...To properly secure your child in the car seat see pages 49 51 Check your child s t often and make any needed adjustments to the car seat as they grow Forward Facing LATCH Lower Anchor Tether Install...

Страница 26: ...positions except to make the child restraint ush against the vehicle seat back Vehicle seat back must be upright NOTE If your vehicle seat has a headrest that interferes with achieving a flush car sea...

Страница 27: ...and pull from side to side It should not move more than 1 in 2 5 cm If it moves more than 1 in 2 5 cm you can try A Putting your knee in the seat and pulling the belt tighter B Reinstalling the child...

Страница 28: ...Check Harness Tightness Try to pinch the harness at the shoulders and hips vertically between index nger and thumb as shown If your ngers slip off the harness is tight enough If you can pinch the harn...

Страница 29: ...der belt system when restraining the child in this booster seat Do not use only the lap belt when using this seat as a booster seat The shoulder belt must always be adjusted snugly across the child s...

Страница 30: ...s shown Locate Buckle s Metal Retainer Fully recline the child restraint and reach under the seat between the base and shell and through the recline handle Rotate metal retainer and push it up through...

Страница 31: ...to Booster Seat Mode 9 10 11 Place Chest Clip Harness Straps and Buckle Tongues Behind the Headrest and Seat Pad As Shown Push chest clip up so it is behind the headrest Tighten Harness Pull on harnes...

Страница 32: ...all Then measure from the oor up to the top of their shoulder Lap Shoulder Belt Use 58 Have Child Sit in Booster Seat Place Booster Seat Forward Facing in Back Seat Put the booster seat into Position...

Страница 33: ...ectly on the child Finished Check periodically to make sure your child has not moved out of position and loosened the shoulder belt Removing Seat Pad Set for Cleaning 60 You DO NOT need to remove the...

Страница 34: ...here is one on each side Pull Down Seat Pad to Stretch Elastic Strap Release elastic strap from tab on each side of seat Pull Pad Off Bottom of Seat Gently Pull Headrest Pad Off Bottom of Headrest As...

Страница 35: ...an result in serious injury or death 1 3 2 63 14 15 4 13 12 Adjust the Headrest to the Highest Position Slide the Fabric Headrest Tabs in Slots on Back of Headrest Slide the fabric headrest tab betwee...

Страница 36: ...d armrest as shown Push Harness Holders Through Slots in Pad Pull Seat Pad Down As Shown Pull harness adjustment strap and buckle through openings in pad Tuck Seat Pad Around Bottom of Seat Attach Ela...

Страница 37: ...straps from the splitter plate and the buckle tongues and chest clip have been unthreaded from the harness straps follow the steps below to rethread them 5 Adjust Headrest to Highest Position 68 Inse...

Страница 38: ...ap Forward Facing Aircraft Installation Follow the steps on pages 40 43 skipping the tether strap steps Rear Facing Aircraft Installation Follow the steps on pages 29 33 70 If you cannot achieve a snu...

Страница 39: ...nsecured child restraint could injure occupants 72 Do not risk your child s safety To keep your child as safe as possible Dorel Juvenile Group strongly recommends replacing the car seat even after a m...

Страница 40: ...l for more information about air bag child restraint use Use the child restraint only on vehicle seats that face forward Do not use on seats that face the sides or rear of the vehicle For vehicles wit...

Страница 41: ...ty1st com Our hours of operation are from 8 00 a m to 6 00 p m EST Monday through Thursday and from 8 00 a m to 4 30 p m on Friday Proof of purchase is required and shipping charges are the responsibi...

Страница 42: ...We accept Visa or MasterCard Thank you for choosing this child restraint The DJG family is committed to creating child restraints with the most comfort and convenience available today Remember parent...

Отзывы: