

TE
I AL S
RT
If you encounter any difficulty in the operation of this product after
reading the manual, please contact us. You can reach us by phone at
from
A to
onday through riday astern
tandard Time . e will be happy to answer your uestions and help you
in any way we can.
ARRA TY
a g ar
warran s is ro c o
r o
c s in a ria an
wor
ans i or a
rio o on
ar ro
a o
rc as . is
warran
o s no cov r a ag r s ing ro acci n a s ac o o
or i
ro r o ra ion.
is ro c o s
co
c iv si
r
rn i
o a g ar
. P as inc
a no
scri ing
ro
s a ong wi
o r na
an r
rn a r ss as w as
origina sa s r c i .
ro c is cov r
n r warran i wi
r air or r
ac
a no
c arg . i is no cov r
warran
o wi
no i i o an c arg s
or wor is on .
Sa eguar Su ly
oon tation t.
ennesaw, A
www.safeguardsupply.com
Test the rogra
ing
After completing the programming steps abo e, test the
programming pairing prior to mounting the transmitter. ush the
"front door" button and or the "back door" button on the transmitter.
You should see a red
on the transmitter the recei er should flash
and or play the selected melody see recei ers for mode of operation
settings . If there s no red
on the transmitter, ensure the plastic
wrapper is remo ed from the battery it s inserted correctly.
Installing/Mounting the LRA-EXTX to Your Doorbell
The transmitter may be small enough to fit inside your wired doorbell
cabinet or you may decide to simply set it on top of your wired door
chime cabinet. The instructions below illustrate using the "cable duct."
This is not mandatory and is only aesthetic purposes. After wiring the
transmitter to your wired doorbell, you can decide the best location to
place the transmitter. You can use the double sided tape or mounting
screws to mount the transmitter to the wall, hide it in the doorbell
cabinet, fix to the side, or simply lay it on top of the doorbell cabinet.
We recommend using the included screws to enable you to easily take
it down to change the batteries
.
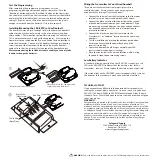
Insert the cable duct to the base
lace the wires in the cable duct and
replace the cable duct co er
a Wire
(Tra
nsformer)
Red
Wire
(Front Door)
White
Wire
(Back Door)
+
+
+
iring the Trans itter to Your ire Doorbell
o ar no a i iar wi
c rica ro c s
as ir a
c r i i
c rician. ns r o
av no ow r going o o r
wir
oor
rning o
circ i r a r.
•
onnect the red wire from the transmitter to the front
door
terminal screw on your wired doorbell see
abo e .
•
onnect the black wire from the transmitter to the
second
or back door terminal screw on your wired
doorbell. If you
are not using a second door you can
go ahead and connect
it or wrap the connector of the
wire in electrical tape to
pre ent interference.
•
onnect the black wire from the transmitter to the
"transformer," or "common" terminal screw on your
wired
doorbell.
•
Test the installation by pressing the outdoor push button.
nsure you ha e turned the power back on and the
recei er is turned on.
•
Your wired doorbell should ding as normal your A
recei er should respond per its settings.
•
lace the transmitter in the desired location affix it using
the double sided tape or mounting screws.
Lo attery In i ator
A randomly blinking one light on the A
recei er or a red
in the A
indicates that the battery is low for this
transmitter. recei er. lease replace the battery as soon as possible.
If the strobe light on the A
seems to randomly flash, it means
the batteries in the recei er are weak and needs to be replaced.
AR I
ancer and eproducti e arm. o to
www.P65Warnings.ca.gov
for more information.


