


www.safehome.dk
4
0. The Package Contains
1 x Siren
1 x Manual
4 x Screws and plugs
1 x Alarm Sign
1. Introduction
These instructions should be retained for future reference.
The siren is an accessory for SafeHome Wireless Alarm System W300S or W500S V2.
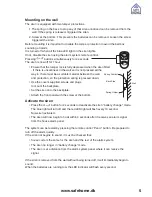
The siren is mounted inside or outside under an overhang on the building in a highly vis-
ible position, providing a permanent visual deterrent to intruders.
It’s alarm duration is adjustable. The user may choose the alarm to sound from 1 to 10
minutes when it triggered.
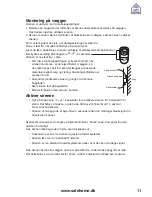
2. Installation
Check the house code panel in your SafeHome Alarm System and the remaining sensors
/ switches are set to. See Section 4 for setting the system’s house code.
Be sure the siren is mounted within within range of the SafeHome Alarm Smart Panel
(Please test before proceeding with installation). The siren is mounted as follows:
• With a screwdriver remove the screw at the bottom of the siren.
• Separate the front and back.
• Install new batteries - noting their polarity.
(battery type: 4 x Alkaline Type D, LR20 (not included).
There may alternatively be connected to a 9V, 300mA power supply. (Not included).
• Set the house security code same as the Smart Panel by moving the “house security
code programming” switches (refer to section 4 House Security Code Settings sec
-
tion”)
• Set the time for how long the siren will sound and flash.
You can choose between 1, 3, 5 or 10 minutes (contact 1M, 3M, 5M or 10M).
(At least choose 1 option)
• Turn the power swich to ON - all blue lights will ON indicating the tamper protection
is disabled.
• Press the learn button to enrol the alarm to SafeHome Security System.
• Completing the remote’s enrollment by pressing
button on the remote of Safe-
Home Security System. The bell box beeps and flashes once enrollment succes
-
seded.
• Press the learn button to complete the enrollment.
• The siren is now ready to mount on the wall.
• Connect multiple remote controls if desired.


