background image


17


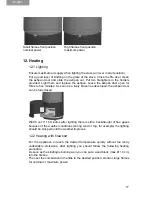
Small flames front position  

High flames front position   

nominal 

power 

  maximum 

power 


12. Heating 


 12.1 

Lighting 


Ensure maximum air supply when lighting the stove (air lever in start position). 
Put a good layer of kindling on the grate of the stove. Close the fire door. Open 
the ashpan door and slide the ashpan out. Put two firelighters in the holders 
provided. Light them and replace the ashpan. Leave the ashpan door open for 
three to five minutes. As soon as a lively blaze has developed, the ashpan door 
can be fully closed.  


Watch out: If 15 minutes after lighting there is still a backdraught of flue gases 
because of the weather conditions (strong wind or fog, for example) the lighting 
should be stopped until the weather improves. 


12.2 Heating with firewood 


For the appliance to reach the desired temperature quickly without too many 
undesirable emissions, after lighting you should follow the following heating 
procedure: 
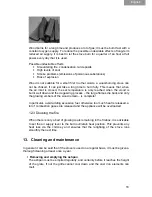
As soon as the kindling is burning well you can put a wood block (max. Ø 14 cm) 
into the firebox.  
Then set the combustion air handle to the desired position: small or large flames 
for nominal or maximum power! 


English 

Содержание Altum

Страница 1: ... poêle à bois Saey Altum Holz Ofen Saey Altum Wood stove Saey Altum Installatie en bedieningshandleiding Guide d installation et d utilisation Aufstell und Bedienungsanleitung Installation and Operation Manual Version 09 08 ...

Страница 2: ...ction from the stove to the chimney 12 9 3 Combustion air 13 9 3 1 Combustion air supply 13 9 4 Clearances around the stove to be respected 14 9 5 Fitting the heat shield 15 9 6 Using the fire lighter dish 15 10 Use 15 10 1 First use 15 10 2 Use 16 11 Operation 16 12 Heating 17 12 1 lighting 17 12 2 Heating with firewood 18 12 3 Dousing the fire 18 13 Cleaning and maintenance 19 14 Troubleshooting...

Страница 3: ...ust be used in the same or adjacent spaces The stove is not designed as an all purpose incinerator Use only suitable fuel The outside of some parts of the stove can become very hot Take appropriate precautions The stove must not be altered or modified in any way Use only original spare parts from the manufacturer This stove is not suitable for installation using a flue to which multiple stoves are...

Страница 4: ...cognise dry wood Dry wood weighs significantly less and makes a brighter noise if you bang two blocks against each other Use prepared wood or finely chopped wood splinters to light the stove Things not to use Rubbish wood chips shavings and sawdust bark and waste from chipboard plywood and wood with a treated surface must not be used They cause soiling of the hearth and the chimney and can emit po...

Страница 5: ...wood C 280 Sizes and weights Height mm 1167 Width mm 362 Depth mm 362 External diameter of flue mm 120 External diameter of combustion air inlet mm 80 Height to underside of combustion air inlet mm 68 Weight Not packed Packed Kg Kg 130 135 Installation values Hearth draught at nominal power Pa 12 Hearth draught limits Pa 10 20 Supply of fresh air m h 25 English ...

Страница 6: ...6 5 Parts English ...

Страница 7: ...2 FRONT 8775306190 LED1005 03003 UPPER FRONT 8775306200 LED1005 03002 FIRE DOOR 8775306210 LED1005 03005 GLASS PANEL 8775306220 LED1005 03006 LEFT CLOSING FILET 8775306230 LED1005 03007 RIGHT CLOSING FILET 8775306240 LED1005 03008 THREADED ROD 8775306250 LED1005 03009 CLIP 8775306260 LED1005 03010 HANDLE 8775306270 LED1005 03011 HANDLE AXLE 8775306280 LED1005 03012 LOCKING CATCH 8775306290 LED1005...

Страница 8: ...isoning Stoves with Snorkel technology are also more efficient because they no longer suck heated air out of the room Airwash Naverbranding post combustion Airwash system and post combustion with our wood and coal burning stoves The airwash system provides a natural flow of air across the window of the stove preventing soot deposits from forming on it So you can enjoy the play of living flame in y...

Страница 9: ...rds must be followed when the appliance is installed Only an appliance connected by a recognised installer guarantees compliance with legislation on construction and fire prevention This is certainly required for safe and proper use of the stove The stove may only be installed on a floor with adequate load bearing capacity If the floor is non compliant then steps will have to be taken to increase ...

Страница 10: ...the following tips These are for information only and are not binding on us There are just too many unknown factors affecting how well the appliance chimney combination works If in doubt you should contact a specialist Chimneys that have worked perfectly well with an old stove can give problems with a new one The stoves of 30 years ago had much lower performance than the present generation of stov...

Страница 11: ...iance s is are fitted with an atmospheric burner and if a static cowl is fitted to the top of the chimney Zone 3 A chimney opening is not permitted under any circumstances For details on chimneys we refer you to the relevant regulations with which the chimney needs to comply Because of the highly technical nature of these regulations they are primarily aimed at professional installers chimney spec...

Страница 12: ...utes to the cleaning openings e g cellar and attic 4 Move all inflammable objects away from the chimney 5 When the stove is put back into service the chimney and the stove should be checked over by a specialist 6 This specialist should also investigate the cause of the chimney fire after and take any corrective measures Note If you let the stove burn for 10 minutes each day at maximum power this a...

Страница 13: ...e space in which the stove is installed They cause underpressure which can lead to a malfunction in the combustion air supply The combustion gas which results can damage residents health and even cause death 9 3 1 Combustion air supply There are two possible systems Traditional system the combustion air is drawn in through the vent low down on the rear of the stove When the traditional system is u...

Страница 14: ...ance to inflammable or temperature sensitive items From the sidewalls from the stove at least 60 cm From the rear wall at the upper connection at least 30 cm From the rear wall with protective shield at least 18 cm Within the line of sight of the glass at least 80 cm Floor protection in front at least 50 cm Floor protection at sides at least 30 cm 9 5 Fitting the heat shield optional Fit the holde...

Страница 15: ...ely dried Warm it for around an hour with a small quantity of fuel During this phase a few unpleasant odours may be released as the undercoat used dries out If necessary open a window or door Stay by the appliance during this phase and remove any condensation immediately before it has the chance to break through the paint 10 2 Use Take care of the following The appliance may only be used when the ...

Страница 16: ... The fire door can be opened using the handle supplied Operating the air inlet All of the combustion air flow is controlled on the front of the appliance Combustion air handle Start or restart position burn out retain heat position English ...

Страница 17: ... blaze has developed the ashpan door can be fully closed Watch out If 15 minutes after lighting there is still a backdraught of flue gases because of the weather conditions strong wind or fog for example the lighting should be stopped until the weather improves 12 2 Heating with firewood For the appliance to reach the desired temperature quickly without too many undesirable emissions after lightin...

Страница 18: ...assing process the large flames die back and only the glowing embers of the wood remain is complete In particular avoid adding excessive fuel otherwise too much heat is released a lot of combustion gases are released and the appliance will be overloaded 12 3 Dousing the fire When there is only a bed of glowing coals remaining in the firebox it is advisable to set the air supply lever to the burn o...

Страница 19: ...ls and heat recovery Fig 2 the removal of the baffle plate by lifting it sideways and sliding it out Fig 3 lift the first cast iron baffle plate over the lip and Fig 4 turn through 90 and remove Fig 5 lift the second cast iron baffle plate a short distance turn through 90 and remove The fly ash in the space and on the plates can simply be removed with a vacuum cleaner English ...

Страница 20: ...od and any open windows If possible install appliance with airbox The fire does not burn well Ashpan is overfull Empty ashpan Add less fuel Condensation forming Excessive temperature difference Put an extra firelighter on top of the fuel in the combustion chamber Wood too damp Check max residual moisture 20 Incorrect fuel Fuel not small enough respect maximum dimensions Only use the appropriate fu...

Страница 21: ...guarantee This guarantee is limited to the repair or replacement of components which prove faulty in normal use This guarantee is not valid for faults resulting from incorrect installation misuse alterations to the appliance the disassembly of the appliance wear and tear or inadequate maintenance Requests for work or replacement under guarantee must always be made via your sales point Saey home an...

Отзывы: