background image

2

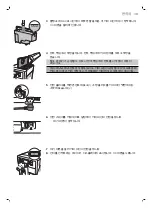
밀크


카라페


뚜껑을


빼냅니다

3

밀크


카라페에


우유를

 MIN

 MAX 

표시선


사이까지


채웁니다

.

참고

우유


거품을


제대로


만들려면


단백질


함량이

 3% 

이상인


우유

(

5°C/41°F)


사용하십시오

전유


또는


저지방


우유를


사용할


있습니다

.

무지방


우유

두유

무유당


우유도


사용할


있습니다

.

4

밀크


카라페를


살짝


기울여


커피


머신의


홈에


끼웁니다

그런


다음


물받이


위에


맞게


끼워질


때까지


카라페


바닥을


커피


머신


쪽으로


밀어


넣습니다

.

5

우유


거품


배출구를


거품이


배출될


위치에


오도록


오른쪽으로


완전히


당겨

빼냅니다

.

참고

우유


거품


배출구를


완전히


당겨


빼내지


않으면


밀크


카라페에서


우유

거품이


제대로


나오지


않습니다

.


우유


함유


커피


음료와


우유


거품


추출

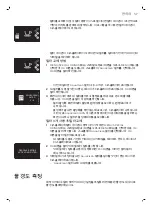
1

우유


거품


배출구


아래에


잔을


놓습니다

.

2

우유


함유


음료를


선택합니다

.

-

CAPPUCCINO(

카푸치노

버튼을


눌러


카푸치노를


추출합니다

.

-

LATTE MACCHIATO(

라테


마키아토

버튼을


눌러


라테


마키아토를

추출합니다

.

-

MENU/SPECIAL DRINKS(

메뉴

/

스페셜


드링크

버튼을


누르고

'Drinks(

음료

)'


선택한


다음


스크롤하여


우유


함유


음료


하나를

선택합니다

플랫


화이트

베이비


카푸치노

우유


거품을


선택할


있습니다

자세한


내용은

 '

스페셜


드링크

단원을


참조하십시오

.

3

정해진


양의


거품


우유가


먼저


잔이나


유리컵에


배출된


다음


정해진


양의

커피가


배출됩니다

.

-

우유나


커피


배출을


중단하려면

 OK 

버튼이나


선택한


음료


버튼을


누릅니다

.

4

우유


함유


커피


음료가


추출되면


밀크


카라페


배출구의


빠른


세척을


실행할지

묻는


메시지가


디스플레이에


표시됩니다

밀크


카라페


안에


우유가


남아


있는

상태에서


빠른


세척을


실행할


있습니다

음료가


잔을


꺼내고


용기를


우유

거품


배출구


아래에


놓으십시오

. OK 

버튼을


눌러


빠른


세척을


바로


수행하거나

,

ESC 

버튼을


눌러


나중에


빠른


세척을


수행하십시오

적어도


하루


빠른

세척을


하는


것이


좋습니다

('

밀크


카라페


세척

단원


참조

).

62

한국의

Содержание PicoBaristo HD8927/06

Страница 1: ...Type HD8927 ENGLISH Register your product and get support at www saeco com welcome 4219 460 3434 1 HD8927 FRONT BACK COVER_EN KO indd 1 07 03 16 11 39...

Страница 2: ......

Страница 3: ...SPRESSO LUNGO CAFFE CREMA CAPPUCCINO LATTE MACCHIATO AROMA STRENGTH MENU SPECIAL DRINKS 25 26 16 15 2 1 3 4 38 36 22 31 32 33 34 43 44 40 18 19 17 23 39 37 28 7 8 6 10 5 11 9 42 41 24 21 20 12 13 14 2...

Страница 4: ......

Страница 5: ...English 6 45...

Страница 6: ...ges 22 How to use the milk carafe 22 Brewing milk based coffee beverages and milk froth 23 Special drinks 24 How to select special drinks 24 Dispensing hot water 24 Adjusting quantity and taste 25 Sae...

Страница 7: ...s Switch off the machine with the main switch located on the back and remove the mains plug from the socket If a malfunction occurs If the machine will not be used for a long time Before cleaning the...

Страница 8: ...ng pads abrasive cleaning agents or aggressive liquids such as petrol or acetone to clean the machine Simply use a soft cloth dampened with water Descale your machine regularly The machine indicates w...

Страница 9: ...ress this button to select confirm or stop a function 3 UP button press this button to scroll up through the display menu 4 DOWN button press this button to scroll down through the display menu The bu...

Страница 10: ...the bean hopper Fill the bean hopper with coffee beans and close the lid Note Do not overfill the bean hopper to avoid damage to the grinder Caution Only use espresso beans Never use ground coffee unr...

Страница 11: ...ages and confirm the chosen language by pressing the OK button 10 The display shows the circuit priming icon to indicate that you have to prime the circuit 11 Insert the hot water dispensing spout 12...

Страница 12: ...ar Note Do not interrupt the rinsing cycle ACTIVATE AQUACLEAN FILTER 2 MIN 17 The display asks Activate AquaClean filter Note If you want to install the AquaClean filter later press the ESC button and...

Страница 13: ...uarantee the best performance 23 Fill the water tank with fresh water up to the MAX level indication and place it back into the machine Press the OK button to confirm PLACE A CONTAINER UNDER THE WATER...

Страница 14: ...t steps 1 to 4 twice Hot water circuit rinsing 1 Insert the hot water dispensing spout and place a container under the hot water dispensing spout HOT WATER 2 Press the MENU SPECIAL DRINKS button Selec...

Страница 15: ...ection Push the AquaClean filter to the lowest possible point Make sure that the filter fits tightly and the seal is in the right position to guarantee the best performance Activating the AquaClean fi...

Страница 16: ...lling the AquaClean filter Fill the water tank up to the MAX level indication INSERT WATER SPOUT 4 The display reminds you to insert the hot water spout into the machine Press the OK button to confirm...

Страница 17: ...indicate that the filter has been activated Replacing the AquaClean filter Replace the AquaClean filter when the filter icon starts flashing on the display Filter capacity indications When you install...

Страница 18: ...FILTER 2 8 The display shows the number of AquaClean filters that have been installed previously from 0 to 8 filters 2 The display asks if you want to activate a new filter Press the OK button to con...

Страница 19: ...ble to adjust the machine settings to the water in your region please measure the water hardness with the water hardness strip supplied 1 Immerse the water hardness test strip supplied with the machin...

Страница 20: ...l Espresso Double Double espresso with thick crema served in a small cup Special Drinks menu Cappuccino 1 3 espresso 1 3 hot milk and 1 3 milk foam served in a large cup Programmable button on control...

Страница 21: ...tte macchiato glass under the coffee outlet Brewing coffee with beans Brewing 1 cup of coffee 1 Place a cup under the coffee dispensing spout ESPRESSO LUNGO 2 Press the ESPRESSO ESPRESSO LUNGO or CAFF...

Страница 22: ...und coffee compartment as this may damage the machine 3 Place the lid back on the pre ground coffee compartment 4 Place a cup under the coffee dispensing spout GROUND COFFEE 5 Press the AROMA STRENGTH...

Страница 23: ...ou can use whole milk or semi skimmed milk It is also possible to use skimmed milk soy milk and lactose free milk 4 Slightly tilt the milk carafe and insert it into the guides of the machine Then push...

Страница 24: ...age and place a container under the milk froth dispensing spout Press the OK button to confirm that you want to quick clean or press the ESC button to perform the quick clean later It is recommended t...

Страница 25: ...dispensing hot water press the OK button or the hot water button Note If you don t stop the dispensing the product stops automatically when it reaches the default quantity or the memorized quantity Ad...

Страница 26: ...rafe and save the milk volume first and then save the coffee volume The amount has now been programmed Note You can only save the set length for espresso double after the second grinding cycle has sta...

Страница 27: ...u can choose from The shorter the line the stronger the coffee The difference becomes noticeable after you have brewed 2 or 3 coffees at the new setting Caution Do not turn the grinder adjustment knob...

Страница 28: ...from the machine and rinse it with fresh water periodically 2 Fill the water tank with fresh water up to the MAX level indication and place it back in the machine Cleaning the coffee compartments Cle...

Страница 29: ...ffee taste 10 Let the brew group air dry thoroughly Note Do not dry the brew group with a cloth to prevent fibers from collecting inside the brew group 11 Clean the inside of the machine with a soft d...

Страница 30: ...he degreasing solution work for approximately 15 minutes 7 Set the main switch to ON 8 Press the standby button 9 Wait until the machine performs an automatic rinsing cycle 10 Perform the Weekly clean...

Страница 31: ...reparing a milk based beverage the carafe cleaning icon appears on the display QUICK CLEAN 1 When the carafe cleaning icon appears on the display press the OK button if you want to perform a cleaning...

Страница 32: ...spensing spout consists of 5 components Disassamble all components once a week to clean them 1 2 5 3 4 1 Suction tube 2 Rubber support 3 Milk frother 4 Milk frother connection 5 Dispensing spout lid D...

Страница 33: ...s 2 to 4 of Disassembling the milk froth dispensing spout in reverse order 2 Place the milk froth dispensing spout back in the top of the milk carafe 3 Place the top of the milk carafe back on the mil...

Страница 34: ...at step 6 10 12 When the machine stops dispensing water the cycle is finished 13 Disassemble all the components and rinse them under a lukewarm tap The machine is ready for use Descaling procedure Whe...

Страница 35: ...level indication Place the water tank back in the machine Press the OK button to confirm The first phase of the descaling cycle starts The machine starts dispensing the descaling solution at interval...

Страница 36: ...t switching off the machine If the machine gets stuck during the cycle you can exit the descaling procedure by pressing the standby button If this occurs or in case of a power failure or accidental di...

Страница 37: ...is not in the machine Insert the group INSERT WATER SPOUT The hot water dispensing spout is not installed Insert the hot water dispensing spout Insert the drip tray and close the service door INSERT...

Страница 38: ...blocked Coffee exit duct clogged Clean the coffee exit duct thoroughly with the handle of the multifunctional tool or a spoon handle 3 4 The brew group cannot be removed The brew group is blocked by...

Страница 39: ...main switch is set in ON position The machine is in DEMO mode The standby button has been pressed for more than 8 seconds Switch the machine off and then on again using the main switch on the back of...

Страница 40: ...ew group and that the hook of the brew group is in the correct position Reset the machine by switching it on and off Place the drip tray and the coffee grounds container back Leave the brew group out...

Страница 41: ...set in the correct position The milk carafe is incompletely assembled Check that all the components have been assembled correctly The type of milk used is not suitable for frothing Different types of...

Страница 42: ...stallation First descale the machine and then install a new AquaClean filter Always activate the filter in the machine menu You placed the AquaClean filter after having used the machine for a while Yo...

Страница 43: ...intenance products Typenumber Product CA6700 Descaling solution CA6903 AquaClean filter HD5061 Brew group grease CA6704 Degreasing tablets CA6705 Milk circuit cleaner Technical specifications The manu...

Страница 44: ...parate collection of electrical and electronic products Correct disposal helps prevent negative consequences for the environment and human health Guarantee and support If you need information or suppo...

Страница 45: ...46 46 46 46 47 48 48 53 53 53 AquaClean 53 AquaClean 53 AquaClean 54 AquaClean 56 57 58 59 60 60 61 61 62 63 63 63 64 Saeco 64 64 64 65 65 66 1 68 69 72 74 74 76 77 80 Saeco 80 81 81 82 45...

Страница 46: ...Saeco PicoBaristo Saeco www philips com welcome 8 8 8 8 46...

Страница 47: ...0 C 1 2 3 4 5 ESC 6 OK 7 8 9 10 11 12 13 14 15 16 17 18 19 20 21 22 23 24 25 26 27 28 29 47...

Страница 48: ...30 31 32 33 34 35 36 37 38 39 40 41 42 43 44 1 2 3 4 1 ESC 2 OK 3 4 OK ESC 1 2 15 cm 15 cm 15 cm 15 cm 15 cm 15 cm 15 cm 15 cm 15cm 48...

Страница 49: ...M A X C A L C C L E A N MAX 3 MAX OK 4 2 1 5 1 2 6 7 8 OK 49...

Страница 50: ...SELECT LANGUAGE 9 OK 10 11 12 OK PRIMING 13 50...

Страница 51: ...HEATING UP 14 15 RINSING 16 ACTIVATE AQUACLEAN FILTER 2 MIN 17 AquaClean AquaClean ESC AquaClean INSERT FILTER FILL WATER TANK 18 AquaClean OK 2 19 AquaClean 5 20 AquaClean 21 51...

Страница 52: ...22 AquaClean AquaClean 23 MAX OK PLACE A CONTAINER UNDER THE WATER SPOUT 24 OK ACTIVATING FILTER 25 26 27 AquaClean 100 52...

Страница 53: ...E 2 AROMA STRENGTH GROUND COFFEE 3 CAFF CREMA 4 5 1 4 1 HOT WATER 2 MENU SPECIAL DRINKS SPECIAL DRINKS HOT WATER OK 3 1 3 4 AquaClean AquaClean AquaClean 8 5000 100ml AquaClean 3 AquaClean AquaClean 1...

Страница 54: ...2 AquaClean 3 AquaClean AquaClean AquaClean AquaClean AquaClean 1 MENU SPECIAL DRINKS MENU OK AquaClean OK AQUACLEAN FILTER 0 8 AquaClean 0 8 ACTIVATE AQUACLEAN FILTER 2 MIN 2 OK 54...

Страница 55: ...INSERT FILTER FILL WATER TANK 3 AquaClean AquaClean MAX INSERT WATER SPOUT 4 OK PLACE A CONTAINER UNDER THE WATER SPOUT 5 OK ACTIVATING FILTER 55...

Страница 56: ...AquaClean 100 AquaClean AquaClean 100 100 20 10 2 56...

Страница 57: ...NU SPECIAL DRINKS MENU OK AquaClean OK AQUACLEAN FILTER 2 8 AquaClean 0 8 2 OK 3 OK AquaClean 100 8 1 MENU SPECIAL DRINKS MENU OK AquaClean OK DESCALE BEFORE ACTIVATING FILTER 2 OK ESC 3 AquaClean Aqu...

Страница 58: ...1 1 2 1 1 2 3 4 3 1 1 2 2 3 3 4 4 1 WATER HARDNESS 2 OK 3 OK Espresso Ristretto 58...

Страница 59: ...ungo Caff Crema Espresso Double Cappuccino 1 3 1 3 1 3 Baby Cappuccino Flat White Latte Macchiato Milk froth Hot Water 40ml 20 230ml 30ml 20 230ml 80ml 20 230ml 125ml 20 230ml 60ml 2 40 230ml 300ml 50...

Страница 60: ...1 1 ESPRESSO LUNGO 2 ESPRESSO ESPRESSO LUNGO CAFF CREMA OK 2 1 ESPRESSO LUNGO 2x 2 2 1 60...

Страница 61: ...2 3 4 GROUND COFFEE 5 AROMA STRENGTH GROUND COFFEE 6 2 1 1 2 1 1 2 61...

Страница 62: ...2 3 MIN MAX 3 5 C 41 F 4 5 1 2 CAPPUCCINO LATTE MACCHIATO MENU SPECIAL DRINKS Drinks 3 OK 4 OK ESC 62...

Страница 63: ...1 MENU SPECIAL DRINKS Drinks 2 OK 3 1 2 1 1 2 1 2 HOT WATER 1 MENU SPECIAL DRINKS Drinks Hot water Hot water 2 OK OK 63...

Страница 64: ...Saeco ESPRESSO 1 MEMO ESPRESSO 2 OK OK 1 MENU SPECIAL DRINKS Drinks 2 3 MEMO OK 4 OK OK AROMA STRENGTH AROMA STRENGTH 1 64...

Страница 65: ...1 2 3 4 5 1 2 3 4 5 GROUND COFFEE 1 2 3 ESPRESSO 1 2 4 1 2 10 2 3 65...

Страница 66: ...1 1 2 1 1 2 2 3 4 5 1 2 MAX 1 1 2 3 4 5 2 1 6 PUSH 1 2 66...

Страница 67: ...7 8 9 10 11 12 13 67...

Страница 68: ...14 PUSH 15 1 500 1 1 2 AROMA STRENGTH GROUND COFFEE 3 4 CAFF CREMA 5 6 15 7 8 9 10 11 12 AROMA STRENGTH GROUND COFFEE 13 CAFF CREMA 14 12 13 15 2 3 30 1 500 1 1 68...

Страница 69: ...2 3 4 5 1 1 QUICK CLEAN 1 OK 2 3 OK 1 69...

Страница 70: ...2 3 4 5 5 1 2 5 3 4 1 2 3 4 5 1 2 1 1 1 2 2 70...

Страница 71: ...2 1 3 4 5 1 2 4 2 3 1 SAECO CA6705 71...

Страница 72: ...MIN MAX 2 MAX 1 1 1 MAX 2 2 3 MENU SPECIAL DRINKS Drinks OK 4 3 5 6 MAX 7 8 9 MENU SPECIAL DRINKS milk froth 10 9 11 6 10 12 13 Saeco Saeco Saeco www shop philips com service 23 20 3 ESC OK 72...

Страница 73: ...PECIAL DRINKS Menu Descaling OK 2 AquaClean OK 3 OK MIN MAX 4 OK 5 1 5l OK M A X C A L C C L E A N CALC CLEAN 1 2 6 CALC CLEAN OK DESCALING PHASE 1 2 20 MIN 20 7 8 9 CALC CLEAN OK 10 MIN DESCALING PHA...

Страница 74: ...DESCALING COMPLETED 13 14 OK 15 16 17 18 AquaClean AquaClean 1 2 CALC CLEAN 3 ADD WATER MAX 74...

Страница 75: ...ADD COFFEE INSERT WATER SPOUT INSERT CARAFE 75...

Страница 76: ...10 SUPPORT REQUIRED 1 3 4 5 AquaClean 76...

Страница 77: ...30 2 3 Philips Saeco www saeco com support DEMO 8 77...

Страница 78: ...1 78...

Страница 79: ...AquaClean 10 100ml AquaClean 8 8 AquaClean 50 100ml AquaClean AquaClean 0 8 AquaClean 79...

Страница 80: ...AquaClean 8 AquaClean 0 8 8 AquaClean AquaClean AquaClean AquaClean AquaClean Philips Saeco 1 STANDBY 8 2 Saeco Saeco www shop philips com service 80...

Страница 81: ...CA6700 CA6903 AquaClean HD5061 CA6704 CA6705 W x H x D 221 x 335 x 430mm 8 9kg 800 1200mm 152 mm 1 8 250g 15 500ml 15 1Wh 2012 19 EU 81...

Страница 82: ...www saeco com support Philips Saeco www saeco com support 82...

Страница 83: ...empty page before backcover...

Страница 84: ...www saeco com welcome 4219 460 3434 1 Rev 00 04 03 2016 4219 460 3434 1 HD8927 FRONT BACK COVER_EN KO indd 2 22 03 16 15 43...

Отзывы: