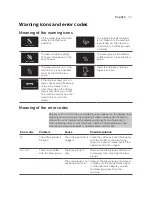
Saeco PICOBARISTO HD8924 Скачать руководство пользователя страница 24

Error code

Problem

Cause

Possible solution

05

There is a water
circuit problem.

There is air in the
water circuit.

Remove and place back the water
tank a couple of times. Make sure
you insert it into the machine
properly. Check if the water tank
compartment is clean. 

If you use an AquaClean filter:
remove the AquaClean filter from the
water tank and shake it to remove all
air from the filter. Then place the
AquaClean filter back into the water
tank. 

14

The machine is
overheated. 

This can have several
causes.

Switch the machine off and switch it
back on again after 30 minutes. Try
this 2 or 3 times.

Troubleshooting

This chapter summarizes the most common problems you could encounter
with the machine. If you are unable to solve the problem with the
information below, visit 

www.saeco.com/care

 for a list of frequently asked

questions or contact the Consumer Care Center in your country.

Problem

Cause

Solution

The machine does not
switch on.

The machine is disconnected
or the main switch is in the 'off'
position (0).

Check if the mains cord is inserted
correctly.

Make sure the main switch is set to 'on'
position (I).

The machine is in DEMO
mode.

You pressed the standby
button for more than 8
seconds.

Switch the machine off and then on
again with the main switch on the back
of the machine.

The drip tray fills up
quickly.

This is normal. The machine
uses water to rinse the internal
circuit and brew group. Some
water flows through the
internal system directly into the
drip tray.

Empty the drip tray when the 'drip tray
full' indicator pops up through the drip
tray cover.

Place a cup under the dispensing spout
to collect rinsing water.

24

English

Содержание PICOBARISTO HD8924

Страница 1: ...ISTO HD8924 EN USER MANUAL DE BENUTZERHANDBUCH ES MANUAL DEL USUARIO FR MODE D EMPLOI IT MANUALE UTENTE NL GEBRUIKSAANWIJZING 4219 460 3607 1 HD8924 SAECO_PICOBARISTO AMF_WE_COVER_A5_FC indd 1 01 09 1...

Страница 2: ......

Страница 3: ......

Страница 4: ...ESSO ESPRESSO LUNGO CAFFE CREMA AROMA STRENGTH MENU SPECIAL DRINKS HOT WATER MILK FROTH 2 1 3 4 14 13 12 16 33 31 29 34 18 19 17 25 26 32 35 21 20 30 28 27 24 22 23 5 6 7 9 8 10 11 36 38 41 40 42 39 3...

Страница 5: ..._____________________________ 14 Adjusting volume and taste_________________________________________________________ 14 Adjusting coffee and milk volume________________________________________________...

Страница 6: ...tomatic milk frother 16 Adjustable coffee dispensing spout 37 Water tank 17 Lid of water tank 38 AquaClean filter 18 Lid of bean hopper 39 Water hardness test strip 19 Lid of pre ground coffee compart...

Страница 7: ...ide filtered water to preserve the aroma and flavor of each cup of coffee If you use a series of 8 AquaClean filters as indicated in this user manual you don t have to descale your machine for 5000 cu...

Страница 8: ...tank Make sure you fill the water tank up to the MAX level indication INSERT WATER SPOUT 5 The display reminds you to insert the hot water spout into the machine Press the OK button to confirm PLACE A...

Страница 9: ...he display press the MENU SPECIAL DRINKS button scroll to AQUACLEAN FILTER and press the OK button to confirm DESCALE BEFORE ACTIVATING FILTER The display tells you that you need to descale the machin...

Страница 10: ...ne has finished dispensing the preset coffee volume press the OK button or the previously selected beverage button You can adjust the volume of espresso or espresso lungo see Adjusting coffee and milk...

Страница 11: ...ically carries out two grinding cycles in sequence Note Using the cover of the bean hopper helps to keep the beans fresh Brewing coffee with pre ground coffee When you brew coffee with pre ground coff...

Страница 12: ...lk and lactose free milk 1 Insert the suction tube into the automatic milk frother 2 Insert the automatic milk frother on the rubber grip in the hot water steam dispensing spout until it locks into pl...

Страница 13: ...s and lengths Beverage types Beverage name Description How to select Espresso Coffee with thick crema served in a small cup One touch beverage button on control panel Espresso lungo A longer espresso...

Страница 14: ...hold the ESPRESSO button until the display shows the MEMO icon The machine enters the programming phase and starts to brew the selected beverage 2 Press the OK button when the cup contains the desired...

Страница 15: ...livers the perfect taste to every cup Note You can only adjust the grind settings when the machine is grinding coffee beans Caution Do not turn the grind setting knob more than one notch at a time to...

Страница 16: ...tray As soon as the red drip tray full indicator pops up through the drip tray Empty the drip tray and clean it under the tap Coffee grounds container When it suits you Empty the coffee grounds conta...

Страница 17: ...select GROUND COFFEE 3 Put a coffee oil remover tablet in the pre ground coffee compartment 4 Press the CAFF CREMA button The machine dispenses water from the coffee dispensing spout 5 When the progr...

Страница 18: ...ition 3 Slide the brew group back into the machine along the guiding rails on the sides until it locks into position with a click Caution Do not press the PUSH button 4 Close the service door Lubricat...

Страница 19: ...milk frother 1 Insert the suction tube into a jug filled with fresh water 2 Place an empty container under the automatic milk frother Press the MILK FROTH button 3 When the water that flows out of the...

Страница 20: ...e dishwasher Disassembling the automatic milk frother 1 Remove the automatic milk frother from the hot water steam dispensing spout Remove the rubber grip from the hot water steam dispensing spout War...

Страница 21: ...om the hot water steam dispensing spout 3 Place a large container 1 5 l under the coffee dispensing spout START DESCALING 23 MIN 4 When the display asks Start descaling press the OK button to start th...

Страница 22: ...cycle The machine starts What to do if the descaling procedure is interrupted Once the descaling procedure has started you must let the machine perform the entire procedure until the very end without...

Страница 23: ...y Meaning of the error codes Below you find a list of the error codes that may appear on the display their meaning and how to solve the problem If these solutions do not help to remove the error code...

Страница 24: ...to solve the problem with the information below visit www saeco com care for a list of frequently asked questions or contact the Consumer Care Center in your country Problem Cause Solution The machin...

Страница 25: ...p is not in the correct position You did not put the brew group in the correct position before placing it back Make sure that the lever is in contact with the base of the brew group and that the hook...

Страница 26: ...ee comes out slowly The grinder is set to a too fine setting Use a different coffee blend or adjust the grinder The brew group is dirty Clean the brew group The coffee exit duct is blocked Clean the c...

Страница 27: ...lter you need to confirm activation in the machine menu Descale your machine first Then activate the AquaClean filter in the menu Also do this when you replace the filter The AquaClean filter icon doe...

Страница 28: ...pty the drip tray when the drip tray full indicator pops up through the drip tray Always empty the drip tray before you start descaling the machine The machine is not placed on a horizontal surface Pl...

Страница 29: ...START DESCALING 23 MIN...

Страница 30: ...4219 460 3607 1 9 2016 www saeco com care 75 recycled paper 75 papier recycl...

Отзывы: