SADiE LRX2 Скачать руководство пользователя страница 2


GETTING STARTED WITH THE SADIE LRX2 

INSTALLING THE SOFTWARE 

BEFORE you connect your LRX2 to the computer you will need to install the SADiE software. 

1.


You will have been provided with a CD-ROM containing the software installer. Place the disk in the 

CD-ROM drive. It should auto-run and a LRX Installation window will appear. 
(NOTE: If the CD does not auto-run, press the Windows

 "Start" button; select "Run" and type: 

"D:\setup" - if you are installing from CD-ROM. In this example D: is the letter of your CD-ROM 

drive. That may not be the case, so use the correct letter for your drive.) 

2.


Press the "Software" button, then the 

Version 5 PCM

 button on the next page. 

3.


Follow the instructions on screen as you run through the setup program. 

4.


Three icons will appear on your desktop 

 for the three variants of software 

 BB2, which is a very 

basic editing interface, MTR - a simplified recording interface tailored to working with the LRX2, and 

SADiE5 which is the full SADiE software. 

5.


Now you can proceed to connect power and then a USB lead between the PC and the LRX2 unit. 

After a short while, a Windows' "Found new hardware" message box will appear. Allow windows to 

install the hardware drivers automatically. 

6.


When Windows reports that the LRX hardware is ready to use, you can double-click on the SADIE5 

software icon to run the software. 
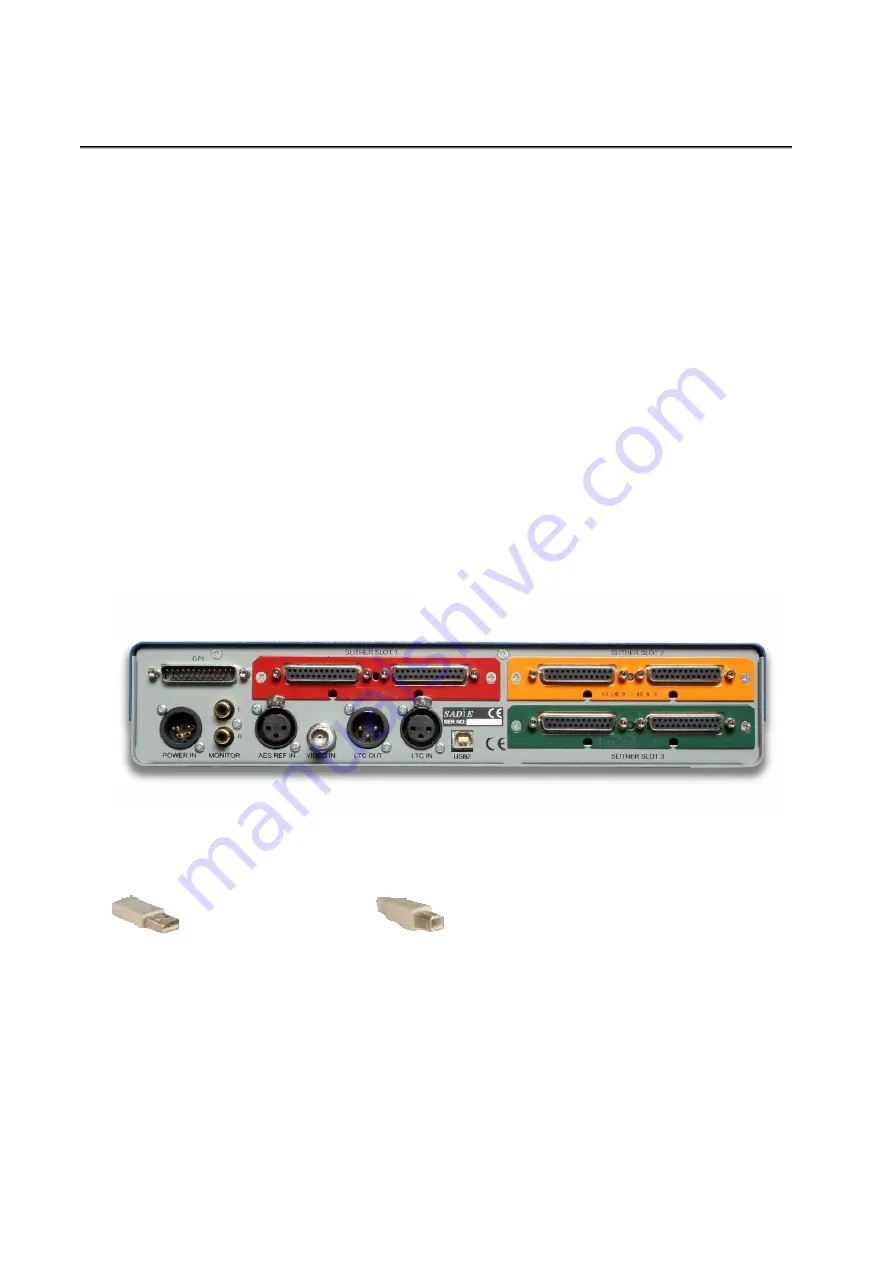
CONNECTING THE LRX2 


Your LRX2 will be supplied with a USB2 (A to B) cable, and a 12V DC power supply (PSU), with a mains plug 

appropriate to your geographical location. 
Your USB2 cable will have an "A" type end and a "B" type end. 


USB "A" Type connector 


USB "B" Type connector 

1.


Connect  the  Power  Supply  via  the  4-pin  XLR  connector  to  the  LRX2  unit,  and  plug  in  to  an 

appropriate mains supply. 

2.


Plug the "A" type connector in to a USB2 or Hi-Speed socket on the back of your PC, and plug the "B" 

type connector in to the USB2  socket on the LRX2 unit. 


NOTE: The LRX2 unit 

must

 use a USB2 connection and will not operate with a standard slow USB 

port. 

3.


Wait  for  Windows  to  plug-and-play  the  LRX;  allow  windows  to  install  the  hardware  drivers 

automatically.  Wait until there is notification that the hardware is ready to use before running the 

SADiE software. 

Содержание LRX2

Страница 1: ......

Страница 2: ...roceed to connect power and then a USB lead between the PC and the LRX2 unit After a short while a Windows Found new hardware message box will appear Allow windows to install the hardware drivers automatically 6 When Windows reports that the LRX hardware is ready to use you can double click on the SADIE5 software icon to run the software CONNECTING THE LRX2 Your LRX2 will be supplied with a USB2 A...

Страница 3: ...hers for analog or digital input and or output The back plates on the Slithers are colour coded Red is Analogue Line In Orange is Mic Line In Green is Analogue Line Out Blue is AES In Out Yellow is MADI The MADI slither is obviously different as it has BNC connectors on the back When viewed from the rear of the unit the right hand 25 way D Type connector of the two on each slither carries channels...

Страница 4: ...6 GROUND 18 Channel 5 HOT 6 Channel 5 COLD 19 Channel 5 GROUND 7 Channel 4 HOT 20 Channel 4 COLD 8 Channel 4 GROUND 21 Channel 3 HOT 9 Channel 3 COLD 22 Channel 3 GROUND 10 Channel 2 HOT 23 Channel 2 COLD 11 Channel 2 GROUND 24 Channel 1 HOT 12 Channel 1 COLD 25 Channel 1 GROUND 13 Not Connected 9 16 and higher is the same order To connect an In to an Out requires a straight pin to pin cable ...

Страница 5: ...OUND 18 Channel 1 2 OUT HOT 6 Channel 1 2 OUT COLD 19 Channel 1 2 OUT GROUND 7 Channel 7 8 IN HOT 20 Channel 7 8 IN COLD 8 Channel 7 8 IN GROUND 21 Channel 5 6 IN HOT 9 Channel 5 6 IN COLD 22 Channel 5 6 IN GROUND 10 Channel 3 4 IN HOT 23 Channel 3 4 IN COLD 11 Channel 3 4 IN GROUND 24 Channel 1 2 IN HOT 12 Channel 1 2 IN COLD 25 Channel 1 2 IN GROUND 13 Not Connected To connect an In to an Out yo...

Страница 6: ...ght just to the left of the connectors you will see a vertical line of sixteen three way headers one for each Input or Output There are three possible ways of connecting these jumpers to change the operating level This is noted in the legend on the slither card 24DBU No connection 21DBU Jumper to the left 18DBU Jumper to the right FACTORY DEFAULT Note that single ended connection is not advisable ...

Страница 7: ...p page under the H64 topic Meters are also displayed in the software beside the stream in both SADiE MTR and SADiE5 you may need to display these with a right click in the left side of the EDL in SADiE5 PFL is automatic in the MTR software and will PFL solo that stream to the Headphone outputs In SADIE5 software a PFL button has to be applied to each stream ALT Drag a Aux Send button from the mixe...

Страница 8: ...cord All Record Enables all Selected Streams Shift applies an alternative function when used in conjunction with other buttons Mode switches the first four buttons so that they become programmable function keys In the software these would be HWC F1 to HWC F4 respectively and are set in the usual Hotkey section of the Setup page Thus when the LED on Mode is lit the other keys are user keys Timecode...

Страница 9: ... approximately 13 5MB s read and 15 5MB s write should be expected Disk Drive fragmentation will spoil performance and even make a quick disk too slow for operation Windows de fragmentation tools should be run if drives are regularly not being completely wiped before recording The Optimised Record Mode item in the Record Setup page should be enabled for larger track counts This disables punch in t...

Страница 10: ...t WAV BWF format BWF has a maximum file size limit of approximately 4GB SADiE5 is able to choose other formats WAVE64 and SADiE3 format do not have this limitation but are less universally accepted The stereo mixdown stream in SADiE MTR is recorded as a stereo interleaved file for convenience whereas all other streams are mono But this means that if you are recording with the stereo mixdown stream...

Страница 11: ...er to be installed on Basic computer description processor speed amount of ram OS Your main work area Are you an existing SADiE user owner Where did you buy the product Date of purchase Where did you hear about the product What made you choose SADiE LRX2 Tick this box if you do not wish to receive offers and product information from SADiE Fax to SADiE UK 44 1353 648867 ...

Отзывы: