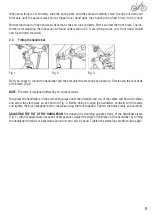
SachsenRad SachsenRad E-Racing R6 Скачать руководство пользователя страница 10

10

2.4 

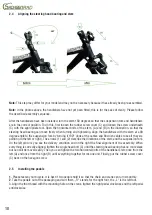
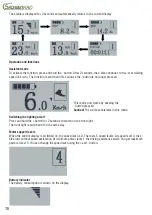
Aligning the steering head bearing and stem


Note: This step may differ for your model and may not be necessary because it has already been pre-assembled.

Note: In the photos above, the handlebars have not yet been fitted; this is for the sake of clarity. Please follow 

the described assembly sequence.

After the handlebars have been installed, turn the stem 180 degrees so that the suspension fork and handlebars 

are in the correct position. To do this, first loosen the rubber screw cover (C) and loosen the screw underneath 

(C) with the appropriate tool. Open the horizontal bolts of the stem, (A) and (B) in the illustration, so that the 

steering head bearing can move freely when turning and tightening. Align the handlebars with the stem at a 90 

degree angle to the suspension fork by turning it 180° (look at the cables and Bowden cables to see if they are 

pointing to the left or right). The arrows (1) and (2) describe the directions of the stem and the suspension fork. 

On the left pic-ture you see the delivery condition and on the right the final alignment of the assembly. When 

everything is correctly aligned, tighten the single head bolt (C) until the steering head bearing has no more slack 

but can still be moved easily. Then you can tighten the two horizontal bolts of the handlebar stem once from the 

left (A) and once from the right (B) until everything together forms one unit. Finally, put the rubber screw cover 

(C) back on the hexagon screw.

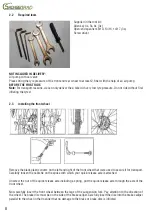
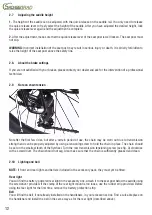
2.5   Installing the pedals

1. Please fasten your bicycle. It is best if two people hold it so that the chain and crank can turn smoothly. 

2. Take the pedals out of the packaging and sort them. „R“ stands for the right foot, the „L“ is the left foot. 

3. Align the foot thread with the mounting hole on the crank, tighten the right pedal clockwise and the left pedal 

anticlockwise.

Содержание SachsenRad E-Racing R6

Страница 1: ...User Manual with E Bike pass and maintenance log SachsenRad E Racing Bike R6 Productnummer BB12062 BB12083...

Страница 2: ...nd bell 12 2 11 Inserting the battery 13 3 OPERATION AND FUNCTIONS 13 3 2 Breaking with the E Bike 14 3 3 The control display 14 4 YOUR E BIKE BATTERY 18 4 2 Battery use safe storage and handling 19 4...

Страница 3: ...following warnings and precautions before using the pro duct for the first time If you lend your e bike to another person ask them to read this manual to minimise the chance of accidents WARNING Wear...

Страница 4: ...that it is dismantled properly We also have a short video online for you https www youtube com watch v zJ2FOVUJSYw Under the following link you will find a video tutorial on how to adjust the brake sy...

Страница 5: ...IKE BATTERY SERIAL NO MOTOR SERIAL NO IF AVAILABLE FRAME FORK RIM DERAILLEUR TYPE NUMBER OF GEARS SUSPENSION FORK BASKET FRONT CARRIER OTHERS FRAME NO MODEL TYPE ENGINE REAR CENTER SIZE IN INCHES COLO...

Страница 6: ...2 hours first Please read sections 5 2 and 5 3 Tip The battery must be charged for at least 12 hours before first use Please read section 5 2 and section 5 3 Remarks Upgrading with accessories attachm...

Страница 7: ...e lever front brake control 2 ASSEMBLY 2 1 Before assembly WARNING Incorrect assembly of your e bike can cause significant damage to the bike and even personal injury If you are not sure whether your...

Страница 8: ...wheel Remove the black plastic covers on the left and right of the front wheel that were used to secure it for transport Carefully loosen the cable tie on the spoke with which your quick release axle...

Страница 9: ...the steering head bearing First loosen the four bolts of the stem Fig 1 NOTE The stem is designed differently on some versions Now place the handlebars in the stem shell please note the direction and...

Страница 10: ...t the cables and Bowden cables to see if they are pointing to the left or right The arrows 1 and 2 describe the directions of the stem and the suspension fork On the left pic ture you see the delivery...

Страница 11: ...re A 2 Insert the seat post into the seat post bracket of the frame picture B 3 Press the quick release lever onto the frame and close it Please make sure that the lever is locked picture C Otherwise...

Страница 12: ...rtain period of use the chain may be worn out due to transmission strength and can be properly adjusted by using a tensioning screw to hold the chain in place The chain should be set on the smallest t...

Страница 13: ...osition Place the battery on top of the battery slide and let the battery slide down as far aspossible If the battery is in the correct posi tion you can lock the battery with the key Before each ride...

Страница 14: ...on the brake handle when you want the motor to work Try the brakes at low speed The brake hand le of the left hand corresponds to the brake of the rear wheel The brake handle of the right hand corres...

Страница 15: ...le for a good screen view Switch off the battery beforehand General operation control display Switching the e bike control display on and off Press and hold the ON OFF button for 2 seconds to switch t...

Страница 16: ...ressed Caution The e bike accelerates in this mode Switching the lighting on off Press and hold the button for 2 seconds to switch on the front light The front light is switched off in the same way Mo...

Страница 17: ...ease contact the manufacturer or a bicycle dealer in your vicinity Quality assurance and warranty The warranty is valid for 24 months from the date of purchase of the e bike and only if used properly...

Страница 18: ...and to 0 after riding NOTE When removing and inserting the battery always set the main switch to 0 beforehand Connections Battery contacts Charging socket USB Charging socket max 1A 5V DC 4 1 BATTERY...

Страница 19: ...equences such as fire serious injury or death If you have any questions about using the battery please contact your dealer WARNING Never short circuit a battery intentionally Doing so may cause an exp...

Страница 20: ...ill gradually lose its performance and life With proper use and maintenance your battery can maintain more than 80 capacity after more than 500 charging cycles but the decrease in total capacity is in...

Страница 21: ...rear brake and the right brake corresponds to the front brake Your e bike is equipped with normal speci fications of brake pads Please check the brake pads every time and ask your dealer about the br...

Страница 22: ...pecifications usually include if necessary cleaning greasing and adjustment of the certain compo nent and if necessary replacement of wear caused by fatigue or damage General infor mation and brief in...

Страница 23: ...rive slowly and keep clear of other vehicles and brake early Failure to do so may result in accidents sig nificant property damage serious bodily injury or death If you are unsure about the performanc...

Страница 24: ...se the door suddenly opens or the car blocks the line of sight so that you cannot see suddenly appearing people or things in time Please be especially careful in bad weather In wet weather your electr...

Страница 25: ...3 Inspection 4 Inspection Carried out on Carried out on Carried out on Carried out on Signature Stamp Specialist workshop Signature Stamp Specialist workshop Signature Stamp Specialist workshop Signat...

Страница 26: ...ontrol unit and motor damage 5 manipulated or wrong settings in display control unit 1 fully charge the battery 2 check the position of the batte ry slide 3 exchange the ebike battery 4 exchange the r...

Страница 27: ...gear shift 3 retension chain 4 retighten crank arms 5 tighten steering head bearings see point 2 5 page 10 Braking effect decreases Brake shows no effect 1 wear of brake pads 2 brake wrongly adjusted...

Страница 28: ...Output voltage 42V DC Output current 2A 11 DECLARATION OF CONFORMITY The manufacturer declares that the above mentioned products are in conformity with all relevant declarations of the Machinery Direc...

Страница 29: ...ontains more than 0 0005 mass percent mercury Please observe the above instructions 13 IMPRINT Every effort has been made to ensure that the information in this manual is correct however product opera...

Страница 30: ...applies in particular to the intended use as well as the care and maintenance instructions 6 Not included in the warranty are a Components subject to wear consumption or deterioration except for clear...

Страница 31: ...above are only valid if confirmed in writing by LEICKE GmbH SachsenRad 10 Should a technical problem occur with the e bike you have purchased please contact the sup port hotline of LEICKE GmbH Sachsen...

Страница 32: ...32 notes...

Страница 33: ...as unable to solve your problem 1 Please contact our customer service before you return the product 2 Pack well Take your time and pack the item carefully Remove old labels and barcodes from the shipp...

Страница 34: ...Battery Charger Display error code Brakes Motor Handlebar Suspension fork Wheel Light Bottom bracket Other If you send this receipt by mail please include pictures or videos of the defect as attachme...

Страница 35: ...35 notes...

Страница 36: ...36 We wish you a good trip with your SachsenRad E Racing Bike R6...

Отзывы: