background image

Quelle: Heinz Fingerhut, www.velo−classic.de | velopedia.online

Historische Fahrraeder e.V.

Содержание 301/A

Страница 1: ...tions Nr 3011 8 D E F Radnabenmotor Wheel Hub Engine Moteur moyeu de roue FICHTEL SACHS AG SACHS MOTOR Type 301 A 301 AB SAXONETTE Ausgabe Edition 11 1987 Quelle Heinz Fingerhut www velo classic de ve...

Страница 2: ...y ee Adjusting the carburettor ma the control cables es er ee RE INEA E Neenee ennen Wome Tess x ici i OT ee jx ii Maintenance chatte ft ni Seen Ee ne ze E Re lees Lubricants and ee agents RECE ze 5...

Страница 3: ...ark Power HP kW Kilowatt Tightening kpm Nm Newtonmeter torque Engine Speed RPM min per minute For a transitional period the previous units shall be stated in paren theses Please note changed figures F...

Страница 4: ...use other oils Damages caused by the using of other oils are not covered by warranty Centrifugal clutch inside crankshaft web Elektronic breakerless magneto maintenance free 1 0 0 2 mm 17 before TDC 0...

Страница 5: ...AB REPARATUR WERKZEUGE UND REPAIR TOOLS AND MOUNTING JIG OUTILLAGE DE R PARATION ET MONTAGE VORRICHTUNG BLOC DE MONTAGE MM Y Quelle Heinz Fingerhut www velo classic de velopedia online i s t o r i s c...

Страница 6: ...l bearings 6201 off the centrifugal clutch Shaft Puller sleeve assembly Threaded sleeve Hexagon head screw Thrust bearing Spare parts for 1476 013 000 Clamping ring inside dia 58 mm Puller shells Adju...

Страница 7: ...g connector 7 Throttle cable 8 Control cable for cold start choke run and stop 9 Rear brake cable 10 Adjusting barrel for rear brake 11 Brake lever 12 Freewheel sprocket To separate the engine from th...

Страница 8: ...e protective cap 3 Fig 1 off the carburet tor Set lever A Fig 4 at the handlebar to the symbol Disconnect the choke control cable 1 Fig 3 and the throttle control cable 3 Fig 3 by pushing the throttle...

Страница 9: ...r to dismantling Bolt the engine to the mounting jig Unscrew the exhaust silencer Bolt the engine to the mounting jig using 3 bolts M 6 x 20 and 6 washers outside dia 30 mm as shown in the picture Rec...

Страница 10: ...system Unscrew screws 3 Unscrew ignition coil with ignition cable Remove rubber grommet 4 and spark plug con nector Hold pole wheel using an adjustable pin spanner 1 Unscrew nut 2 left hand thread and...

Страница 11: ...crew carburettor 1 taking care of the sealing ring Unscrew diaphragm plate 2 and remove gasket Note On SACHS 301 AB engines the diaphragm plate is screwed to the housing with a special screw 1 M 5 x 1...

Страница 12: ...shaft Attention While removing the crankshaft never turn it to avoid piston ring fallure Take care of the half washers Clean all parts heck for wear and replace if necessary It is advisable to replac...

Страница 13: ...ring bush 4 washer 5 and gears 6 Take care of the needle cages and of the shims between the gears Pawls Remove snap ring 1 and pawls 2 Note The pawl carrier is fitted solid onto the 3rd stage gear Ins...

Страница 14: ...s in flush with the hub sleeve rim Rebuilding Lightly oil all the bearings prior to assembling Fit the needle roller assy 8 and gear 9 with the pawl carrier foremost Fit washer 11 thickness 1 mm needl...

Страница 15: ...with its closed side foremost and push the hub sleeve 5 over the pawls while slightly turning it clockwise Screw the adjusting cone 2 on and lock it with hex nut 1 M 10 x 1 Tightening torque 40 Nm 4...

Страница 16: ...ire utiliser le d monte axe de piston 12 Attention Pour remplacer un piston ou un cylindre il est indispensable de respecter l appariage Les pistons portent sur leur dessus une lettre rep re B C ou D...

Страница 17: ...tion straps will lock with the clutch flyweights see the arrow of Fig 25 Attention At the fulcrum point of each flyweight the friction strap 1 Fig 26 belonging to this flyweight must be on top of the...

Страница 18: ...t head screw 3 M 6 x 50 just by the height of its head Separate the clutch drum from the gear shaft by applying hammer blows plastic hammer onto the screw head 3 Unscrew the hexagon socket head screw...

Страница 19: ...ide Screw the parts with the gear shaft 5 handtight together Lock the gear as illustrated and screw both shafts tight Tightening torque 15 17 Nm 1 5 1 7 kpm Refer to Fig 30 Slip on the needle roller a...

Страница 20: ...ke spring 3 and starter pawl 4 Remove snap ring 2 Carefully remove cord pulley 1 taking care that the spiral spring underneath it will not jump out Remove cord Remove the check washer which is underne...

Страница 21: ...ng is reusable it will be cleaned and inserted coil by coil into the cord pulley The direction how to coil the spring is shown by an arrow The spring must be perfectly plane in the pulley Set the spri...

Страница 22: ...e outer casing length is 405 mm Fig 39 dimension A fit a 1450 mm long cord Fit the check washer only into starter housings without the white SACHS logo Slip on the pulley with spiral spring and cord p...

Страница 23: ...ed sector To achieve this position of the starter pawl 4 Fig 38 change the position of the knot 2 as need be Pull the clamp into the starter grip Secure the outer casing 4 by means of screw 5 Note Mak...

Страница 24: ...ventional measuring methods resistance measur ing Also there isn t any possibility of checking the ignition coil using commercial type ignition coil testers Only the function as explained e g on page...

Страница 25: ...f the starter slide 1 the fuel cock inside the carburettor gets closed and the ignition system grounded Idle adjustment screw 3 Idle speed 2300 2500 min Diaphragm plate The diaphragm plate 4 is availa...

Страница 26: ...le removing the cover plate take care of con tact spring 1 and the plate with plug 3 While fitting the cover plate take care that the contact pin 2 be guided in the contact spring 1 and that the plate...

Страница 27: ...rburettor set ting Cylinder Carefully remove carbon deposit from the combustion chamber and the transfer ports with a screwdriver Piston Carefully remove only carbon deposits flakes from the piston cr...

Страница 28: ...e d chire D coller le joints par de l gers coups de mandrin Pr senter l arracheur de telle sorte que les deux crochets 1 attaquent derri re la bordure en t le d acier du joint de vilebrequin S il est...

Страница 29: ...ase outer edge Apply LOCTITE 572 to the mating surface of the lower crankcase half taking care not to bring any of the sealing compound into the bearing seats Attention Be sparing with sealing compoun...

Страница 30: ...ring 3 and fasten them with 2 screws 6 M 5 x 32 and insulating washers 5 fabric side towards the carburettor Screw 6 to be fitted with sealing compound No 40 Brake The bearing bolt 4 is sealed in the...

Страница 31: ...while tightening the ig nition coil Push ignition cable with rubber grommet 5 into the carburettor cover plate There are no other jobs needed for setting the ignition How to check the function of the...

Страница 32: ...o this module will not occur therefrom If another working of the starting device does still not produce any ignition spark we recomend to replace the electronic module first If there is still no ignit...

Страница 33: ...has a play of about 1 mm Set lever A Fig 59 to 0 Stop Adjust the choke control cable by means of the barrel 1 Fig 59 so that there is a slight play of max 1 mm bet ween the lever 1 and the washer 2 T...

Страница 34: ...nt may be made at the handlebar adjusting bar rel 3 Fig 59 The hand brake lever must not bottom out onto the handlebar tube and the rear wheel must be clear to rotate when the hand brake lever is not...

Страница 35: ...s are not covered by war ranty Spark plug Provisional cleaning of the spark plug from carbon deposit on the insulator and between the electrodes A complete cleaning can only be achieved with a sand bl...

Страница 36: ...l otherwise remove the control cables and grease the inner wires well Engine and exhaust system Decarbonizing see page 26 Brakes In case of poor braking performance check the condition of the handleba...

Страница 37: ...ng crankshaft bearings Lubrication provided by two stroke mixture i e special SACHS mixing oil in cans F S Part No 0263 005 100 or special SACHS mixing oil in tubes F S Part No 0263 005 001 or two str...

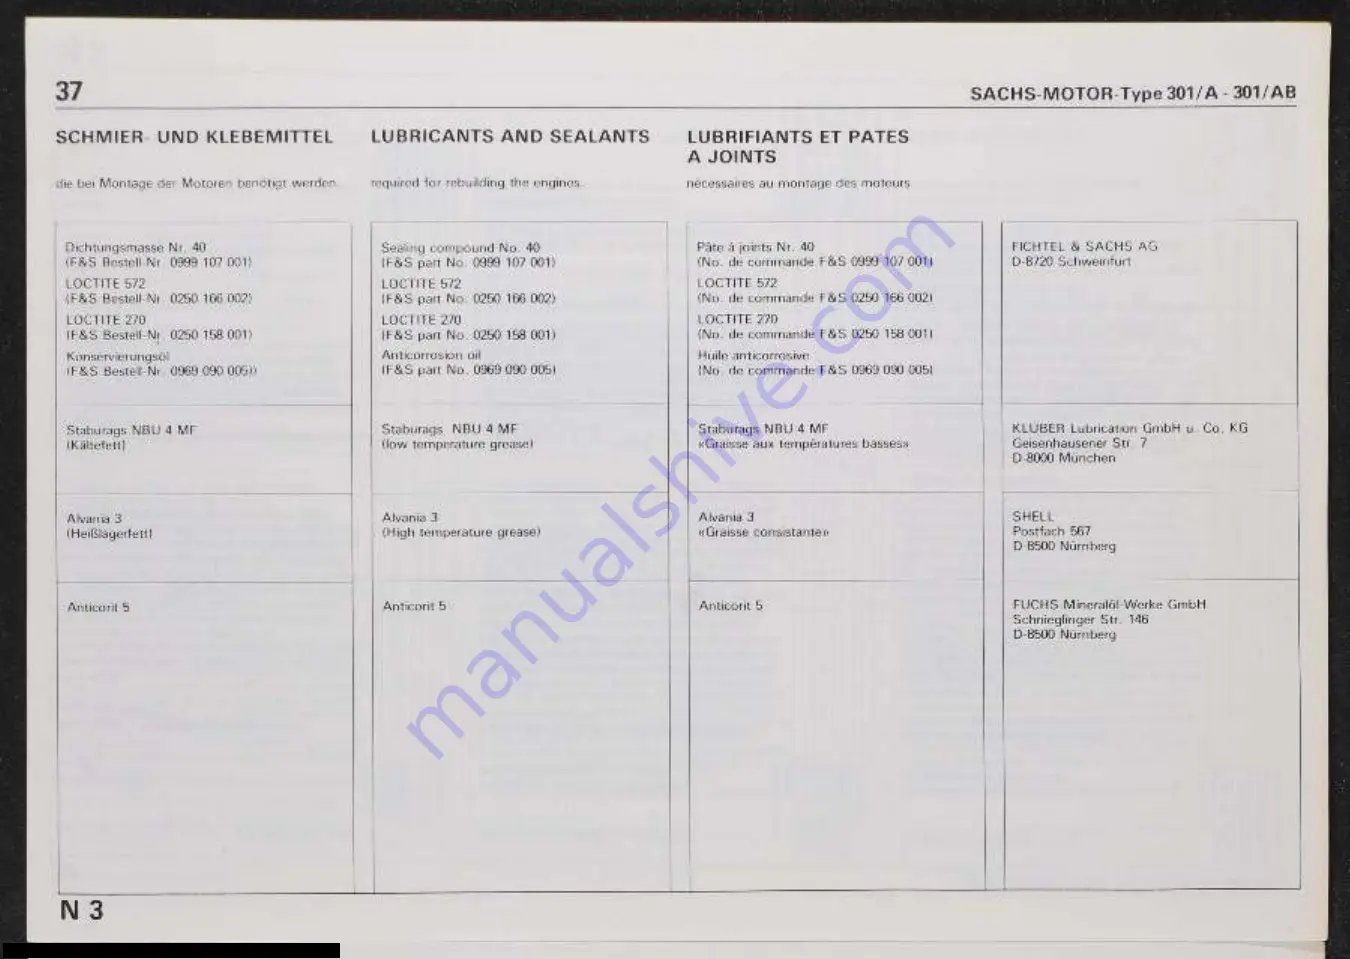
Страница 38: ...090 005 Staburags NBU 4 MF low temperature grease Alvania 3 High temperature grease Anticorit 5 LUBRIFIANTS ET PATES A JOINTS necessaires au montage des moteurs P te joints Nr 40 No de commande F S 09...

Страница 39: ...engine thoroughly with engine cleaner and preserve it with anticorrosive varnish Attention Store fuels and fuel oil mixtures in suitable receptacles tanks of the equipment or cans Such receptacles mus...

Страница 40: ...used but no wire brush Preserve the surface with an anticorrosive varnish Apply SACHS preservative and polish spray F S Part No 0269 003 000 to the frame chromium and painted parts Attention Using exc...

Страница 41: ...C 4 Quelle Heinz Fingerhut www velo classic de velopedia online i s t o r i s c h e F a h r r a e d e r e V...

Страница 42: ...O 3 Y N m PA O O L Y se Y o ud LL mn Di O LL Printed in Germany Quelle Heinz Fingerhut www velo classic de velopedia online i s t o r i s c h e F a h r r a e d e r e V...

Отзывы: