background image


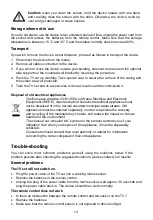
Caution:

  when you clean the screen, hold the device steady with one hand 

and carefully clean the screen with the other. Otherwise, the device could tip 
over and get damaged or cause injuries. 

Storage when not in use 

If you do not plan to use the device for an extended period of time, unplug the power cord from 
the socket and remove the batteries from the remote control. Make sure that the storage 
temperature is between -15 °C and 45 °C and the relative humidity does not exceed 90%. 

Transport 

If you wish to move the device a short distance, proceed as follows to transport the device: 

1.  Disconnect the device from the mains. 

2.  Remove all cables connected to the device. 

3.  If you wish to move the device outside your building, demount the base and the optional 

side supports or the mounted wall bracket by reversing the procedure. 

4.  Pack the TV set up carefully. Take special care to ensure the corners of the casing and 

the screen are well protected.  

5.  Take the TV set and its accessories to its new location and recommission it. 

Trouble-shooting 

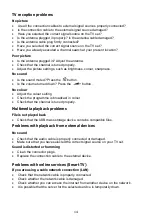
You can solve most common problems yourself using the solutions below. If the 

problem


persists after checking the suggested solutions, please contact your reseller.  

General problems 

The TV set will not switch on. 

  Plug the power cable of the TV set into a working mains socket. 

  Replace the batteries in the remote control. 

  Unplug the plug of the power cable from the mains socket, wait approx. 30 seconds and 

plug the power cable back in. The device should then work normally. 

The remote control does not work 

  Is there an obstruction between the remote control and the sensor on the TV? 

  Replace the batteries. 

  Make sure that the remote control sensor is not exposed to direct sunlight. 


Disposal of old electrical appliances 

The European directive 2012/19/EU on Waste Electrical and Electronic 
Equipment (WEEE), requires that old household electrical appliances must 
not be disposed of in the normal unsorted municipal waste stream. Old 
appliances must be collected separately in order to optimize the recovery 
and recycling of the materials they contain, and reduce the impact on human 
health and the environment. 
The crossed out “wheeled bin” symbol on the product reminds you of your 
obligation, that when you dispose of the appliance, it must be separately 
collected. 
Consumers should contact their local authority or retailer for information 
concerning the correct disposal of their old appliance. 
 

13

Содержание SBA43UHD194

Страница 1: ...M A N U E L D U T I L I S A T I O N Mod le n T L VISEUR LED SBA43UHD194 108cm...

Страница 2: ......

Страница 3: ...peuvent diff rer de l apparence du produit r el Le design et les sp cifications du produit peuvent tre modifi s sans pr avis Aide La fonction d aide offre un grand nombre d informations propos de vot...

Страница 4: ...u manuel lectronique comme suit Vous pouvez utiliser les fl ches et le bouton OK pour faire une s lection Contenu de l emballage 1 TV LED 1 pi ce 2 T l commande 1 pi ce 3 Support 2 pi ces 4 Manuel d u...

Страница 5: ...ts et les personnes handicap es peuvent ne pas tre en mesure de comprendre les risques potentiels Par cons quent les enfants et les personnes handicap es ne devraient jamais tre autoris s utiliser des...

Страница 6: ...llez retirer les piles Une utilisation incorrecte peut provoquer des explosions ou des fuites Attention C bles Tenez toujours les c bles par le connecteur et ne tirez pas sur les c bles eux m mes Veil...

Страница 7: ...facilitent le bon fonctionnement de l appareil et en prolongent la dur e de vie Positionnez l appareil uniquement sur une surface plane et stable et ne posez aucun objet sur l appareil L appareil n e...

Страница 8: ...it de compatibilit lectromagn tique et de blindage Utilisez exclusivement les accessoires recommand s par le fabricant N utilisez pas cet appareil des fins autres que celles indiqu es et ne le modifie...

Страница 9: ...es piles dans la t l commande 1 Retournez la t l commande avec le dessous orient vers le haut ins rez un doigt dans le renfoncement et poussez le couvercle du compartiment piles dans le sens de la fl...

Страница 10: ...Arri re 5 6 1 3 2 7 4 8 HDMI1 ANT DIGITAL AUDIO OUT AV USB2 0 5V 500mA COMMON INTERFACE 2 3 8...

Страница 11: ...9 HDMI1 ANT DIGITAL AUDIO OUT AV USB2 0 5V 500mA COMMON INTERFACE...

Страница 12: ...10...

Страница 13: ...de D finition des boutons de la t l commande Alimenta tion Son d sactiv M dia Num ros EPG Source Bouton directionnel OK Retour Voix Programme YouTube Couleur Sous titres TTX Info R gla ges Menu Volume...

Страница 14: ...une interface HDMI Si vous souhaitez connecter un appareil HDMI compatible ARC par exemple un home cin ma vous devez utiliser la prise HDMI 1 Pour lire les signaux audio et vid o provenant du p riph r...

Страница 15: ...e les signaux audio et vid o provenant du p riph rique externe sur le t l viseur s lectionnez la source de signal AV Pr parations Allumer et teindre le t l viseur Mise sous tension V rifiez que le t l...

Страница 16: ...e votre b timent d montez la base et les supports lat raux en option ou le support mural mont en inversant la proc dure 4 Emballez soigneusement le t l viseur Faites particuli rement attention ce que...

Страница 17: ...ur V rifiez que la cha ne est syntonis e correctement Probl mes de lecture multim dia Le fichier n est pas lu V rifiez que le p riph rique de stockage de masse USB contient des fichiers compatibles Pr...

Страница 18: ...ns Angle de vue H V Temp rature de fonctionnement C Temp rature de stockage Contraste Prise antenne standard 75 5 C 35 Couleur 1 07B 0 5W Classe d efficacit nerg tique A 1 170 170 L R g Diagonale d cr...

Страница 19: ...tion du support Voir galement le Guide d installation de la base fourni Le support est maintenant amovible 4 Installez le support mural VESA l arri re de l cran Suivez les instructions d installation...

Страница 20: ......

Страница 21: ......

Страница 22: ...108cm LED COLOR TELEVISION I N S T R U C T I O N M A N U A L Model No SB43UHD194...

Страница 23: ......

Страница 24: ...ded for reference only and may differ from actual product appearance Product design and specifications may be changed without notice Help The Help feature offers a lot of information about your TV ope...

Страница 25: ...elp option and then enter the e manual page as follows You can use the arrow and OK buttons to make a selection Package contents 1 Led TV 1 pc 2 Remote Control 1 pc 3 Stand 2 pc 4 User Manual 1 pc 5 S...

Страница 26: ...ies should never be allowed to use electrical devices unsupervised Batteries and small parts represent potential choking hazards Therefore keep the batteries in a safe place Seek medical attention imm...

Страница 27: ...d it especially near the plug and at the connection jack and never tie it to other cables All cables must be laid so that nobody can trip over them or be obstructed by them Do not try to open or modif...

Страница 28: ...a thick carpet on a bed or anywhere that obstructs the ventilation slots and leave at least 10 cm clearance on all sides Do not expose the device to direct heat sources e g heaters Do not expose the d...

Страница 29: ...t current Trademarks Dolby Dolby Audio and the Dolby logo are trademarks of Dolby Laboratories All other trademarks and registered trademarks are the property of their respective owners Getting starte...

Страница 30: ...e control if you are not going to use the device for an extended period of time Otherwise the remote control can be damaged by leaking battery acid Controls and connections Caution Before connecting o...

Страница 31: ...HDMI1 ANT DIGITAL AUDIO OUT AV USB2 0 5V 500mA COMMON INTERFACE Connection 8...

Страница 32: ...Connection 9...

Страница 33: ...System Settings Menu Source Select signal source Direction OK Press the direction buttons to select menu options or settings Press OK to select or confirm menu item Menu Display main menu Back Return...

Страница 34: ...I interface In order to play the audio and video signal fed in from the external device on the TV select the signal source as appropriate You can connect headphones or an analogue playback device to t...

Страница 35: ...ice or press the button on the remote control After use Cleaning Warning Make sure the device is unplugged from the mains power before cleaning Otherwise there is a risk of electrocution Never spill o...

Страница 36: ...he problem persists after checking the suggested solutions please contact your reseller General problems The TV set will not switch on Plug the power cable of the TV set into a working mains socket Re...

Страница 37: ...e USB mass storage device contains compatible files Problems with playback from external devices No sound Check that the audio cable is properly connected or damaged Make sure that you have selected t...

Страница 38: ...m another device on the wireless network It is possible that the server for the selected service is temporarily down Check the network settings on the TV set Note All the pictures in this user manual...

Страница 39: ...er consumption 0 5W Screen resolution in physical horizontal and vertical pixel count Wall mount Standard Operating Temperature Storage Temperature C 5 C to35 C 15 C to 45 SABA visible screen diagonal...

Страница 40: ...oosen the bracket fixing screw See also the Basic Installation Guide provided The stand is now removable 4 Install the VESA wall mount on the back of the screen Follow the installation instructions th...

Страница 41: ...Union harmonization legislation Radio Equipment directive 2014 53 EU and other Union harmonization legislation where applicable LVD2014 35 EU EMC2014 30 EU ErP2009 125 EC RoHS 2011 65 EU and 2015 863...

Страница 42: ......

Страница 43: ......

Страница 44: ......

Отзывы: