jxh
Страница 1: ...jxh Saab 9000 Service Manual M 1985 95 2 3 Fuel and air induction syste m...
Страница 2: ...E MANUAL 2 3 Fuel and air induction system M1985 1995 Foreword This service manual replaces Parts of service manual 2 3 LH Fuel injection system M1985 1989 Service Information 234 030 234 1057 234 115...
Страница 3: ...ortant Points out the risk of minor damage to the car and also warns the mechanic of difficulties and time wasting mistakes Note Hints and tips on how the work can be done in a way that saves time and...
Страница 4: ...ins bar psi Fuel pressure B202T M1987 System pressure bar psi Residual pressure after 20 mins bar psi Fuel pressure B234T System pressure bar psi Residual pressure after 20 mins bar psi Fuel pressure...
Страница 5: ...995 fuel level sensor full tank Resistance M1992 M1995 fuel level sensor empty tank Bosch Capacity at 2 5 3 0 bar counterpressure Resistance fuel level sensor full tank Resistance fuel level sensor em...
Страница 6: ...3 6 2 3 psi 2 8 0 25 0 15 bar 40 3 6 2 3 psi 3 0 0 25 0 15 bar 43 3 6 2 3 Turbo 1986 bar psi 2 5 36 2 7 39 2 9 42 3 1 45 bar psi 2 5 36 1 9 28 2 1 30 2 3 33 Saab9000 Technical data 3 Turbo B202i 1986...
Страница 7: ...sure regulator opening pressure bar 2 5 Turbo 86 Flow capacity ml 30s 104 Trionic Flow capacity aspirating engine ml 30s 127 10 Flow capacity turbo engine ml 30s 176 14 Motronic Flow capacity ml 30s 1...
Страница 8: ...ools 83 94 397 Wrench fuel pump Walbro M1988 89 83 94 330 Wrench fuel pump Bosch 83 93 886 Diagnostics cable 83 94 405 Testhose for checking fuel flow 83 94 462 Wrench fuel pump Walbro M1990 45 30 148...
Страница 9: ...tension fuel pressure adaptor V6 83 94 744 Adapter fuel pressure and fuel flow V6 83 93 852 Measuring equipment fuel pressure 83 93 860 Hose kit spare part 83 93 878 Nipple spare part 83 94 546 Instal...
Страница 10: ...n to the pres sure in the engine s air intake 4 cylinder engines only The quantity of fuel injected is therefore gov erned only by time the injector is open and not by pressure variations in the intak...
Страница 11: ...ensor and rubber gaiter The induction system is connected the throttle body The quantity of air used by the engine passes through the induction system where a filter removes dust particles The air cle...
Страница 12: ...ng The quantity of air used by the engine passes through the induction system where a filter removes dust particles The air cleaner air collection chamber also func tions as an intake air silencer The...
Страница 13: ...m consists of air intake pipe with resonator sound absorbing plastic chamber air cleaner rubber elbow mass air flow sensor and con necting hose The induction system is connected to the throttle body T...
Страница 14: ...tem 8202 2 4 3 1 Fuel pump 2 Fuel filter 3 Fuel line 4 Fuel rail 5 Injector 6 Pressure regulator 7 Cold starting valve certain versions only 8 Roll over valve M1985 88 only Saab9000 Technical descript...
Страница 15: ...escription Fuel system B234 i T 5 7A 2 3 1 Fuel pump 2 Fuel filter 3 Fuel line 4 Pulsator 5 Fuel rail 6 Injector 7 Pressure regulator Turbo engines engines 8 Cold startin9 valve certain versions only...
Страница 16: ...pump assemblies Bosch 1 Fuel pump 2 Feed pump 3 Fuel level sensor 2 Walbro negative ejector 1 Non return valve in pump unit 2 Two versions of roll over valve in return line Saab 9000 Technical descri...
Страница 17: ...mblies contd 1 2 Walbro positive ejector 1 Non return valve in feed line 2 Roll over valve in return line 1 2 Walbro positive ejector with integrated fuel level sensor 1 Non return valve in feed line...
Страница 18: ...f the pressure exceeds a certain level A non return valve on the pressure side of the pump prevents the pressure in the fuel line from dropping immediately if the ignition is switched off An electric...
Страница 19: ...e pump As the main pump is located in the reservoir fuel supply is assured during cornering and accelera tion even when only a small quantity of fuel remains in the tank The pump unit with the ejector...
Страница 20: ...r fuel supply is assured during cornering and accelera tion even when only a small quantity of fuel remains in the tank Pump and motor are sealed and cannot be dismantled for overhaul A non return val...
Страница 21: ...holds the fil ter in the metal housing The efficiency of the filter de pends on how contaminated the fuel is Fuel rail The fuel rail uniformly distributes fuel to all the injec tors The fuel rail also...
Страница 22: ...take pipe behind the air throttle via a hose previously on V6 This means that the pressure in the fuel system is affected by the abso lute pressure in the intake pipe which means that the pressure dro...
Страница 23: ...ke pipe The temperature sensor continuously supplies the control module with information about the temperature of the intake air The IAT sensor consists of a brass body with an NTC type resistor at it...
Страница 24: ...he air cleaner and filter are located in the left hand wheel housing Intake air is drawn invia a snorkel be tween the air cleaner and an outlet in the left hand wheel housing plate The air cleaner con...
Страница 25: ...jxh 22 Technicaldescription Saab 9000...
Страница 26: ...er 27 Air induction system 4 Cyl i S M1989 28 Changing filter cartridge air cleaner 29 Removing air cleaner housing 30 Induction system V6 M1995 32 Changing air filter and air collection box 33 Changi...
Страница 27: ...m air cleaner 3 Undo the clips securing the upper part of the air cleaner 4 Remove the air cleaner lid and removethe filter 5 Clean the air collection box lower part of air cleaner Fit new filter Plac...
Страница 28: ...the mass air flow sensor Removal 1 Disconnect electrical connection 2 Remove connecting pipe 3 Remove mass air flow sensor from rubber gai ter Fitting Fitting is in reverse order Saab 9000 Air inducti...
Страница 29: ...ir induction system Air induction system 4 Cyl turbo engine M1988 1 6 3 5 1 Mass air flow sensor 2 Filter cover 3 Filter cartridge 4 Inner air cleaner housing 5 Outer air cleaner housing 6 Air pipe Sa...
Страница 30: ...e the filter housing with a dry cloth 4 Place a new filter in the filter housing Note that the air intake opening should face outwards to wards the intermediate piece 5 Fit the intermediate piece comp...
Страница 31: ...r induction system Air induction system 4 Cyl i S M1989 1 5 1 Mass air flow sensor 2 Plastic pipe connecting pipe 3 Filter cartridge 4 Inner air cleaner housing 5 Outer air cleaner housing 6 Air pipe...
Страница 32: ...lter cartridge 3 Wipe the inner air cleaner housing with a dry cloth Important When fitting the new filter cartridge it the open end should point upward toward the lid 4 Place a new air filter cartrid...
Страница 33: ...he inner air cleaner housing is freed Important When removing the light cluster as detailed below take care not to scratch the bumper Never place the cluster directly on the bumper but always place a...
Страница 34: ...lift out the outer part of the air pipe Two of the clips can be undone through the light cluster opening 8 Remove the three inner air cleaner housing re taining screws 9 Press down the locking lugs o...
Страница 35: ...duction system V6 M1995 2 3 1 Air intake pipe 2 Resonator 3 Air cleaner consisting of 4 Filter element 5 Air collection chamber 6 Intake air temperature sensor 7 Mass air flow sensor 8 Connecting hose...
Страница 36: ...the air cleaner 7 Undo the sensor connectors and remove the MAF sensor 8 Remove the hose to the idle air control valve on the intake pipe 9 Undo the hose clips between the air intake pipe and the thr...
Страница 37: ...hose located between the air pump and intermediate piece from the intermediate piece 14 Undo the clips holding the intermediate piece to the air cleaner 15 Remove the intermediate piece 16 Remove the...
Страница 38: ...the resonator 2 Undo the two clips between the MAF sensor and the air cleaner 3 Unplug the sensor connector and remove the MAF sensor Air induction system 35 0 ________________ Fitting Lubricate the...
Страница 39: ...tor and remove the MAF sensor 8 Remove the hose to the idle air control valve on the intake pipe 9 Undo the hose clips between the air intake pipe and the throttle body 1O Lift the air intake pipe tog...
Страница 40: ...ing fuel gauge float arm position 66 Important For method for changing fuel rail and checking changing the fuel pressure regulator M1985 1993 see service manual 2 3 LH Fuel injection system Checking f...
Страница 41: ...parate draining unit via the filling pipe or using _ the car s fuel pump Emptying the tank with the car s fuel pump Remove the floor from the luggage compart ment and the cover over the fuel pump elec...
Страница 42: ...ews from the floor of the luggage compartment and remove the floor 3 Turn both the bayonet fasteners that secure the cover over the fuel pump using a hexagon key and remove the cover 4 Unscrew the ban...
Страница 43: ...he RH side and bend the handbrake cable to one side Lift down the strap on the LH side Support the tank while working o Lift down the tank LH side first Make sure that the tank s pipe is not damaged a...
Страница 44: ...nearby Be careful of the danger of sparking e g from cir cuit breaking short circuiting etc No smoking Fuel system 41 Removal 1 Empty the fuel from the tank 2 Remove the two retaining screws from the...
Страница 45: ...handbrake cable to one side Lift down the strap on the LH side Support the tank while working 10 Lift down the tank LH side first Make sure that the tank s pipe is not damaged against the plate edge...
Страница 46: ...fuel connec tions Place a container in a suitable place to col lect the fuel that runs out 2 Drain fuel from filter before removing 3 Loosen both banjo connectors somewhat Use hexagonal grip to hold t...
Страница 47: ...ort circuiting etc No smoking 0 0 Removal Raise the car and remove the RH rear wheel 2 Clean around the filler pipe so that dirt does not get into the pipe or the tank 3 Remove the rubber elbow connec...
Страница 48: ...th the wing and twist it so that the roll over valve at the front clears the edge of the body panel Withdraw the pipe sufficiently to provide better access to dis connectthe breather hose Remove the h...
Страница 49: ...he danger of sparking e g from cir cuit breaking short circuiting etc No smoking Removal 1 Raise the car and remove the RH rear wheel 2 Clean around the filler pipe and its connections 3 Remove the cl...
Страница 50: ...ment floor and undo both the bolts holding the floor Raise the floor 2 Turn both the bayonet clips securing the cover over the fuel pump and remove the cover 3 Remove the clip around the pump s sealin...
Страница 51: ...safety valve at the top of the container 7 If the feed pump is running but no fuel comes out of the safety valve change the feed pump If the feed pump is not working checkthe leads to it Fitting Fitti...
Страница 52: ...r part of the luggage compart ment floor and undo both the bolts holding the floor Raise the floor 2 Turn both the bayonet clips securing the cover over the fuel pump and remove the cover 3 Unplug the...
Страница 53: ...the fuel pump out of the container 3 Remove the clamp that holds the sealing collar and remove the pump from the collar 4 Pull the strainer from the pump 5 Unscrew the clamp from around the sealing co...
Страница 54: ...pump 45 4 Adjust the overall height of the pump to 250 mm 9 8 in 4 3 Fuel system 51 ________________ 5 Connect the return hose to the fuel container and attach the clamp Connect the fuel pump electric...
Страница 55: ...g short circuiting etc No smoking Important Before starting work on the pump release the pressure in the fuel system by undo ing the nipple on the fuel filter Retighten the nip ple Removal 1 Release t...
Страница 56: ...albro fuel pump contd 4 Tie the fuel lines to the floor panel with a plastic tie 5 Fit tool 83 94 397 as illustrated 6 Pass the chain through the load securing eyes and tighten it Saab 9000 Fuel syste...
Страница 57: ...the screw top and place the tool to one side 8 Undo the screw top by hand Remove the rubber seal and raise the pump tilting the top over to the right Lift the pump out of the tank and transfer it to a...
Страница 58: ...he tank centered between the ribs on the bottom of the tank and with the mark on the top of the pump against the mark on the top of the tank 2 Lubricate a new rubber gasket with acid free vaseline and...
Страница 59: ...op with tool Tightening torque 75 Nm 55 lbt ft 5 Connect the fuel lines with new O rings on the connectors The return line with non return valve inthe fitting is connected to the outlet towards the re...
Страница 60: ...ubber gasket has come loose and blocked the aper ture in the ejector pump When correcting this the non return valve is fitted with a plastic gasket consisting of peg 8977761 and valve 8977779 In produ...
Страница 61: ...on return valve the pump unit must be lifted out of the tank and the ejector pump must be blown clean to remove any remains of the valve 4 Place the new peg in the valve and press the valve into the r...
Страница 62: ...ced at the same time 1 Remove the fuel pump 2 Free the ejector pump from the container by us ing a small screwdriver to liftthe small lugs hold ing the side of the ejector pump 3 Rotate the ejector pu...
Страница 63: ...d 5 Assemble the pump unit with a new container in cluding filter and O ring 6 Fit the ejector pump with a new 0 ring Align the pump in position with the lugs outward Rotate the pump 90 so that the lu...
Страница 64: ...nto the pump s return line Ifthis does not help disman tle the fuel pump i Detach the ejector pump from the container by lifting the small lugs securing the sides of the ejector pump using a small scr...
Страница 65: ...thout damaging the fittings 2 Thread on hose clips and fit the new hose The ends of the hose may be dipped in soap solution to make them easier to fit 3 Tighten the hose clips and at the same time mak...
Страница 66: ...hten the fitting 8 Fuel system 63 Removal Remove the parcel shelf and fold the backrest forward not CD 2 Remove the cover rail On CD cars with small screwdriver bit 3 Fold up the rear portion of the l...
Страница 67: ...n indicators aligned 3 Fit and tighten the screw cap using tool 83 94 462 and torque wrench Tightening torque 75 55 lbf ft Check that the positioning marks are still aligned Positioning marks pump cap...
Страница 68: ...mp 5 Fit new O rings 79 74 546 onto the valve 6 Connect wiring and fuel lines Fitthe locking pin 7 Check the residual pressure to see ifthe non re turn valve was the cause of the fault 8 Start the car...
Страница 69: ...the sensor should be Empty tank float arm in lowest position 30 40 Ohms Full tank float arm in uppermost position 340 360 Ohms Year model M1992 When the tank is on a level surface the distance be twe...
Страница 70: ...3 4Cyl Fit a test hose part No 83 94 405 to the return flow Place the free end in a 2 I measuring beaker 6Cyl Connect adapter with hose special tool No 83 94 744 tho the fuel rail return Place the hos...
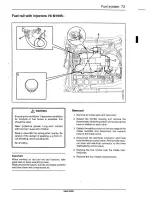
Страница 71: ...njectors take great care to keep everything clean Wash around the valves fuel railand intake manifold and blow clean with compressed air Removal 1 Remove the plastic pipe between the throttle body and...
Страница 72: ...of the upper half of the intake manifold and slightly loosen the lower ones 7 Remove the oil filler pipe bracket and the re maining screws on the upper half of the intake manifold 8 Lift off the upper...
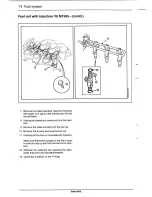
Страница 73: ...sure that there is paper or similar to hand in order to mop up the fuel that comes out of the fuel rail or injectors 12 Remove the injector retaining clips and remove the injectors Fitting Fitting is...
Страница 74: ...g clean Wash around the valves fuel rail and intake manifold and blow clean with compressed air 3 4 0 ____________ Removal Remove the screws from the fuel rail 2 Carefully lift the fuel rail complete...
Страница 75: ...compressed air 0 0 1 Remove fuel rail complete with injectors see page 68 aspirating engine or page 71 turbo depending on engine version 2 Start the fuel pump by connecting LH diagnostic cable 83 93...
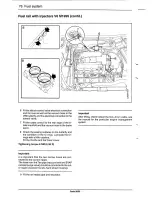
Страница 76: ...Wash around the valves fuel rail and intake manifold and blow clean with compressed air Fuel system 73 Removal 1 Remove air intake pipe and resonator 2 Detach the throttle housing and remove the thre...
Страница 77: ...from the injec tors 9 Remove the cable conduit from the fuel rail 1o Remove the screws securing the fuel rail 11 Carefully lift the fuel rail complete with injectors Make sure that there is paper or t...
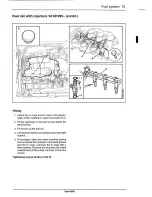
Страница 78: ...uring clip 3 Fit and do up the fuel rail 4 Connect the injector connectors and fit the cable conduit 5 If necessary clean the intake manifold parting line and check the condition of the sealing faces...
Страница 79: ...on the butterfly and the condition of the O rings Lubricate the O rings with a Jittlevaseline Fit the throttle and the three hoses Tightening torque 8 NM 6 lbf ft Important It is important that the tw...
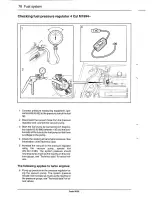
Страница 80: ...nd the valves fuel railand intake manifold and blow clean with compressed air 1 Remove the fuel rail complete with injectors as described on the previous pages 2 Start the fuel pump by jumping between...
Страница 81: ...mp so that there is voltage to the pump 4 Check the reading at barometric pressure See information under technical data 5 Increase the vacuum in the pressure regulator using the vacuum pump special to...
Страница 82: ...mportant When working on the fuel rail and injectors take great care to keep everything clean Wash around the valves fuel rail and intake manifold and blow clean with compressed air Removal 0 0 Discon...
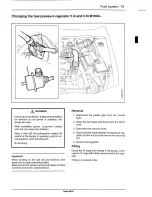
Страница 83: ...When working on the fuel rail and injectors take great care to keep everything clean Wash around the valves fuel rail and intake manifold and blow clean with compressed air Removal 1 Start by cleanin...
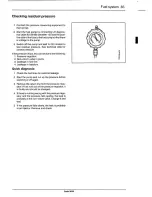
Страница 84: ...tor and connect the vacuum pump 3 Start the fuel pump by jumping between fuses 14 and 18 using special tool 83 93 886 4 Check the reading a barometric pressure The reading should be 3 0 bar 43 5 psi 5...
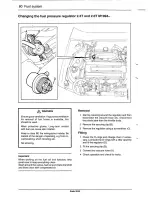
Страница 85: ...g short circuiting etc No smoking Important When working on the fuel rail and injectors take great care to keep everything clean Wash around the valves fuel rail and intake manifold and blow clean wit...
Страница 86: ...ing 1 Pressure regulator 2 Non return valve in pump 3 Leakage in fuel line 4 Leakage in injectors Quick diagnosis 1 Check the fuel lines for external leakage 2 Start the pump and run up the pressure b...
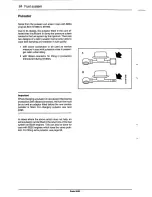
Страница 87: ...ure in cars with pulsation noise in passen ger cabin when idling 2 with ribbed connector for fitting in production introduced during M1992 Important When changing a pulsator of new design fitted durin...
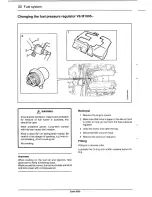
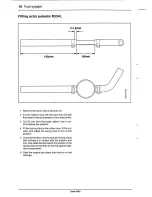
Страница 88: ...rt circuiting etc No smoking Important When working on the fuel rail and injectors take great care to keep everything clean Wash around the valves fuel rail and intake manifold and aboutclean with com...
Страница 89: ...se to ac commodate the pulsator 4 Fit two spring clips to the rubber hose fit the pul sator and adjust the spring clips to the correct position 5 Connect the return line to the fuel rail and check tha...
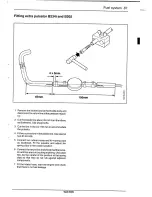
Страница 90: ...nectors inthe plastic line Use special tool 83 94 546 5 Connect two rubber hoses and fit 4 spring clips as illustrated Fit the pulsator and adjust the spring clips to the correct position 6 Connect th...
Страница 91: ...Manual concerned It is important that Saab technicians in the field regard the Workshop Service Manual as their bible and we therefore strive to make the manual easy to use and to provide accurate inf...
Страница 92: ...jxh Saab Automobile AB Trollhattan Sweden Printed Systems AB ai 0 l 1 c 0 gi w z C 0...