


6
Original
instructions
| English
ELECTRICAL
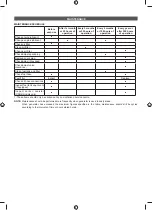
GENERATOR CAPACITY
Make sure the generator can supply enough continuous
(running) and surge (starting) watts for the items you will
power at the same time. Follow these simple steps.
1. Select the items you will power at the same time.
2. Total the continuous (running) watts of these items. This
is the amount of power the generator must produce to
keep the items running. See the wattage reference
chart at right.
3. Estimate how many surge (starting) watts you will need.
Surge wattage is the short burst of power needed to
start electric motor-driven tools or appliances such as a
circular saw or refrigerator. Because not all motors start
at the same time, total surge watts can be estimated by
adding only the item(s) with the highest additional surge
watts to the total rated watts from step 2.
NOTE:
The total generator output required, which is the
sum of the continuous (running) and the surge (starting)
watts, are based on the standard environment ambient
air temperature (25 °C/298 K), ambient air pressure
(100 kPa), and relative humidity (30%). The continuous
(running) and surge (starting) watts will be different when
the environmental conditions change.
Example:
Tool or
Appliance
Running Watts*
Additional Starting
Watts*
Refrigerator
700
1350
Portable fan
40
120
Laptop
250
250
46" flat panel
television
190
190
Light (75 Watts)
75
75
1255 total
Running watts
1350 highest
starting watts
Total Continuous (Running) Watts
1255
Plus Highest Additional Surge Watts
+1350
Equals Total Generator Output Required
2605
POWER MANAGEMENT
To prolong the life of the generator and attached devices,
it is important to take care when adding electrical loads to
the generator. There should be nothing connected to the
generator outlets before starting its engine. The correct and
safe way to manage generator power is to sequentially add
loads as follows:
1. With nothing connected to the generator, start the
engine as described later in this manual.
2. Plug in and turn on the first load, preferably the largest
load (highest wattage) you have.
3. Permit the generator output to stabilise (engine runs
smoothly and attached device operates properly).
4. Plug in and turn on the next load.
5. Again, permit the generator to stabilise.
6. Repeat steps 4 and 5 for each additional load.
7. Never add more loads than the generator capacity.
Take special care to consider surge loads in generator
capacity as previously described.
CAUTION
Do not overload the generator’s capacity. Exceeding the
generator’s wattage/amperage capacity can damage the
generator and/or electrical devices connected to it.
Application/Equipment
Estimated
Starting
Watts*
Estimated*
Additional
Starting
Watts
Emergency / Home Standby
Lights (qty. 4 x 75 W)
300
300
Refrigerator
700
1350
46" flat panel television
190
190
Satellite receiver
250
250
Portable fan
40
120
Heater
1300
1300
Laptop
250
250
Slow cooker
270
270
Radio
50
50
DIY/Job Site
(OHFWULFGULOOíPP
600
1000
Quartz halogen work light
1000
1000
Reciprocating saw
960
1920
&LUFXODUVDZíPP
1400
2300
0LWUHVDZíPP
1800
1800
$LUFRPS3
970
1600
$LUOHVVVSUD\HUí+3
600
1200
*Wattages listed are approximate. Check tool or appliance for actual wattage.
FEATURES
KNOW YOUR GENERATOR
See figure 1
The safe use of the product requires an understanding of
the information on the product and in this operator’s manual
as well as a knowledge of the project you are attempting.
Before use, familiarise yourself with all operating features
and safety rules.
AC CIRCUIT BREAKER
The circuit breaker is provided to protect the generator
against electrical overload and can be used to turn the
generator’s electrical power on or off.
240 V AC RECEPTACLE
Your generator has the following single phase, 50 Hz
outlets: Two 240 Volt AC, 15 Amp receptacles. These can
be used for operating appropriate appliances, electrical
lighting, tools, and motor loads.
Содержание RGN3600B
Страница 1: ...ORIGINAL INSTRUCTIONS Low Power Generating Set RGN3600B...
Страница 4: ...Fig 4 Fig 5 Fig 6 11 8 9 6 10 Fig 7 Fig 8 16 15 13 12 17 14...
Страница 5: ...Fig 9 7 13 12 14 Fig 10 2 Fig 11 20 19 18 21 Fig 12...
Страница 6: ...Fig 13 Fig 15 Fig 16 Fig 17 Fig 14 22 28 26 27 29 24 25 23 30...
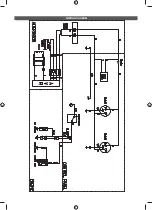
Страница 21: ...WIRING DIAGRAM...
Страница 22: ......
Страница 23: ......