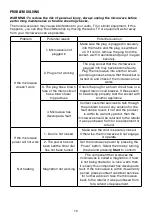
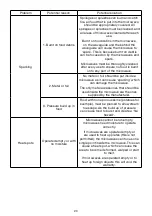
Russell Hobbs RHMO10 Скачать руководство пользователя страница 22

22

Problem

Potential reason

Potential solution

Too noisy

1. Glass turntable fitted 

incorrectly

Check that the glass turntable has been 

placed correctly on the turntable and is not 

hitting the walls/doors of the microwave 

during operation.

2. Dishes/plate are too 

large for the microwave

Check that the dishes/plates are the correct 

size for the microwave and that they are not 

hitting the walls/door of microwave during 

operation.

Door not shutting/

locking

1. Glass turntable fitted 

incorrectly

Check that the glass turntable has been 

placed correctly on the turntable and is not 

stopping the door from shutting correctly.

2. Latches have 

become deformed

If the microwave is within its warranty 

period, please contact customer services 

for further advice or take the microwave 

back to the retailer it was purchased from 

for a refund or replacement.

Turntable not 

rotating

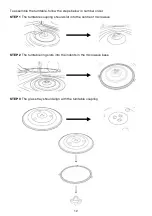
1. Turntable coupling 

not fitted or tape not 

removed

Check that the turntable coupling is fitted 

correctly and the transportation tape has 

been removed.

2. Turntable roller 

ring not fitted or fitted 

incorrectly

Check that the coupling has be placed 

under the turntable and that it is position 

correctly.

3. Glass turntable fitted 

incorrectly

Check that the glass turntable has been 

placed correctly on the turntable.

4. Turntable has 

developed a fault

If the microwave is within its warranty 

period, please contact customer services 

for further advice or take the microwave 

back to the retailer it was purchased from 

for a refund or replacement.

SPARE PARTS

Turntable ring

Glass turntable

Turntable coupling

Содержание RHMO10

Страница 1: ...RHMO10_IB_FA_081220 1 YEAR WARRANTY 20L COMPACT DIGITAL MICROWAVE RHMO10 INSTRUCTIONS WARRANTY ...

Страница 2: ... It is not designed for industrial or laboratory use 10 The microwave oven has several built in safety switches to ensure that the power remains off when the door is open Do not tamper with these switches 11 Do not use the microwave oven cavity for storage purposes Do not store combustible items such as bread cookies paper products etc inside the oven 12 Do not use the microwave oven for the purpo...

Страница 3: ... the microwave oven 12 Do not store or use this appliance outdoors 13 Keep cord away from heated surfaces 14 Do not cover the microwave oven when in use 15 Keep the microwave oven and the power cord away from the edge of table or countertops and out of reach of children and persons with reduced physical sensory or mental capabilities 16 Do not place on or near any hot or damp surface 17 Do not ins...

Страница 4: ...e container is removed from the microwave oven is not always present This could result in very hot liquids suddenly erupting when the container is disturbed or a spoon or other utensil is inserted into the liquid Care must be taken when handling the container 16 Stir liquids both before and halfway through heating for best results 17 After heating allow the container to stand in the microwave oven...

Страница 5: ...n should not be adjusted or repaired by anyone except properly qualified service personnel c Liquids and other foods must not be heated in sealed containers as they are liable to explode IF MATERIALS INSIDE THE MICROWAVE OVEN IGNITE 1 Keep the microwave oven door closed to contain and stifle any flames 2 Turn the microwave oven off and remove the plug from the wall power outlet Please ensure cooki...

Страница 6: ...ome microwave energy and should NOT be used This test is not applicable for plastic items Check the markings on plastic items to ensure they are microwave safe CAUTION Personal Injury Hazard Use an oven mitt or tea towel when handling containers and utensils that have been heated in the microwave Cookware Microwave Glass plate Turntable ring assembly and Turntable shaft provided Yes Heat Resistant...

Страница 7: ...Heat resistant oven glassware only Make sure there is no metallic trim Do not use cracked or chipped dishes Confirm glassware is heat resistant before using in the microwave oven Oven cooking bags Follow manufacturer s instructions Do not close with metal tie Make slits to allow steam to escape Paper plates and cups Use for short term cooking warming only Do not leave microwave oven unattended whi...

Страница 8: ...cause arcing and could cause a fire in the microwave oven Paper bags May cause a fire in the microwave oven Recycled paper products Unless the paper product is labelled as microwave safe Recycled paper products may contain impurities which may result in sparks and or fires when used Plastic foam Plastic foam may melt or contaminate the liquid inside when exposed to high temperatures Wood Wood will...

Страница 9: ...rowaves to pass through to cook the food Please ensure you keep this cover clean at all times by wiping with a damp cloth Do not remove place in a dishwasher 2 Check the oven after unpacking for any visual damage such as A misaligned door Damage to the door Dents or holes in the door window and screen Dents in the inside This microwave oven weighs approximately 11 5kg so you must put it on a horiz...

Страница 10: ...nterlock latches 2 Door assembly and window 3 Glass turntable 4 Oven cavity 5 Microwave top 6 Plastic waveguide cover do not remove 7 Screen display 8 Control panel buttons and dial 9 Turntable coupling 10 Turntable ring 11 Glass turntable ...

Страница 11: ...icrowave oven 5 A minimum clearance of 20cm is required between the microwave oven and any adjacent walls 6 Do not remove the legs from the bottom of the microwave oven 7 Blocking the intake and or outlet vents can damage the microwave oven WARNING Do not install microwave oven over a range cook top or other heat producing appliance If installed near or over a heat source the microwave oven could ...

Страница 12: ...the steps below in number order STEP 1 The turntable coupling should slot into the centre of microwave STEP 2 The turntable ring slots into the indents in the microwave base STEP 3 The g lass tray should align with the turntable coupling ...

Страница 13: ... to set the time to 08 30 am 1 Press the Clock Pre Set button The display will show 0 00 2 Turn the Timer Weight Auto Menu dial clockwise until the hour display shows 8 Press the Clock Pre Set button to confirm 3 The display will show 8 00 and the minutes will flash 4 Set the minutes by turning the Timer Weight Auto Menu dial clockwise until the display shows 08 30 Press the Clock Pre Set button t...

Страница 14: ...t on the display take out the contents close the door and press the Stop Clear button twice to clear When cooking has finished the microwave will beep five times and the screen display will go back to the clock indicating that the microwave has stopped QUICK START FUNCTION For quick and easy microwave cooking you can press the Start 30Sec Confirm button to automatically add 30 seconds of cooking t...

Страница 15: ...ing you are able to activate the auto menu by turning the Timer Weight Auto Menu dial clockwise This will display A 1 A 8 Continue to rotate the dial to access the other auto selections up to A8 You will need to use your discretion regarding food type temperature and weight as times may vary below is a guideline for each auto cooking setting Display Auto Menu Weight g on the Display Power A 1 Rehe...

Страница 16: ...resent to input the programmes Make sure your food is in the microwave and prepared when you programme the pre set function You will need to set the clock and the cooking menu and time It is possible to input a maximum of 2 cooking stages Do not use the defrost function in the pre set function The auto menu can be set for a single stage only PRE SET COOKING FUNCTION EXAMPLE If the current time is ...

Страница 17: ... a cooking cycle Once the cooking programme has been set if the Start 30Sec Confirm button is not pressed within 1 minute the current time will display and the setting will be cancelled The buttons will beep if they are pressed correctly if not pressed correctly they will not beep The buzzer will sound five times to remind you when cooking is finished DEFROSTING TIPS Microwaves penetrate around 4c...

Страница 18: ...anel Carefully wash the glass turntable and turntable ring in warm soapy water Rinse with clean water and dry thoroughly before placing back into the microwave Ensure these parts are correctly in place before use Wipe the bottom of the microwave oven interior with a soft damp cloth to ensure smooth operation of the turntable ring To remove odours from the microwave in a deep microwave safe bowl co...

Страница 19: ... plug for a blown circuit fuse or a tripped main circuit breaker If these seem to be working properly test the socket with another appliance 4 Microwave has developed a fault Contact customer services to talk through the problem to see if any solution for the fault can be found If not and the product is within its warranty period then the microwave should be returned to the retailer it was purchas...

Страница 20: ...put inside a microwave as it can cause sparking which can damage the microwave The only metal accessories that should be used inside the microwave are the ones supplied by the manufacturer 3 Pressure build up in food Food with none porous skins potatoes for example must be pierced to allow steam to escape As the build up of pressure can cause food to burst and create a fire hazard Heat spots Opera...

Страница 21: ...ve to overheat The installation instructions in the instruction manual must be followed or the warranty will be void Paint damage peeling Maintenance If the microwave is within its warranty period please contact customer services for further advice or take the microwave back to the retailer it was purchased from for a refund or replacement Light not working Bulb not working Due to the construction...

Страница 22: ...arranty period please contact customer services for further advice or take the microwave back to the retailer it was purchased from for a refund or replacement Turntable not rotating 1 Turntable coupling not fitted or tape not removed Check that the turntable coupling is fitted correctly and the transportation tape has been removed 2 Turntable roller ring not fitted or fitted incorrectly Check tha...

Страница 23: ...23 ...

Страница 24: ...tact details as set out at the end of this warranty Supplier means the authorised distributor or retailer of the Goods that sold you the Goods in Australia or in New Zealand and You means you the original end user purchaser of the Goods 1 Our goods come with guarantees that cannot be excluded under the Australian Consumer Law or the CGA You are entitled to a replacement or refund for a major failu...

Страница 25: ... by prepaid freight within the Warranty Period accompanied with i the legible and unmodified original proof of purchase which clearly indicates the name and address of the Supplier the date and place of purchase the product name or other product serial number and ii this warranty 9 This warranty is immediately void if a Any serial number or appliance plate is removed or defaced b The Goods have be...

Страница 26: ...ssellhobbs com au russellhobbs co nz RUSSELL HOBBS and logo are Trade Marks of Spectrum Brands Inc or one of its subsidiaries Manufactured in China to Spectrum Brands specifications 2020 Spectrum Brands Inc ...

Отзывы: