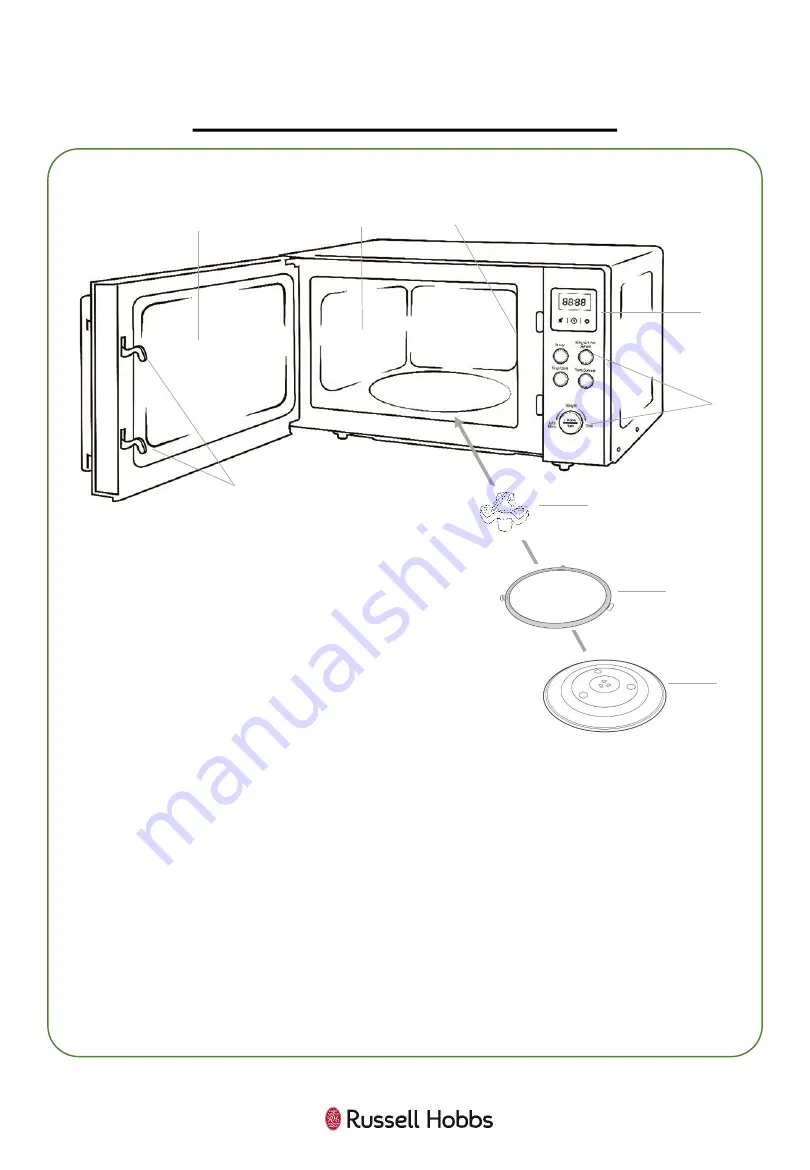
Russell Hobbs RHM2086SS-G Скачать руководство пользователя страница 14

14

PRODUCT OVERVIEW

1

2

3

4

5

6

8

9

1.

Safety interlock latches

2.

Door assembly and 
window

3.

Oven cavity

4.

Wave guide cover (do 
not remove)

5.

Screen display

6.

Control panel - buttons 
and dial

7.

Turntable coupling

8.

Roller ring

9.

Glass turntable

7

Содержание RHM2086SS-G

Страница 1: ...Model Number RHM2086SS G Compact Digital Microwave User Guide PLEASE RETAIN FOR FUTURE REFERENCE For Customer Services Spare Parts please call 0345 209 7461 Or visit us at http mda russellhobbs com...

Страница 2: ...RODUCT OVERVIEW 14 MICROWAVE OVEN INSTALLATION 15 16 TURNTABLE INSTALLATION 17 18 CONTROL PANEL 19 HOW TO USE THE MICROWAVE 20 28 COOKING TIPS 29 CLEANING THE MICROWAVE 30 PROBLEM SOLVING 31 34 GUARAN...

Страница 3: ...given supervision or instruction concerning use of the appliance in a safe way and understand the hazards involved Children shall not play with the appliance Cleaning and user maintenance shall not b...

Страница 4: ...lothing and heating of warming pads wheat bags slippers sponges damp cloth and similar is extremely dangerous and may lead to risk of injury ignition or fire If materials inside the oven smoke or catc...

Страница 5: ...since they may explode even after microwave heating has ended The oven should be cleaned regularly and any food deposits removed Failure to maintain the oven in a clean condition especially if liquid...

Страница 6: ...Do not leave the microwave oven unattended while you are using it Do not use the microwave when it is empty This could damage the oven Do not use metal pans dishes with metal handles or anything with...

Страница 7: ...m several times with a fork Do not try to deep fry foods in this microwave oven Do not overcook food Please remember that as food or liquids heat up they will release steam or may be spitting Never co...

Страница 8: ...hich will absorb microwave energy This may cause the dishes to crack or burn and will slow down the cooking speed Do not use the microwave oven for heating utensils plates or dishes Do not cook using...

Страница 9: ...tilation openings Do not use harsh abrasive cleaners or sharp metal scrapers to clean the oven door glass since they can scratch the surface which may result in shattering of the glass If steam builds...

Страница 10: ...rd size of dinner plate It comes with a removable and dishwasher safe glass turn table for easy cleaning Pre programmed auto cook menus such as pizza reheat fish and popcorn allow you to cook all your...

Страница 11: ...of the microwave piping hot when your utensils inside the oven stay much cooler The microwaves do not stay in the air or in the food when you open the microwave oven door The microwave oven will work...

Страница 12: ...Hz Rated Input Power Microwave 1200W Rated Output Power Microwave 700W Oven Capacity litres 17 Internal volume is calculated by measuring maximum width depth and height Actual capacity for holding foo...

Страница 13: ...th Do not remove place in a dishwasher 2 Check the oven after unpacking for any visual damage such as A misaligned door Damage to the door Dents or holes in the door window and screen Dents in the ins...

Страница 14: ...2 3 4 5 6 8 9 1 Safety interlock latches 2 Door assembly and window 3 Oven cavity 4 Wave guide cover do not remove 5 Screen display 6 Control panel buttons and dial 7 Turntable coupling 8 Roller ring...

Страница 15: ...he reception Plug the oven into a suitable 13 amp mains socket make sure the voltage is the same as on the rating label do not use extension cables or mains socket adaptors The microwave oven should b...

Страница 16: ...in85cm WARNING DO NOT install the oven over a cooker or other heat or steam producing appliance as this will damage the microwave oven The minimum installation height is 85cm A minimum clearance of 7...

Страница 17: ...tray should align with the turntable coupling 17 TURNTABLE INSTALLATION Before first use check that any securing tape and all packaging has been removed from the glass tray and turntable ring assembl...

Страница 18: ...cooking as shown below Do not place the food directly onto the glass tray always place on or in suitable microwaveable cookware Please check that crockery is microwave safe before using If the glass...

Страница 19: ...number of times to set a cooking power level Weight Time Defrost Press this button to input weight or time for defrosting Stop Clear Press to Stop Clear the cooking process Start Confirm Press to star...

Страница 20: ...on to confirm The clock is now set Note Before setting a cooking program the clock needs to be set If the clock is not set the clock will not function when powered During the process of clock setting...

Страница 21: ...this can cause irreparable damage Pausing cooking If you want to pause the cooking to turn over or stir contents simply open the door then close again and press the Start Confirm button to continue th...

Страница 22: ...ht Time dial clockwise until you reach the desired weight 400g 3 To commence defrosting press the Auto Menu Weight Time dial Time Defrost As an example to defrost 10 minutes 1 In standby mode press th...

Страница 23: ...Auto Menu Weight Time dial anti clockwise The Auto symbol will be displayed 3 Press the Start Confirm button to confirm the menu The display will show the weight in grams or amounts 4 Turn the Auto M...

Страница 24: ...690g Prick the skins and place on a suitable plate Turn the potatoes over halfway through the cooking time If the potato s used are larger than 230g each then they will need to be cut up in to smaller...

Страница 25: ...Start Confirm button instead continue to set the second stage of the cooking program 5 Press the Power button 3 times to choose 60 power 6 Turn the Auto Menu Weight Time dial to set the time 10 00 Th...

Страница 26: ...80 is displayed 2 Turn the Auto Menu Weight Time dial to adjust the cooking time to 7 minutes 3 After the above steps DO NOT press the Start Confirm button but do as follows 4 Press the Pre Set butto...

Страница 27: ...ff A beep will sounds when a button is pressed Child safety lock This function is to prevent children from using the microwave oven To set the child lock In standby mode the microwave oven will enter...

Страница 28: ...crowave energy This may cause the dishes to crack or burn and will slow down the cooking speed Use only cookware that is approved to be used in a microwave oven Do not cook using a container with a re...

Страница 29: ...d the thinner parts toward the centre spread out as evenly as possible Do not overlap food if possible as this could result in uneven cooking results Cooking time If you are unsure of cooking times it...

Страница 30: ...rol panel If steam builds up inside or around the outside of the oven door wipe with a soft cloth This may happen when the microwave oven is used in humid conditions Regularly remove the glass turntab...

Страница 31: ...returned to the retailer it was purchased from for a replacement or refund If the microwave power will not work 1 Door is not closed Make sure the door is securely closed Otherwise the microwave will...

Страница 32: ...ould be put inside a microwave as it can cause sparking which can damage the microwave The only metal accessories that should be used inside the microwave are the ones supplied by the manufacturer 3 P...

Страница 33: ...id Paint damage peeling Maintenance If the microwave is within its warranty period please contact customer services for further advice or take the microwave back to the retailer it was purchased from...

Страница 34: ...acement Turntable not rotating 1 Turntable coupling not fitted or tape not removed Check that the turntable coupling is fitted correctly and the transportation tape has been removed 2 Turntable roller...

Страница 35: ...e faulty product must be returned to the place of purchase Refund or replacement is at the discretion of the retailer The following conditions apply The product must be returned to the retailer with t...

Страница 36: ...36 SPARE PARTS Turntable ring Glass turntable Turntable coupling To check the availability of the following spare parts simply contact our friendly Customer Service team on 0345 209 7461...

Страница 37: ...BS1363 If this plug is unsuitable or needs to be replaced refer to customer services as it should only be replaced by a qualified engineer To replace the 13amp fuse remove the plug from the socket re...

Страница 38: ...inal marked with the letter N or coloured BLACK The BROWN wire is the LIVE wire and must be connected to the terminal marked with the letter L or coloured RED Always ensure that the plug cord grip is...

Страница 39: ...39 NOTES...

Страница 40: ...n schemes which cater for the recovery and recycling of materials contained within Your co operation is vital to ensure the success of these schemes and for the protection of the environment For your...

Отзывы: