Russell Hobbs RHM2016 Скачать руководство пользователя страница 8


For Customer Services & Spare Parts please call 

0845 209 7461 

Opening times: Monday – Friday 8am – 6pm 

8

Operating instructions


Connect the main plug into a suitable 13amp mains socket, make sure the voltage is the 
same as on the rating label (do not use extension cables or mains adaptors).  
 
The microwave oven will beep once and the display will show the clock symbol and ‘1:01’ 


During any cooking program,  

¾


To pause cooking press the CANCEL pad.  

¾


To stop cooking press CANCEL pad again. 

¾


Cooking or defrosting can be interrupted at any time to stir or check the food progress 
by opening the door. Press START pad to continue program after closing the door. 

¾


After cooking time has elapsed ‘End’ will be displayed and 3 beeps will be heard every 
2 minutes until the oven door is opened or the CANCEL pad is pressed. 


SETTING THE CLOCK


With the oven ready for input, touch the CLOCK pad to set the digital clock in 


12 hour format. 
 
FOR EXAMPLE: Suppose you want to set the oven clock time to 8:30. 


1. 

Touch the CLOCK pad. 

2. 

Touch CANCEL pad. 

3. 

Use the number pads to enter the correct time, press the 8, 3 and 0 pads. You must 
touch at least three numbers to set the clock (one for hour and two for minutes). 

4. 

Touch CLOCK pad again to confirm the setting. 


NOTE:

 To check clock time during cooking, press the CLOCK pad once. 


SETTING THE TIMER


To use the clock as a kitchen timer


5. 

Touch the TIME pad. 

6. 

Enter the amount of time you want to count down by touching the number pads.  The 
time is expressed in minutes and seconds and set left to right. Set one digit (a 5 for 5 
seconds) or up to four digits (2405 for 24 minutes, 5 seconds). 

7. Touch 

POWER 

pad. 

8. 

Touch number pad 0. 

9. 

Touch START pad and the timer will activate. 


MICROWAVE COOKING 

1. 

Place the food in a container suitable for use with microwave ovens, put it into the 
microwave oven and close the door. 

2. 

Use the number pads to set a cooking time. You can set a cooking time from one second 
to 99 minutes and 99 seconds. 

3. 

If you want to set a power level other than 100% power, touch POWER pad, then use 
the number pads to enter the power level.  Use digits to set corresponding cooking 
power level (see table below). 

4. 

Touch START pad to start cooking. 
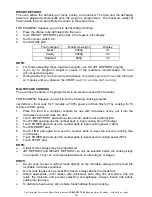
5.  

Cooking power  

100% 90% 80% 70% 60% 50% 40% 30% 20% 10% 0% 

Number pad 

10 9 8 7 6 5 4 3 2 1 0 


NOTE: 

You can check the power level during cooking by touching t h e  POWER pad.  

Содержание RHM2016

Страница 1: ...wave Oven Instruction Manual Model Number RHM2016 Please read these instructions carefully and keep them for future reference For Customer Services Spare Parts please call 0845 209 7461 Opening times...

Страница 2: ...Feature diagram 6 Connection to the mains supply 6 Control panel 7 Operating instructions 8 Setting the clock 8 Setting the timer 8 Microwave cooking 8 Delayed start cooking 9 Quick start 9 Jet defros...

Страница 3: ...ehold electrical socket Inside the microwave oven is the magnetron which turns the electrical energy into microwaves Microwaves cannot go through metal so the inside of the oven is lined with metal Th...

Страница 4: ...oven due to the possibility of ignition Only use the oven for preparing food For example do not use for drying clothes paper or any other non food items or for sterilising purposes Do not use the oven...

Страница 5: ...ok raw meat or raw shellfish in a microwave due to the possibility for uneven heating Do not use the microwave oven for home canning or bottling Improperly canned or bottle foods may spoil and be dang...

Страница 6: ...mains supply WARNING THIS APPLIANCE MUST BE EARTHED This appliance is designed to operate from a mains supply of AC230V 50HZ Check that the voltage marked on the product corresponds with your supply v...

Страница 7: ...ds of alternating defrost and stand times by cycling on and off POWER Use to set power level To check power level during time cooking touch POWER pad PRE SET Use to set the oven to start at a later ti...

Страница 8: ...e press the 8 3 and 0 pads You must touch at least three numbers to set the clock one for hour and two for minutes 4 Touch CLOCK pad again to confirm the setting NOTE To check clock time during cookin...

Страница 9: ...cally DO NOT press the START pad NOTE Multistage cooking maybe programmed in combination with delayed start function QUICK START This program allows you to cook food at 100 power at four popular micro...

Страница 10: ...lowing cooking program Jet defrost a food cook for 5 minutes at 100 power and then finish off by cooking for 10 minutes at 50 power 1 Place the food in a container suitable for use with microwave oven...

Страница 11: ...ok It is important that the wave guide cover is kept clean at all times To do this wipe with mild detergent and water then dry Do not remove the waveguide cover You should clean the outside of the ove...

Страница 12: ...with another appliance If the microwave power will not work Make sure the door is securely closed Otherwise the microwave energy will not flow into the oven Important utensil information Use only cook...

Страница 13: ...For Customer Services Spare Parts please call 0845 209 7461 Opening times Monday Friday 8am 6pm 13 Please use this page for your notes and recipes...

Страница 14: ...ASTA approved fuse conforming to BS1362 of the same rating If the fuse cover is lost the plug must not be used until a replacement is obtained from an electrical supplier If you need to remove the plu...

Страница 15: ...roduct batteries should not be disposed of with your general household waste Only discard electrical electronic battery items in separate collection schemes which cater for the recovery and recycling...

Отзывы: