Russell Hobbs RHM2011 Скачать руководство пользователя страница 12


12

AUTO MENUS 

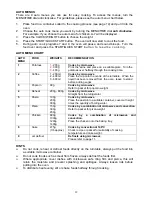
There are 9 auto menus you can use for easy cooking. To access the menus, turn the 
MENU/TIME dial anti clockwise. For guidelines, please see the auto menu chart below. 
 
1. 

Place food in a container suited to the cooking process (see page 14) and put it into the 
oven. 

2. 

Choose the auto cook menu you want by turning the MENU/TIME dial 

anti clockwise

For example, if you choose the auto menu for chicken, A-7 will be displayed. 

3. 

Press the CLOCK/WEIGHT button to choose the weight. 

4. 

Press the START/QUICK START button. The oven will now start to cook the food. 

5. 

During auto cook programs 7 and 9, the oven will pause and sound bleeps.  Turn the 
food over and press the START/QUICK START b u t t o n  to r e s u m e  c o o k i n g . 


AUTO MENU CHART 


AUTO 
MENU


FOOD


WEIGHTS


RECOMMENDATION


Potatoes 

1 -

 200g 

2 -

 300g 

3 - 

400g 

Cooks by microwave 

Prick the skins and place on a suitable plate.  Turn the 
potatoes over halfway through the cooking time. 

2


Coffee 

1 - 200ml 
2 - 400ml 
3 - 600ml 

Cooks by microwave  

Place the cup onto the centre of the turntable.   When the 
liquid has been removed from the oven, leave to stand 
before adding sugar. 

3


Popcorn 99g 

Cooks by microwave 

Refer to packet for popcorn weight.  

4


Reheat 

200g - 800g 

Cooks by microwave 

Straight from the refrigerator. 

5


Pasta 100g 

200g 
300g 

Cooks by microwave  

Place the pasta into a suitable container, cover with eight 
times the quantity of boiling water. 

6


Pizza  

150g 
300g 
450g 

Cooks by a combination of microwave and convection

Refer to packet for pizza weight. 

7


Chicken 800g 

1000g 
1200g 
1400g 

Cooks by a combination of microwave and 
convection.   

Place the chicken onto the baking tray. 

8


Cake 475g 


(1lb approx.)

Cooks by convection at 140°C 

Check recipe or packet for suitability of cooking 
temperature and cake weight. 

9


Jet defrost 


Defrosts using microwave 

Please refer to page 11. 

 
HINTS 

¾


Do not cook, reheat or defrost foods directly on the turntable, always put the food into 
a suitable microwave container. 

¾


Do not cook foods such as meat from frozen, always defrost the foods first. 

¾


Where appropriate, cover dishes with microwave safe cling film and pierce, this will 
retain the moisture and prevent splashing and spillages. Always loosen lids before 
putting into the oven. 

¾


To distribute heat evenly, stir or shake foods halfway through cooking. 


Содержание RHM2011

Страница 1: ...20 Litre Stainless Steel Convection Microwave Oven User s Manual Model number RHM2011 DCP 0587 061 0001 SKU 7227022 Please read these instructions carefully and keep them for future reference...

Страница 2: ...Setting the clock 8 Kitchen timer 8 Microwave cooking 9 Quick start cooking 9 Grill 9 Combination 1 10 Combination 2 10 Convection 10 Microwave and convection cooking 11 Jet defrost 11 Multi stage coo...

Страница 3: ...n is the magnetron which turns the electrical energy into microwaves Microwaves cannot go through metal so the inside of the oven is lined with metal The door is lined with a fine metal mesh which sto...

Страница 4: ...rvice engineer with a suitably approved part Keep the oven cable and plug dry never immerse in water When heating food in plastic or paper containers keep an eye on the oven due to the possibility of...

Страница 5: ...e oven off at the wall switch or shut the power off at the fuse or circuit breaker panel FOOD SAFETY Do not cook raw meat or raw shellfish in a microwave due to the possibility for uneven heating Do n...

Страница 6: ...T BE EARTHED This appliance is designed to operate from a mains supply of AC230 240V 50Hz Check that the voltage marked on the product corresponds with your supply voltage This product is fitted with...

Страница 7: ...icrowave and convection oven Stop Cancel Press this button to cancel a setting or reset the oven before setting a cooking program Press this button once to pause a cooking program and twice to cancel...

Страница 8: ...ol and prolong the life of the oven SETTING THE CLOCK With the oven ready for input press the CLOCK WEIGHT button to set the digital clock in 12 or 24 hours format Press the button to toggle between t...

Страница 9: ...START QUICK START button QUICK START COOKING This program allows you to cook food at 100 power between 30 seconds and 10 minutes by pressing the START QUICK START button a number of times Each press o...

Страница 10: ...evenly This oven can be programmed for 10 different cooking temperatures 110 C to 200 C Each press of the convention button decreases the cooking temperature by 10 C Press convection button x 1 2 3 4...

Страница 11: ...dial until display shows 10 00 5 Press the START QUICK START button The display will now start to count down and defrost the food NOTE during auto defrost program the oven will pause and sound bleeps...

Страница 12: ...e liquid has been removed from the oven leave to stand before adding sugar 3 Popcorn 99g Cooks by microwave Refer to packet for popcorn weight 4 Reheat 200g 800g Cooks by microwave Straight from the r...

Страница 13: ...ipe with mild detergent and water then dry Do not remove the waveguide cover on the inside wall of the cavity You should clean the outside of the oven with a damp cloth and polish dry with a soft dry...

Страница 14: ...he microwave mode Use only cookware that is approved to be used in a microwave oven Do not use metal pans or dishes with metal handles Do not use anything with a metal trim Do not use paper covered wi...

Страница 15: ...15 Please use this page for your notes and recipes...

Страница 16: ...he plug cut it from the mains lead and dispose of it Never attempt to re use this plug or insert it into a socket outlet as there is a very great risk of an electric shock SPECIFICATIONS Rated voltage...

Отзывы: