


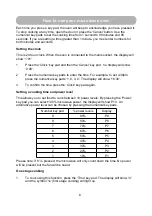


2
Enter the length time you want to cook the food for using the numerical key
pads. For example, to cook for 24 minutes, press '2400'.
3
To set the power, press the 'Power' key pad, the display will show 'P10'. If you
want to choose a different power level setting, press the 'Number' key pad you
want from the chart on page 8. The power level will be displayed.
4
Press the 'Start' key pad to start cooking, the microwave symbol will light up and
the microwave oven will now start to count down. When the cooking time has
finished the display will show 'END' and beep three times.
After the time has elapsed, the microwave will automatically beep 3 times. It will
continue to beep 3 times every 2 minutes until the door is opened or the 'Cancel' key
pad is pressed.
Two stage cooking
This function can be used for food that may need two power levels and two different
lengths of time:
1
To cook using this function, press the 'Time' key pad. The display will show ':0'
and the symbol '1s' (first stage cooking) will light up.
2
Enter the time you want to cook the food for using the numerical key pads. For
example, to cook for 10 minutes in stage 1, press '1000'.
3
To set the power, press the 'Power' key pad, the display will show 'P10'. If you
want to choose a different power level setting, press the 'Number' key pad you
want from the chart on page 8. For example, if P9 is chosen, P9 will be
displayed.
4
Do
not
press the 'Start' key pad, instead press the 'Memory' key pad. The
display will show '2s' (second stage cooking).
5
Press the 'Time' key pad, the display will show ':0'. Enter the time you want to
cook the food for using the numerical key pads. For example, to cook for 5
minutes in stage 2, press '500'.
6
To set the power, press the 'Power' key pad, the display will show 'P10'. If you
want to choose a different power level setting, press the 'Number' key pad you
want from the chart on page 8. For example, if P5 is chosen, P5 will be
displayed.
7
Press the 'Start' key pad, the microwave symbol will light up and the food will
start to cook.
The microwave oven will now cook food for 10 minutes at 90% power (stage 1), after
ten minutes the microwave oven will automatically change to stage 2 and cook the food
for 5 minutes at 50% power.
You can check the power setting at any time during cooking by pressing the 'Power' key
pad. The power level will show on the display.
9
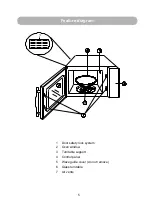
Содержание RHM1710
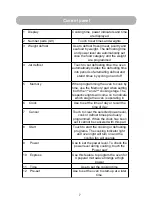
Страница 7: ...6 Control panel Control panel 1 2 3 4 5 6 7 8 9 10 11 12...
Страница 18: ......


