14
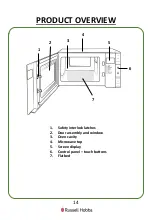
PRODUCT OVERVIEW
1. Safety interlock latches
2. Door assembly and window
3. Oven cavity
4. Microwave top
5. Screen display
6. Control panel – touch buttons
7. Flatbed
1
2
3
4
5
7
6
Страница 1: ...ily Size Flatbed Digital Microwave User Guide PLEASE RETAIN FOR FUTURE REFERENCE Model Number RHFM2363 B S For Customer Services Spare Parts please call 0345 209 7461 Or visit us at mda russellhobbs c...
Страница 2: ...THE MICROWAVE 13 PRODUCT OVERVIEW 14 MICROWAVE OVEN INSTALLATION 15 16 CONTROL PANEL 17 HOW TO USE THE MICROWAVE 18 25 COOKING TIPS 26 CLEANING THE MICROWAVE 27 PROBLEM SOLVING 28 31 GUARANTEE CUSTOM...
Страница 3: ...given supervision or instruction concerning use of the appliance in a safe way and understand the hazards involved Children shall not play with the appliance Cleaning and user maintenance shall not b...
Страница 4: ...lothing and heating of warming pads wheat bags slippers sponges damp cloth and similar is extremely dangerous and may lead to risk of injury ignition or fire If materials inside the oven smoke or catc...
Страница 5: ...heated in microwave ovens since they may explode even after microwave heating has ended The oven should be cleaned regularly and any food deposits removed Failure to maintain the oven in a clean condi...
Страница 6: ...Do not leave the microwave oven unattended while you are using it Do not use the microwave when it is empty This could damage the oven Do not use metal pans dishes with metal handles or anything with...
Страница 7: ...s ready meals and so on without piercing them several times with a fork Do not try to deep fry foods in this microwave oven Do not overcook food Please remember that as food or liquids heat up they wi...
Страница 8: ...slow down the cooking speed Do not use the microwave oven for heating utensils plates or dishes Do not cook using a container with a restricted opening such as bottles as they may explode Before you...
Страница 9: ...se harsh abrasive cleaners or sharp metal scrapers to clean the oven door glass since they can scratch the surface which may result in shattering of the glass If steam builds up inside or around the o...
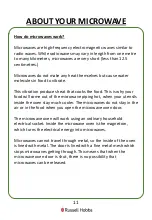
Страница 10: ...is easier to clean than a conventional microwave so food debris and moisture can be easily wiped away The diamond cavity structure provides improved microwave distribution by enhancing the reflection...
Страница 11: ...of the microwave piping hot when your utensils inside the oven stay much cooler The microwaves do not stay in the air or in the food when you open the microwave oven door The microwave oven will work...
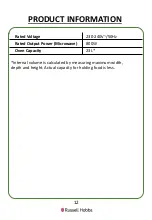
Страница 12: ...T INFORMATION Rated Voltage 230 240V 50Hz Rated Output Power Microwave 800W Oven Capacity 23L Internal volume is calculated by measuring maximum width depth and height Actual capacity for holding food...
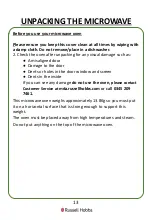
Страница 13: ...r holes in the door window and screen Dents in the inside If you can see any damage do not use the oven please contact Customer Service at mda russellhobbs com or call 0345 209 7461 This microwave ove...
Страница 14: ...14 PRODUCT OVERVIEW 1 Safety interlock latches 2 Door assembly and window 3 Oven cavity 4 Microwave top 5 Screen display 6 Control panel touch buttons 7 Flatbed 1 2 3 4 5 7 6...
Страница 15: ...he reception Plug the oven into a suitable 13 amp mains socket make sure the voltage is the same as on the rating label do not use extension cables or mains socket adaptors The microwave oven should b...
Страница 16: ...install the oven over a cooker or other heat or steam producing appliance as this will damage the microwave oven The minimum installation height is 85cm A minimum clearance of 7 5cm is required betwee...
Страница 17: ...for defrosting 4 5 To scroll through the food you want to cook from the auto menu or to select weight or time for normal microwave power cooking 6 Time defrost Press this button to input the time for...
Страница 18: ...setting if you press Stop Clear button the oven will go back to the previous status Microwave cooking Once you have correctly installed the unit turned on the power and set the clock you are ready to...
Страница 19: ...rn over or stir contents simply open the door then close again and press the Start button to continue the cycle If you wish to stop cooking with time left on the display take out the contents close th...
Страница 20: ...le by weight As an example to defrost 0 4kg of poultry 1 Press the Weight Defrost button dEF1 will be displayed 2 Press the and buttons until you reach the desired weight 400 3 To commence defrosting...
Страница 21: ...press the and buttons to access the other auto selections up to A 8 You will need to use your discretion regarding food type temperature and weight as times may vary below is a guideline for each auto...
Страница 22: ...s for different times for one dish Note This can be used to set a maximum of two different stages The auto menu cannot be set as one of the multi stage cooking functions For example if you wanted to d...
Страница 23: ...d buttons to enter the desired time The maximum time is 95 minutes 3 Press Start 30sec Confirm button to confirm the time The clock symbol on the display will flash as the time counts down 4 When the...
Страница 24: ...he lock is now functional A rectangle will illuminate on the display To cancel the child lock again press and hold the Stop Clear button for 3 seconds A loud beep will sound to indicate the microwave...
Страница 25: ...crowave energy This may cause the dishes to crack or burn and will slow down the cooking speed Use only cookware that is approved to be used in a microwave oven Do not cook using a container with a re...
Страница 26: ...d the thinner parts toward the centre spread out as evenly as possible Do not overlap food if possible as this could result in uneven cooking results Cooking time If you are unsure of cooking times it...
Страница 27: ...or spray on cleaners on the control panel If steam builds up inside or around the outside of the oven door wipe with a soft cloth This may happen when the microwave oven is used in humid conditions Re...
Страница 28: ...turned to the retailer it was purchased from for a replacement or refund If the microwave power will not work 1 Door is not closed Make sure the door is securely closed Otherwise the microwave will no...
Страница 29: ...rowave as it can cause sparking which can damage the microwave The only metal accessories that should be used inside the microwave are the ones supplied by the manufacturer 3 Pressure build up in food...
Страница 30: ...allation instructions in the instruction manual must be followed or the warranty will be void Paint damage peeling Maintenance If the microwave is within its warranty period please contact customer se...
Страница 31: ...olution Door not shutting locking Latches have become deformed If the microwave is within its warranty period please contact customer services for further advice or take the microwave back to the reta...
Страница 32: ...e faulty product must be returned to the place of purchase Refund or replacement is at the discretion of the retailer The following conditions apply The product must be returned to the retailer with t...
Страница 33: ...33 SPARE PARTS To check the availability of the following spare parts simply contact our friendly Customer Services team using the details provided at the bottom of this page...
Страница 34: ...BS1363 If this plug is unsuitable or needs to be replaced refer to customer services as it should only be replaced by a qualified engineer To replace the 13amp fuse remove the plug from the socket re...
Страница 35: ...inal marked with the letter N or coloured BLACK The BROWN wire is the LIVE wire and must be connected to the terminal marked with the letter L or coloured RED Always ensure that the plug cord grip is...
Страница 36: ...e Only discard electrical electronic battery items in separate collection schemes which cater for the recovery and recycling of materials contained within Your co operation is vital to ensure the succ...