6
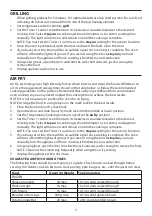
Food
Quantity/Weight
Time (minutes)
Potato wedges
600 g max.
14-18 or until golden brown
Sweet potato fries
400 g max.
10-14 or until golden brown
French-fries
400 g max.
10-14 or until golden brown
Chunky chips
800 g max.
20-25 or until golden brown
Chips
600 g max.
18-24 or until golden brown
Pizza
10-16. Rotate 180º halfway through cooking
for even cooking
FRESH
Chips
550 g max.
22-27 or until browned and crisp
Potato wedges
600 g max.
20-25 or until browned and crisp
Sweet potato chips
500 g max.
17-22 or until browned and crisp
BAKING
For best results, when baking or cooking, always preheat the oven for at least 10 minutes at the
desired temperature setting. For optimal results use the middle or lower shelf position.
1. Set the Temperature/Cooking function control to the temperature required.
2. Set the Timer 1 control to 20 then turn it clockwise or counterclockwise to the desired
cooking time. Select
stay on
to cook longer than 60 minutes or to control cooking time
manually. The light will come on and remain on until the cooking is complete.
•
NOTE: You must set the Timer 1 to a time or to the
stay on
setting for the oven to function.
3. Once the oven has preheated, open the door and insert the food. Close the door.
4. If you have set a time, there will be an audible signal once cooking is complete. The oven
will turn off and the light will go out. If you are not using the timer (
stay on
) you must
manually turn the appliance off once cooking is finished to your satisfaction.
5. Using oven gloves, open the door and slide the rack outward, just far enough to remove the food.
6. Unplug appliance when not in use.
CARE AND MAINTENANCE
1. Clean the glass door with a damp cloth or sponge dipped in warm to hot soapy water. Do
not use a spray glass cleaner. Wipe clean with a soap free damp cloth to remove residual
suds and streaks from the glass.
2. Wash the wire rack in warm to hot soapy water. Rinse and dry thoroughly.
3. Wash the bake pan/drip tray/air fry mesh rack in warm to hot soapy water. Rinse and dry
thoroughly.
4. If any food is baked onto the wire rack or bake pan/drip tray/air fry mesh rack, soak in warm
to hot soapy water for 1 hour before cleaning. Use a sponge or soft cleaning brush to
remove stains. Rinse and dry thoroughly.
5. Clean the exterior with a damp cloth.
CRUMB TRAY
To install:
•
With the oven door closed, slide the tray into the base of the oven from the front.
To clean:
1. When the device is cool enough to touch safely, slide out the crumb tray.
2. Dispose of crumbs and wipe tray with a damp cloth. Dry thoroughly before refitting.
Содержание 26095
Страница 2: ...2 h b k e f g i j n m o l j ...
Страница 7: ...7 ...


