background image

Installation

Runco VX-2i Owner’s Operating Manual

23 

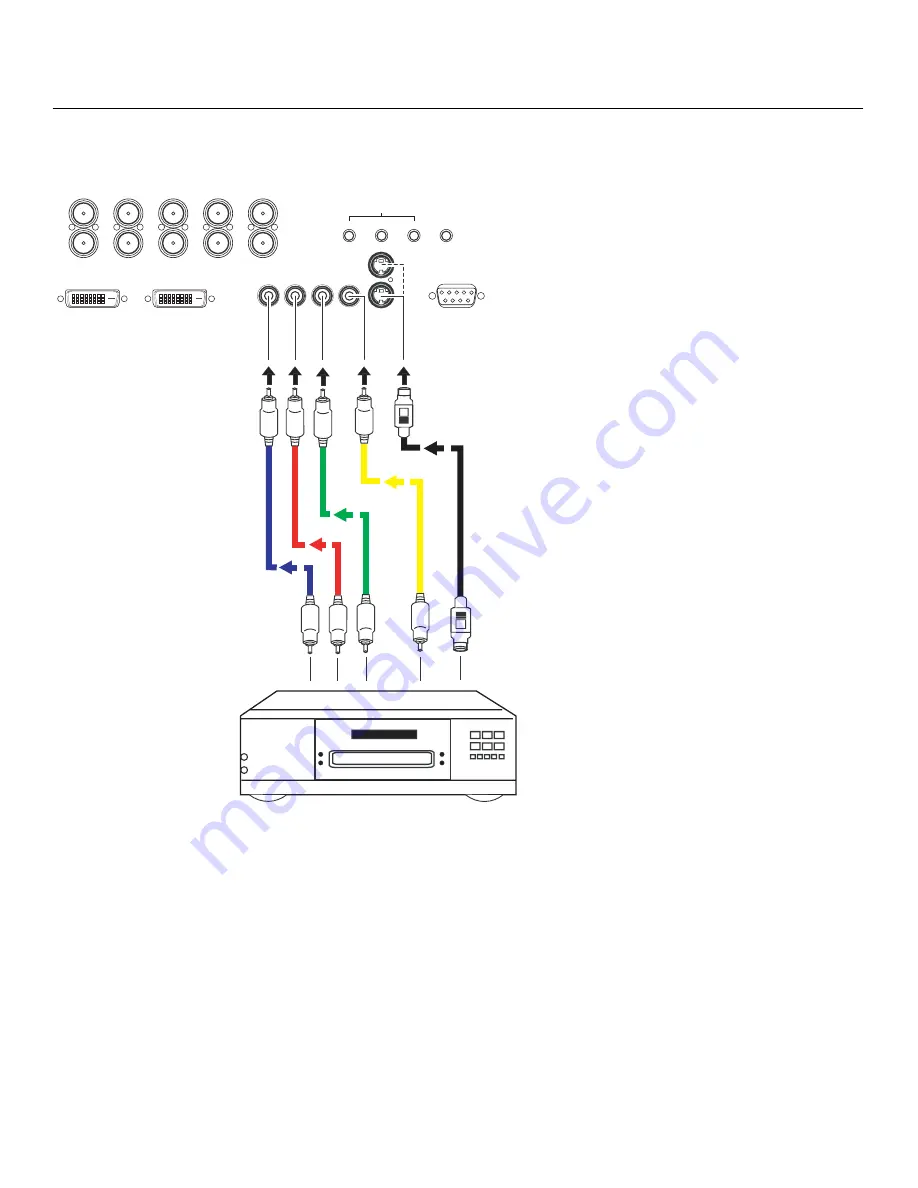
Composite/S-Video/Component Video Connections: 

See Figure 3-10. 

Figure 3-10. Composite, S-Video and Component Video Connections

DVI 1

DVI 1

HD1

HD2

Y

G

G

Y

H

V

INPUTS

H

V

HD1

HD2

INPUTS

R

Pr

Pr

R

B

Pb

Pb

B

DVI 2

DVI 2

COMPONENT VIDEO

Pb

Pr

Y

COMPONENT VIDEO

Y

Pr

Pb

VIDEO

VIDEO

S-VIDEO 2

S-VIDEO 2

S-VIDEO 1

S-VIDEO 1

RS-232

CONTROL

RS-232

CONTROL

IR

IR

1

2

3

1

2

3

TRIGGERS

TRIGGERS

DVD Player, VCR,
Satellite Receiver,
Laser Disc etc.

Содержание Video Xtreme VX-2i

Страница 1: ...OWNER S OPERATING MANUAL VX 2i Digital Light Processing Projector ...

Страница 2: ......

Страница 3: ...f the original warranty period This Limited Warranty only covers failure due to defects in materials and workmanship that occur during normal use and does not cover normal maintenance This Limited Warranty does not cover cabinets or any appearance items failure resulting from accident misuse abuse neglect mishandling misapplication faulty or improper installation or setup adjustments improper main...

Страница 4: ...g distance of the closest Runco Authorized Service Center or the repair requires the unit be returned to the Runco factory it is the owner s responsibility to arrange for shipment of the product for repair These arrangements must be made through the selling Runco Dealer If this is not possible contact Runco directly for a Return Authorization number and shipping instructions Runco will return prod...

Страница 5: ..._________________________________ Model Purchased Date ____________________________________________________________________________________________________________ Serial Number ____________________________________________________________________________________________________________ Runco Authorized Dealer Name ____________________________________________________________________________________...

Страница 6: ...ts DC 12V signal for triggering Do not connect to any other power input or output This could cause damage to this unit 10 Only use accessories specified by Runco International 11 Keep the packing material in case the equipment should ever need to be shipped 12 Unplug this projector during lightning storms or when it will not be used for an extended period of time 13 The lamp becomes extremely hot ...

Страница 7: ...atures and Benefits 3 Parts List 4 2 Controls and Functions 5 VX 2i at a Glance 5 VX 2i Rear Panel 6 VX 2i Remote Control 8 3 Installation 11 Remote Control 11 Notes on Batteries 11 Notes on Remote Control Operation 11 Quick Setup 12 Installation Considerations 13 Installation Type 13 Screen Type and Size 14 Ambient Light 15 Other Considerations 15 Throw Distance 15 Vertical and Horizontal Positio...

Страница 8: ...rning on the Power 25 Adjusting the Picture Orientation 25 Lens Adjustments 26 Focus 26 Zoom 26 Shift 26 Using the On Screen Menus 26 Main Menu 28 Input Source 28 Aspect Ratio 28 Picture 30 Input Position 33 ISF Presets 34 Information 34 Calibration 34 Service 36 5 Maintenance and Troubleshooting 39 Lamp Replacement 39 Troubleshooting Tips 39 6 Serial Communications 41 RS 232 Connection and Port C...

Страница 9: ... DVI Source Connections 20 3 8 Digital DTV RGB Connections 21 3 9 Analog RGB Connections 22 3 10 Composite S Video and Component Video Connections 23 3 11 RS 232 Control System Connection 24 3 12 Connecting 12 Volt Trigger Outputs 24 4 1 VX 2i OSD Menu Structure 27 4 2 Typical PLUGE Pattern for Adjusting Brightness 30 4 3 Typical Gray Bar Pattern for Adjusting Contrast 31 4 4 Typical Color Bar Pat...

Страница 10: ...List of Figures x Runco VX 2i Owner s Operating Manual Notes ...

Страница 11: ...b runco com Textual and Graphic Conventions Text Conventions The following conventions are used in this manual in order to clarify the information and instructions provided Remote and built in keypad button identifiers are set in upper case bold type for example Press EXIT to return to the previous menu All keys with functional names are initial capped set in bold type and enclosed in angle bracke...

Страница 12: ...ignificance They also provide supplemental information CAUTIONS alert users that a given action or omitted action can degrade performance or cause a malfunction WARNINGS appear when a given action or omitted action can result in damage to the equipment or possible non fatal injury to the user DANGER appears when a given action can cause severe injury or death Tip Note Caution WARNING DANGER If you...

Страница 13: ...an impressive 2500 ANSI lumens of light output CSMS light output of 52 1 ft Lamberts The VX 2i s 16 9 native aspect ratio DMD array makes it ideal for widescreen viewing while its 3 chip 1280 x 720 native resolution produces crisp crystal clear high definition images with richly saturated colors deep black levels and natural highly refined detail This advanced design provides pure digital connecti...

Страница 14: ...Runco dealer or Runco Customer Service at 800 23 RUNCO VX 2i DLP Projector Remote Control Unit and two 2 AAA size batteries AC Power Cord 1 Warranty information and registration card Runco VX 2i Owner s Operating Manual this document Optional Accessories CineWide with AutoScope system anamorphic lens and motorized mount Ceiling mount kit LiveLink DVI Cabling System ...

Страница 15: ...1 INTAKE VENT 2 LENS 3 RUNCO LOGO The logo can be rotated to match the projector orientation inverted ceiling mounted or upright To rotate the logo grip it at the sides pull it away from the projector and rotate it 180 degrees 4 EXHAUST VENT 5 CABLE OPENINGS Pass cables through these openings 6 IR SENSOR 2 Controls and Functions 2 3 4 5 5 1 6 ...

Страница 16: ...automatically detects the signal format RGB HV or YPrPb 480p 720p 480i 576i or 1080i 4 COMPOSITE VIDEO INPUT Standard composite video input for connecting a VCR laser disc player or other composite video source DVI 1 DVI 1 HD1 HD2 Y G G Y H V INPUTS H V HD1 HD2 INPUTS R Pr Pr R B Pb Pb B DVI 2 DVI 2 COMPONENT VIDEO Pb Pr Y COMPONENT VIDEO Y Pr Pb VIDEO VIDEO S VIDEO 2 S VIDEO 2 S VIDEO 1 S VIDEO 1...

Страница 17: ...lable only on CineWide equipped projectors For more information about aspect ratios refer to Table 4 1 11 LEFT BUTTON Used to direct select inputs or move the menu cursor left in the On Screen Display When no menu is present on screen the LEFT button toggles you through the different sources in this order DVI 2 DVI 1 HD RGB2 HD RGB1 Component SD S Video 2 S Video 1 Composite 12 DOWN BUTTON Use to ...

Страница 18: ...n use the direct access buttons on the remote control 18 POWER INPUT 100 to 240 VAC Connect the VX 2i to power here 19 MAIN POWER SWITCH Disconnects or applies power to the VX 2i 20 POWER STANDBY LED 2 3 VX 2i Remote Control Figure 2 3 shows the VX 2i remote control and the paragraphs that follow describe its functionality Figure 2 3 VX 2i Remote Control Functions 11 6 5 10 9 2 3 1 4 7 8 12 ...

Страница 19: ...ualWide Letterbox Standard 4 3 Anamorphic Likewise the LEFT and RIGHT buttons toggle through the different source inputs in this order LEFT Button DVI 2 DVI 1 HD RGB2 HD RGB 1 Component SD S Video 2 S Video 1 Composite RIGHT Button Composite S Video 1 S Video 2 Component SD HD RGB 1 HD RGB 2 DVI 1 DVI 2 5 LIGHT Press to illuminate the buttons Not available on all models 6 MENU Press this button to...

Страница 20: ...9 Image in letterbox format is enlarged to fit 16 9 full screen display and the upper lower portions are blanked off V WIDE VirtualWide 4 3 image is enlarged NON linearly in horizontal direction to fit 16 9 full screen display 10 S VID 1 4 S VID 2 5 S Video Press to select an S Video input or to enter the numeric character 4 or 5 11 HD 1 7 HD 2 8 Press to select a HD RGBHV or YPbPr component input...

Страница 21: ...eries to avoid damage from battery leakage Notes on Remote Control Operation Make sure that there is nothing obstructing the infrared beam between the remote control and the IR receiver on the projector If the effective range of the remote control decreases or it stops working replace the batteries with new ones The remote control may fail to operate if the infrared remote sensor is exposed to bri...

Страница 22: ...or 13 2 Connect signal sources to the projector 20 3 Connect external controller to RS 232 port optional 24 4 Connect other home theater components to 12 volt trigger outputs optional 24 5 Apply power to the projector 24 25 6 For rear screen and or ceiling mount installations select the proper picture orientation 25 7 Lens adjustments projected image size zoom position shift and focus 17 26 8 Proj...

Страница 23: ...o access Shares floor space with audience Front Screen Inverted Mount ceiling Installation Does not take up audience space Projector is unobtrusive Projector cannot be accidentally moved Installation is more permanent Projector access is more difficult Rear Screen Floor Mount Installation Projector is completely hidden Projector is easily accessed Usually good ambient light rejection Requires sepa...

Страница 24: ...itting just outside this area Runco generally does not recommend use of curved screens due to excessive brightness and uncorrectable geometrical distortion Figure 3 1 Flat vs Curved Screens Rear screen installations There are two basic types of rear screens diffused and optical A diffusion screen has a surface that spreads the light striking it Purely diffused screens have a gain of less than 1 Th...

Страница 25: ... can help improve your installation Keep the ambient temperature constant and below 35 C 95 F Keep the projector away from heating and or air conditioning vents Changes in temperature may cause drifts in the projector circuitry which may affect performance Keep the projector away from devices that radiate electromagnetic energy such as motors and transformers Common sources of these include slide ...

Страница 26: ...ct Runco Technical Support for more information Proteus B 1 22 1 44 122 144 Proteus C 1 45 1 76 145 176 Proteus D 1 82 2 39 182 239 Proteus D with CineWide 1 34 1 75 134 175 Proteus E 2 42 3 57 242 357 Proteus E with CineWide 1 78 2 62 178 262 Proteus F 3 63 5 72 363 572 Proteus F with CineWide 2 67 4 20 267 420 Notes 1 Throw distance does not affect image quality provided these ranges are taken i...

Страница 27: ... inch 16 9 screen you can shift the image up to 43 20 inches 1 10 meters below the screen center Upward vertical lens shift is not possible Horizontal Lens Shift The VX 2i zoom lenses Proteus B through F allow up to 10 of horizontal lens shift in either direction left or right For example with a 96 x 54 inch 16 9 screen you can shift the image up to 9 60 inches 24 38 cm left or right of the screen...

Страница 28: ...ns Shift 1 0 x H 150 Height Lens Shift 1 5 x H Screen Center 0 Note This is a general example of lens shift Lenses vary in their shift capabilities No particular lens is used in this example 0 Screen Center 100 Width Lens Shift 1 0 x W 50 Width Lens Shift 0 5 x W 150 Width Lens Shift 1 5 x W Screen Width W Note This is a general example of lens shift Lenses vary in their shift capabilities No part...

Страница 29: ...uch as a table or cart Carts are useful when moving a projector during a presentation or from site to site If possible lock the wheels when it s in position to prevent it from being moved during a presentation Ceiling Mounting The projector can also be inverted and suspended from the ceiling using a specially designed ceiling mount fixture This type of mounting is recommended for fixed installatio...

Страница 30: ...Connecting the VX 2i to Source Components Connect your video sources to the VX 2i as shown and described in the sections that follow DVI Connections See Figure 3 7 Figure 3 7 DVI Source Connections Use the DVI inputs whenever possible This ensures the highest video quality because the signal is carried in the digital domain throughout the entire signal path from source component output into the pr...

Страница 31: ...l DTV RGB Connections DVI 1 DVI 1 HD1 HD2 Y G G Y H V INPUTS H V HD1 HD2 INPUTS R Pr Pr R B Pb Pb B DVI 2 DVI 2 COMPONENT VIDEO Pb Pr Y COMPONENT VIDEO Y Pr Pb VIDEO VIDEO S VIDEO 2 S VIDEO 2 S VIDEO 1 S VIDEO 1 RS 232 CONTROL RS 232 CONTROL IR IR 1 2 3 1 2 3 TRIGGERS TRIGGERS DTV Source Red Green Blue Horiz Vert ...

Страница 32: ...g RGB Connections DVI 1 DVI 1 HD1 HD2 Y G G Y H V INPUTS H V HD1 HD2 INPUTS R Pr Pr R B Pb Pb B DVI 2 DVI 2 COMPONENT VIDEO Pb Pr Y COMPONENT VIDEO Y Pr Pb VIDEO VIDEO S VIDEO 2 S VIDEO 2 S VIDEO 1 S VIDEO 1 RS 232 CONTROL RS 232 CONTROL IR IR 1 2 3 1 2 3 TRIGGERS TRIGGERS Personal Computer Red Green Blue Horiz Vert ...

Страница 33: ...ideo and Component Video Connections DVI 1 DVI 1 HD1 HD2 Y G G Y H V INPUTS H V HD1 HD2 INPUTS R Pr Pr R B Pb Pb B DVI 2 DVI 2 COMPONENT VIDEO Pb Pr Y COMPONENT VIDEO Y Pr Pb VIDEO VIDEO S VIDEO 2 S VIDEO 2 S VIDEO 1 S VIDEO 1 RS 232 CONTROL RS 232 CONTROL IR IR 1 2 3 1 2 3 TRIGGERS TRIGGERS DVD Player VCR Satellite Receiver Laser Disc etc ...

Страница 34: ...hem to the 12 volt trigger outputs as shown in Figure 3 12 Figure 3 12 Connecting 12 Volt Trigger Outputs Connecting to AC Power Plug the female end of the power cord into the AC receptacle on the rear of the VX 2i AC 100V 240V Then connect the other end to your AC power source COMPONENT VIDEO Pb Pr Y COMPONENT VIDEO Y Pr Pb VIDEO VIDEO S VIDEO 2 S VIDEO 2 S VIDEO 1 S VIDEO 1 RS 232 CONTROL RS 232...

Страница 35: ...Picture Orientation By default the VX 2i is configured for a floor front installation in which the projector is installed upright and in front of the screen If it is installed behind the screen and or mounted on a ceiling you must change the picture orientation To do this 1 Press MENU and enter the Service Menu passcode 2 Select Service from the Main Menu 3 Select Display Device from the Service M...

Страница 36: ... sign Then press and hold the ENTER button To enlarge the picture zoom in use the cursor buttons to highlight the plus sign Then press and hold the ENTER button Shift To change the projected image position use the cursor buttons to highlight Left Right Up or Down Then press and hold the ENTER button to shift the image in that direction 4 4 Using the On Screen Menus Press the MENU button on either ...

Страница 37: ... VirtualWide Cinema Virtualwide 2 35 Picture Brightness Contrast Color Tint Sharpness Input Position Left Right Up Down Width Height Overscan ISF Presets Recall ISF Night Recall ISF Day Recall Save Custom 1 Recall Save Custom 2 Reset to Factory Default Information read only Serial Number Hardware Firmware Date Service Test Video Grey Bars 1 Grey Bars 2 Color Bars 1 Color Bars 2 Language English Fr...

Страница 38: ...appropriate aspect ratio for the type of program material being viewed refer to Table 4 1 The currently selected aspect ratio is indicated by a 7 to its left in the example at right Anamorphic is selected Runco Video Input Source Aspect Ratio Picture Input Position ISF Presets Information Calibration Service Input Source Composite S Video 1 S Video 2 Component SD HD RGB 1 HD RGB 2 DVI 1 DVI 2 Aspe...

Страница 39: ...ing and most VHS video cassettes Letterbox LET BOX The image in the Letterbox mode is stretched vertically the top and bottom portions are blanked off Letterbox is best suited for LaserDisc movies or non anamorphic DVDs VirtualWide V WIDE A 4 3 image is transformed into a 16x9 image Cinema The image in the Letterbox mode is enlarged to a 16x9 image and the upper and lower portions are compressed V...

Страница 40: ... be possible to obtain satisfactory picture quality using the naked eye and regular program material Runco recommends using the following calibration tools for best results External test pattern source Sencore VP401 Multimedia Video Generator Ovation Multimedia test DVD or equivalent A blue filter provided with many test DVDs for color level and tint adjustments Connect your test pattern source to...

Страница 41: ...visible The lighter gray areas are clearly visible The white areas are a comfortable level of true white The image contains only black gray and white no color Contrast On your external test pattern source select a stepped gray bar pattern like the one shown in Figure 4 3 Figure 4 3 Typical Gray Bar Pattern for Adjusting Contrast Select Contrast and press ENTER Adjust the contrast to a point just b...

Страница 42: ...essentially the ratio of red to green in the color portion of the image When tint is decreased the image appears redder when it is increased the image appears greener To set the tint select Tint and press ENTER While looking at the color bar pattern through a blue filter adjust the tint level until the cyan and magenta color bars on either side of the green bar appear to be a single shade of blue ...

Страница 43: ...shift the image to the right use the left or down button to shift it to the left Up Down Select Up Down from the Input Position menu to shift the projected image vertically Use the right or up cursor button to shift the image upward use the left or down button to shift it downward Width Select Width from the Input Position menu to change the projected image width Use the right or up cursor button ...

Страница 44: ...y will be lost when a new input source or resolution is selected Aspect ratio Picture quality settings brightness contrast color saturation tint and sharpness Input position image position width height and overscan percentage To reset all image presets to their factory defaults select Factory Default and press ENTER Information Select Information from the Main Menu to see information that uniquely...

Страница 45: ...ttons to manipulate the on screen slidebars Lamp Power Select Lamp Power from the Display Color Menu to adjust the lamp output level You can choose to run the lamp as bright as possible 1 this is the default setting or you can choose the lower setting 0 Generally lower lamp output can prolong the life of the lamp but decreases brightness Color Temp Select Color Temp from the Display Color menu to ...

Страница 46: ...ress MENU when you have finished entering text Then check the Splash Enable box to have the VX 2i display the information you enter here when it is turned on OSD Position Select OSD Position press ENTER and use the arrow buttons to change the size and position of the OSD controls Service Use the Service menu to access advanced projector configuration settings This menu should be used by ISF certif...

Страница 47: ...n invalid code the LED flashes for three or four seconds Try again entering a valid code Display Device The options in the Display Device menu allow you to change the picture orientation reset the lamp timer perform lens adjustments and access additional test patterns Installation Select Installation from the Display Device menu to change the picture orientation to suit the method of installation ...

Страница 48: ...D menus appear and disappear when you press MENU Choose one of the following 0 No transition menus abruptly appear and disappear 1 Menus fade in and out 2 Checkerboard dissolve menus appear and disappear in sections 3 Window shade effect menus are drawn on a diagonal from top left to bottom right and retract in the opposite direction Timeout Short Long These settings control how long the OSD menus...

Страница 49: ...1 provides some general guidelines for troubleshooting problems you may encounter with the VX 2i If you encounter an issue not described here please contact Runco Technical Support 5 Maintenance and Troubleshooting Table 5 1 Troubleshooting Chart Symptom Possible Cause s Solution The projector does not turn on after initial installation The power LED lights red after you press the power button The...

Страница 50: ... on the VX 2i Ensure that the source outputs are connected to the correct VX 2i input The projector will not turn back on after it was powered down or the image disap pears during operation The projector will not turn on for two minutes after power down to protect the lamp The lamp has failed Wait two minutes until the LED at the front of the VX 2i turns red Table 5 1 Troubleshooting Chart continu...

Страница 51: ...nd a string of multiple commands on a single line separated by commas For example COMPOSITE BRIGHTNESS 100 ANAMORPHIC Return switches to the Composite video input sets the brightness to 100 and sets the aspect ratio to Anamorphic Command strings can be up to 255 characters long Table 6 1 lists the RS 232 command set The Parameter min max column shows the valid parameter ranges or NA for commands t...

Страница 52: ... space RGB with embedded sync on green YUV NA YES HD YUV output color space PHASE 0 3 YES Adjusts phase IHPOS 100 100 YES Sets a value for horizontal input position IVPOS 100 100 YES Sets a value for vertical input position IWIDTH 100 100 YES Sets the value for input width IHEIGHT 100 100 YES Sets the value for input height OVERSCAN 0 10 YES Sets the overscan percentage OHPOS 100 100 YES Sets the ...

Страница 53: ... Returns active input OUTRES NA NA Returns output resolution SERIALNUM NA NA Returns projector serial number DATE NA NA Returns projector manufacture date IVPOS NA NA Returns input vertical position value OVERSCAN NA NA Returns overscan percentage OVPOS NA NA Returns output vertical position value BRIGHTNESS NA NA Returns brightness setting value TINT NA NA Returns tint setting value PRESET NA NA ...

Страница 54: ...rns sharpness setting value BKGND NA NA Returns background setting value INRES NA NA Returns input resolution ASPECTOUT NA NA Returns output screen size HWVER NA NA Returns hardware version number Table 6 1 Serial Commands continued Command Parameter min max Value Stored Description ...

Страница 55: ...ed Width 72 120 in Maximum Width 250 in Throw Distance Factor x Screen Width Proteus A Fixed 0 64 for rear screen applications only Proteus B Zoom 1 22 1 44 x width Proteus C Zoom 1 45 1 76 x width Proteus D Zoom 1 82 2 39 x width 1 34 1 75 with CineWide Proteus E Zoom 2 42 3 57 x width 1 78 2 62 with CineWide Proteus F Zoom 3 63 5 72 x width 2 67 4 20 with CineWide Horizontal and Vertical Offset ...

Страница 56: ...and projector light output Home Theater Calibration Specifications Light Output 1227 ANSI Lumens Contrast Ratio 217 1 These specifications are obtained by calibrating the projector as described above for CSMS measurements Industry Standard Specifications Light Output 2500 ANSI Lumens Contrast Ratio 2800 1 These are typical projector brightness and contrast specifications found in most companies sa...

Страница 57: ...ual 47 Limited Warranty Projector Two 2 years parts and labor from the date of delivery to the end user Lamp 1000 hours or six 6 months whichever comes first Specifications are subject to change without notice Table 7 1 VX 2i Specifications continued ...

Страница 58: ... 7 2 VX 2i Dimensions Figure 7 1 shows the VX 2i dimensions Figure 7 1 VX 2i Dimensions 0 8 389 15 857 21 190 500 25 737 134 1 500 1 330 750 9 245 1 500 12 123 R 10 680 0 1 620 23 990 alldimensionsareininches 14 671 9 934 0 1 685 19 505 1 305 4 335 Ø 1 140 ...

Страница 59: ......

Страница 60: ...Runco CL 810 Owner s Operating Manual Runco International 2900 Faber Street Union City CA 94587 Ph 510 324 7777 800 23RUNCO Fax 510 324 9300 www runco com RUMA 011155 rev 11 04 05 SERIAL NUMBER ...

Отзывы: