Runco CINEWIDETM VX-3000D Скачать руководство пользователя страница 35

Installation

VX-3000d Series Installation/Operation Manual

19 

PRE

L

IMINAR

Y

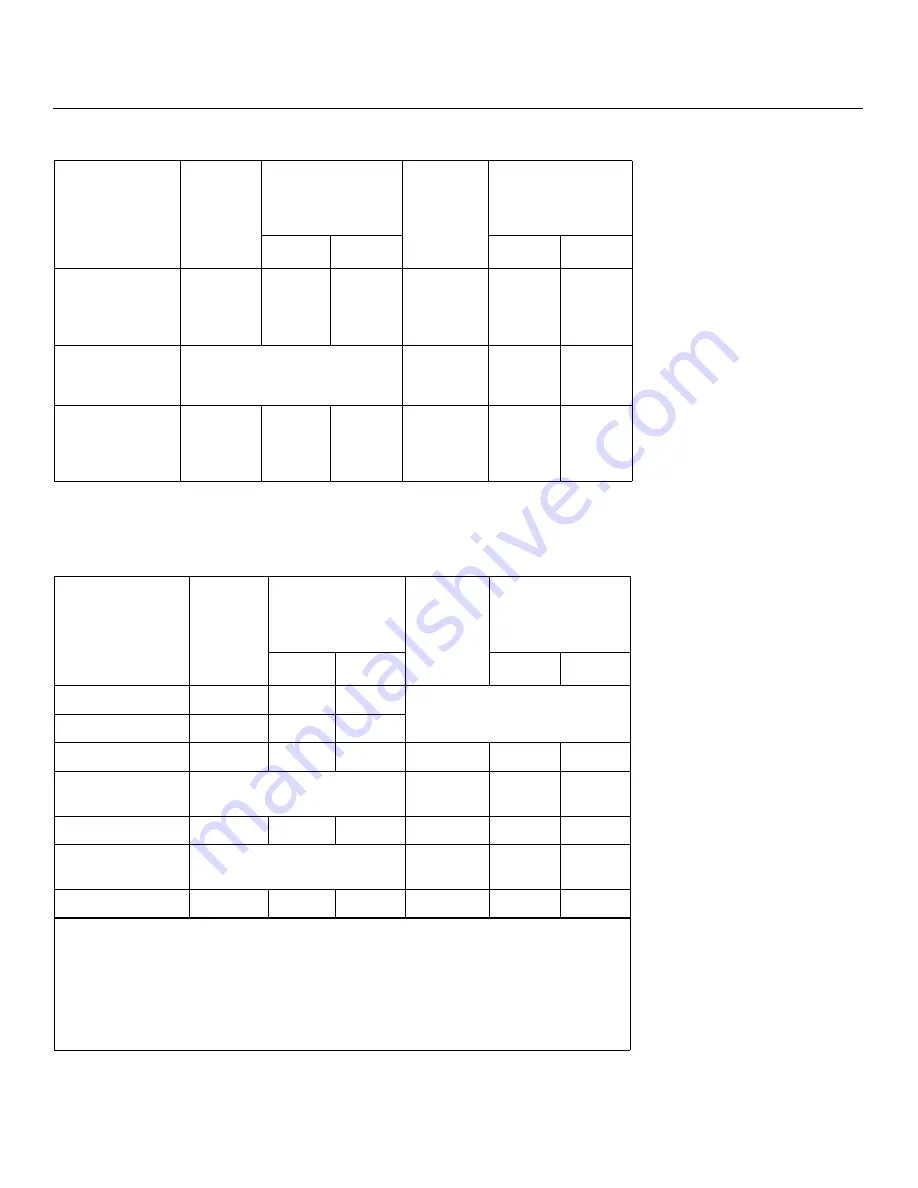
Table 3-4 gives the throw ratios for the VX-3000d Ultra. 

VX-3000d/


CineWide with 
AutoScope 
(Rainier II Lens)

1.87 – 2.20

135.76

159.72

1.55 – 1.65

148.80

158.40

VX-3000d/


CineWide 
(McKinley Lens)

(n/a)

1.40 – 1.65

134.40

158.40

VX-3000d/


CineWide with 
AutoScope 
(McKinley Lens)

1.87 – 2.20

135.76

159.72

1.40 – 1.65

134.40

158.40

Table 3-4. Throw Ratios for the VX-3000d Ultra 

Lens Option

Throw 

Ratio with 

Primary 

Lens Only

Throw Range in 

inches, with 

72.6x40.8-inch 

(1.78:1) Screen

Throw Ratio 

with 

Primary 

Lens and 

Anamorphic 

Lens

Throw Range in 

inches, with 

96x40.8-inch (2.35:1) 

Screen

Minimum Maximum

Minimum Maximum

Proteus B (Note 1)

1.06 - 1.20

76.96

87.12

Not Applicable

(Note 2)

Proteus C

1.40 - 1.50

101.64

108.90

Proteus D 

1.55 - 1.98

112.53

143.75

1.18 - 1.48

113.28

142.08

Proteus D+Whitney 
(Note 3)

Not Applicable

1.85 - 1.98

177.60

190.08

Proteus E

2.07 - 3.00

150.28

217.80

1.57 - 2.24

150.72

215.04

Proteus E+Whitney 
(Note 3)

Not Applicable

2.07 - 3.00

198.72

288.00

Proteus F

3.10 - 4.80

225.06

348.48

2.35 - 3.57

225.60

342.72

Notes:

1. The Proteus B lens can only be used in rear-projection installations.

2. Only the Proteus D, E and F lenses can be used with the optional CineWide (secondary 

anamorphic) lens. Doing so affects the throw distances as shown here. 

3. When using the Proteus D or E with the Whitney anamorphic lens, the screen width must be 

78 inches or greater and the throw distance must be 144 inches or greater. 

Table 3-3. Throw Ratios for the VX-3000d Series (continued)

Projector Model

Throw 

Ratio with 

Primary 

Lens Only

Throw Range in 

inches, with 

72.6x40.8-inch 

(1.78:1) Screen

Throw Ratio 

with 

Primary 

Lens and 

Anamorphic 

Lens

Throw Range in 

inches, with 

96x40.8-inch (2.35:1) 

Screen

Minimum Maximum

Minimum Maximum

Содержание CINEWIDETM VX-3000D

Страница 1: ...eries 1080p DLPTM Home Theater Projectors VX 3000d VX 3000d CineWide VX 3000d CineWide with AutoScope VX 3000d Ultra VX 3000d Ultra CineWide VX 3000d Ultra CineWide with AutoScope INSTALLATION OPERATI...

Страница 2: ......

Страница 3: ...ve in material or workmanship during the warranty period Runco will repair the product replace the product with a similar new or like new product or refund a prorata share of the purchase price calcul...

Страница 4: ...ge claims directly with the shipping company 5 The customer is responsible for providing a suitable box to ship the defective product to an authorized Runco repair depot Boxes may be purchased from a...

Страница 5: ...anty does not cover black uniformity issues or other LCD issues associated with usage outside the Runco recommended guidelines and specifications for the product 7 Second day shipment delivery time an...

Страница 6: ...u specific legal rights and you may have other rights which vary from locality to locality Some localities do not allow limitations on implied warranties and or do not allow the exclusion of incidenta...

Страница 7: ...moving the cart apparatus to avoid injury from tip over 13 Unplug this apparatus during lightning storms or when unused for long periods of time 14 Refer all servicing to qualified service personnel...

Страница 8: ...MC Part 4 Testing and measurement techniques Section 5 Surge immunity test EN 61000 4 6 Electromagnetic compatibility EMC Part 4 Testing and measurement techniques Section 6 Conducted disturbances ind...

Страница 9: ...003 du Canada The Product contains small amounts of tin lead and or mercury Disposal of these materials may be regulated due to environmental considerations Lamp s inside this product contain mercury...

Страница 10: ...x VX 3000d Series Installation Operation Manual P R E L I M I N A R Y Notes...

Страница 11: ...ou Have Comments About This Manual 1 Textual and Graphic Conventions 1 Using This Manual 2 Description Features and Benefits 3 Key Features and Benefits 4 Parts List 4 2 Controls and Functions 5 VX 30...

Страница 12: ...VX 3000d 38 Floor Mounting Upright 38 Ceiling Mounting Inverted 38 Adjusting the Projector Height or Projection Angle 38 Connections to the VX 3000d and DHD Controller 39 Connector Panel Access 39 Con...

Страница 13: ...g 85 Lamp Replacement 85 Troubleshooting Tips 86 6 External Control 89 RS 232 Connection and Port Configuration 89 Serial Communications 89 RS 232 Connection and Port Configuration 89 Serial Command S...

Страница 14: ...Table of Contents xiv VX 3000d Series Installation Operation Manual P R E L I M I N A R Y Notes...

Страница 15: ...eiling Mounting Plate Bottom View 34 3 11 VX 3000d CineWide with Rainier II McKinley Cylindrical Lens Base Plate and Ceiling Mounting Plate Exploded View 35 3 12 VX 3000d Ultra CineWide with Rainier I...

Страница 16: ...4 Typical Color Bar Pattern for Adjusting Color Saturation and Tint 68 4 5 Typical Test Pattern for Adjusting Sharpness 70 4 6 Overscan Modes 71 4 7 CIE 1931 Chromaticity Diagram 75 4 8 Keystone Corr...

Страница 17: ...r Runco product manuals on line at www Runco com If You Have Comments About This Manual Runco welcomes your comments about this manual Send them to techpub runco com Textual and Graphic Conventions Te...

Страница 18: ...e supplemental information CAUTIONS alert users that a given action or omitted action can degrade performance or cause a malfunction WARNINGS appear when a given action or omitted action can result in...

Страница 19: ...creen width Electronic focus and zoom controls further simplify installation and setup of a VX 3000d Ultra The VX 3000d s illumination system provides two light intensity levels to allow maximum flexi...

Страница 20: ...3000d is shipped with the following items If any items are missing or damaged please contact your Runco dealer or Runco Customer Service at 800 23 RUNCO VX 3000d Series Home Theater Projector and DHD...

Страница 21: ...2 show the key VX 3000d components Figure 2 1 VX 3000d Front Side Top View 1 EXHAUST VENT 2 ZOOM TAB Standard VX 3000d Use this to change the projected image size with a standard VX 3000d Use the remo...

Страница 22: ...lashes orange for approximately 110 seconds after the projector is turned off to indicate that the lamp is cooling down Red when an internal failure requiring service has occurred 7 LAMP LED Indicates...

Страница 23: ...t To rotate the logo grip it at the sides pull it away from the projector and rotate it 180 degrees 2 CABLE OPENING Pass cables through this opening 3 CABLE ACCESS DOOR Open to access connectors 4 LAM...

Страница 24: ...VX 3000d Rear Panel 1 DHD INPUT An HDCP compliant digital video input for connecting the HDMI output from the DHD Controller 2 RS 232 CONTROL PORT Connect the Display Control output on the DHD Control...

Страница 25: ...s it again to return to standby mode For a discrete on or off command you can use the direct access buttons on the remote control 5 LEFT BUTTON Used to direct select inputs or move the menu cursor lef...

Страница 26: ...current menu and return to the previous one 9 UP BUTTON Use to direct select aspect ratios or move the menu cursor up in the OSD When no menus are present on screen the UP button toggles through aspe...

Страница 27: ...ideo sources or RGBHV sources such as personal computers 7 Component SCART 5 x RCA connectors SD HD input for connecting SDTV EDTV or HDTV component video sources or RGBHV sources Also provides RGB in...

Страница 28: ...VX 3000d Remote Control Unit Figure 2 6 shows the VX 3000d remote control and the paragraphs that follow describe its functionality Figure 2 6 DHD Controller VX 3000d Remote Control CUST 1 CUST 2 SVC...

Страница 29: ...le through the different source inputs in this order LEFT Button HDMI 2 HDMI 1 SCART HD 2 HD 1 Component S Video 2 S Video 1 Composite Video RIGHT Button Composite Video S Video 1 S Video 2 Component...

Страница 30: ...C CineWide equipped projectors only Selects the Virtual Cinema aspect ratio used for viewing 16 9 source material on a 2 35 1 screen 11 S VID 1 4 S VID 2 5 S Video Press to select an S Video input or...

Страница 31: ...emove the batteries to avoid damage from battery leakage Notes on Remote Control Operation Make sure that there is nothing obstructing the infrared beam between the remote control and the IR receiver...

Страница 32: ...ontroller 41 6 Connect external controller to RS 232 port optional 46 7 Connect 12 volt trigger outputs to AutoScope lens motor and or other equipment optional 47 8 Connect projector DHD Controller an...

Страница 33: ...quickly Easy to access Shares floor space with audience Front Screen Inverted Mount ceiling Installation Does not take up audience space Projector is unobtrusive Projector cannot be accidentally move...

Страница 34: ...e the throw distance by taking the width of the screen and multiplying it by the lens throw ratio see Figure 3 1 The result of this calculation tells you roughly how far back the projector should be p...

Страница 35: ...55 1 98 112 53 143 75 1 18 1 48 113 28 142 08 Proteus D Whitney Note 3 Not Applicable 1 85 1 98 177 60 190 08 Proteus E 2 07 3 00 150 28 217 80 1 57 2 24 150 72 215 04 Proteus E Whitney Note 3 Not App...

Страница 36: ...ns Shift You can use the lens shift controls on the projector remote to center the image on the screen Lens shift is generally expressed as a percentage of the screen height or width as shown in Figur...

Страница 37: ...R Y Figure 3 4 Horizontal Lens Shift Example Only 0 Screen Center 100 Width Lens Shift 1 0 x W 50 Width Lens Shift 0 5 x W Screen Width W Note This is a general example of lens shift Lenses vary in t...

Страница 38: ...t 0 10 Note 4 10 Lens Shift Limits in Inches with a 100 by 56 inch 1 78 1 Screen Vertical Up 19 60 10 08 11 20 11 20 11 20 11 20 Down 28 00 14 00 24 64 24 64 25 76 25 76 Horizontal Left 0 10 00 Note 4...

Страница 39: ...y audio receiver that has the ability to effectively synchronize audio and video signals Most mainstream audio receiver switchers have the ability to synchronize the audio and video to the Advanced Te...

Страница 40: ...tic energy such as motors and transformers Common sources of these include slide projectors speakers power amplifiers and elevators 3 4 Installing the Primary Projection Lens VX 3000d Ultra only The V...

Страница 41: ...lens from damage 6 Carefully cut and remove the plastic band around the lens motor connector wires Take great care not to cut the wires 7 Detach the lens motor connector from the motor by removing th...

Страница 42: ...at the lens assembly motor has a male socket connector 9 Remove the front cap from the lens 10 Connect the lens motor to the projector 11 Hold the lens assembly with the motor facing upward Carefully...

Страница 43: ...ssembly to the projector flange with the three Allen screws on the outer ring of the assembly using a 3 mm hex driver 14 Install the foam shield around the front of the lens 15 Replace the front lens...

Страница 44: ...talling a CineWide projector equipped with a cylindrical Rainier II or McKinley anamorphic lens proceed with Installing the Fixed CineWide Base Plate Cylindrical Lens page 35 If you are installing a V...

Страница 45: ...VX 3000d CineWide with AutoScope Motor Assembly Exploded View 4 5 Screw Phillips Pan Head 10 32 x 1 2 4x 1 AutoScope Lens Motor 2 Screw Phillips Flat Head 10 32 x 1 4 2x 3 CineWide with AutoScope Cei...

Страница 46: ...own on a blanket or other soft surface Then remove the two height adjusters at the front of the projector by turning them counterclockwise until they come out Standoff 10mm x 5mm x M5 Aluminum Black A...

Страница 47: ...e bottom of the projector up and around the AutoScope lens motor housing For floor installations where the projector is upright the adapters allow the projector to lie flat on the mounting surface Usi...

Страница 48: ...ide of the projector 3 Secure the motor to the projector with the four 4 supplied 10 32 Pan Head Phillips screws item 1 and nylon spacers or aluminum standoffs item 7 4 Secure the AutoScope Ceiling Mo...

Страница 49: ...with the projector ceiling mount kit with those on the bottom of the projector 3 Line up the two mounting holes on the CineWide base plate with those on the bottom of the projector and at the front o...

Страница 50: ...ase Plate and Ceiling Mounting Plate Bottom View Washers under Lens Base Plate 2 places Washers between Lens Base Plate and Ceiling Mounting Plate 2 places VX 3000d CineWide with Prismatic Lens Base P...

Страница 51: ...lindrical Rainier II McKinley lens base plate assembly for a VX 3000d CineWide Figure 3 11 VX 3000d CineWide with Rainier II McKinley Cylindrical Lens Base Plate and Ceiling Mounting Plate Exploded Vi...

Страница 52: ...l Rainier II McKinley lens base plate assembly Figure 3 12 VX 3000d Ultra CineWide with Rainier II McKinley Cylindrical Lens Base Plate and Ceiling Mounting Plate Exploded View Ceiling Mount Plate par...

Страница 53: ...e as shown in Figure 3 12 4 If you are mounting the projector on a ceiling Line up the four holes on the projector ceiling mounting plate included with the projector ceiling mount kit with those on th...

Страница 54: ...mount fixture The projector can also be inverted and placed in an enclosure above and behind the viewing area Install four feet on the inside bottom surface of the enclosure on which the projector ca...

Страница 55: ...nsate For detailed instructions refer to Using the On Screen Menus on page 61 3 7 Connections to the VX 3000d and DHD Controller Proceed as follows to connect the DHD Controller to the VX 3000d your v...

Страница 56: ...the HDMI Output of the DHD Controller to the DHD INPUT connector on the VX 3000d as shown in Figure 3 14 Figure 3 14 Connecting the VX 3000d to the DHD Controller RS 232 Connection Connect the Display...

Страница 57: ...e 3 15 Figure 3 15 HDMI Source Connections Use the HDMI inputs whenever possible This ensures the highest video quality because the signal is carried in the digital domain throughout the entire signal...

Страница 58: ...N A R Y Component Video Source Connections Connect your component video sources to the HD1 HD2 and or Component SCART inputs as shown in Figure 3 16 Figure 3 16 Component Video Source Connections Y P...

Страница 59: ...GBHV Source Connections Connect personal computers and or other RGB sources to the HD1 HD2 and or Component SCART inputs as shown in Figure 3 17 Figure 3 17 RGBHV Source Connections or Computer RGB Ca...

Страница 60: ...lue and red outputs from your SCART source to the Component SCART input on the DHD Controller Connect the sync output from your SCART source to the Video input on the DHD Controller See Figure 3 18 Fi...

Страница 61: ...n Operation Manual 45 P R E L I M I N A R Y Composite and S Video Source Connections See Figure 3 19 Figure 3 19 S Video and Composite Video Source Connections Gaming Console VCR Camcorder Composite S...

Страница 62: ...ect a PC or control automation system if present to the RS 232 port on the DHD Controller see Figure 3 20 For more information about using this connection refer to External Control on page 89 Figure 3...

Страница 63: ...the AutoScope lens motor to a 12 volt trigger output on the DHD Controller see Figure 3 21 Similarly connect other 12 volt trigger activated equipment such as retractable screens or screen masks to t...

Страница 64: ...annot reach the DHD Controller due to excessive distance or obstructions such as walls or cabinet doors you can connect an external IR receiver to the DHD Controller to extend the range of the remote...

Страница 65: ...his is an AutoScope equipped projector turn on the main power switch at the rear of the AutoScope lens motor The lens motor power switch is located next to the AC input 4 Turn on the main power switch...

Страница 66: ...s menu gives you a great deal of control over the picture size position and focus Focus To focus the projected image use the cursor buttons to highlight In or Out Then press and hold the ENTER button...

Страница 67: ...ight of the image as opposed to stretching the width to achieve a 2 35 1 aspect ratio with a 1 78 1 display device The cylindrical anamorphic lens has a larger aperture than the prismatic lens It stre...

Страница 68: ...pe Carriage Plate or Fixed CineWide Base Plate item 7 Position the bracket so that the long slot at the bottom of the lens holder is perpendicular to the corresponding slots on the plate 3 Secure the...

Страница 69: ...tant image height independent of the aspect ratio while using the full display resolution of the projector It accomplishes this by moving the anamorphic lens in front of the primary lens when widescre...

Страница 70: ...or repeatedly with no menus visible on screen Adjusting the Horizontal X Lens Position 1 Project a white field on the screen 2 Loosen the Yaw X Adjustment Levers underneath the lens 3 Slowly move the...

Страница 71: ...tangular The anamorphic lens will almost always be angled with respect to the projector this is normal Once the proper lens angle has been set firmly tighten the Pitch Adjustment T Screws to secure th...

Страница 72: ...h to allow it to rotate freely 3 Grasp the lens by the center ring and rotate the lens until the image is properly anamorphic 4 When the image geometry appears correct tighten the Anamorphic Lens Set...

Страница 73: ...he lens with the brackets installed on top of or under if the projector is inverted the Base Plate item 2 so that the two threaded posts at the bottom of the brackets pass through the corresponding sl...

Страница 74: ...o bottom pincushion distortion To do this loosen the Pitch Adjustment Screws on either side of the lens to allow it to pivot freely Then adjust the anamorphic lens angle so that the projected image is...

Страница 75: ...Yaw Z Adjustment Knobs to allow the lens to pivot freely from side to side Then angle the lens to even out any left right pincushion distortion Once the proper lens angle has been set firmly tighten...

Страница 76: ...Installation 60 VX 3000d Series Installation Operation Manual P R E L I M I N A R Y Notes...

Страница 77: ...ht Overscan Overscan Mode Zoom Crop Phase RGB Component SCART signals only Tracking RGB Component SCART signals only Memory Presets Recall ISF Night Recall ISF Day Recall Save Custom 1 Recall Save Cus...

Страница 78: ...et Yes No Diagnostic White Red Green Blue Yellow Cyan Magenta Color Space Auto REC601 REC709 RGB PC or RGB Video Not available on S Video or Composite video inputs Color Gamut Auto REC709 SMPTE C or E...

Страница 79: ...in this example 16 9 is selected Note that some aspect ratios are unavailable and or not useful with certain types of source material The optimal setting depends on a number of factors such as The as...

Страница 80: ...Letterbox LBOX Letterbox mode scales zooms in on a 4 3 image linearly by the same amount on all sides to fill a 16 9 display Letterbox is best suited for viewing LaserDisc movies or non anamorphic DV...

Страница 81: ...more on the sides than in the center to fit a 2 35 1 screen Virtual Cinema is available only on CineWide equipped projectors Native none Select Native to display the source signal in its native resol...

Страница 82: ...tely Although it may be possible to obtain satisfactory picture quality using the naked eye and regular program material Runco recommends using an external test pattern source Ovation Multimedia Digit...

Страница 83: ...as are barely visible The lighter gray areas are clearly visible The white areas are a comfortable level of true white The image contains only black gray and white no color Contrast On your external t...

Страница 84: ...ront panel 2 Select Service from the Main Menu and press ENTER 3 Enter the Service menu passcode 4 Select Display Device from the Service menu and press ENTER 5 Press ENTER again to select Configure 6...

Страница 85: ...greener To adjust the tint enable blue only display mode in the Diagnostic menu as you would for adjusting color saturation refer to the previous section Color Saturation Select Tint from the Picture...

Страница 86: ...amount of noise reduction keeping in mind that higher settings which reduce high frequencies may also soften the image Input Position Use the controls in the Input Position Menu to fine tune the aspec...

Страница 87: ...his control defines the amount of overscan applied to the image The range is from 0 to 20 There are two overscan modes In Crop mode each increment adds a mask at the top bottom left and right edges of...

Страница 88: ...or several soft vertical stripes or bands across the entire image indicates poor pixel tracking Proper pixel tracking helps ensure that the image quality is consistent across the screen that aspect r...

Страница 89: ...memory preset select it press or to highlight Save and press ENTER To reset the Custom 1 or Custom 2 memory preset to its factory default state select it press or to highlight Reset and press ENTER S...

Страница 90: ...olor imbalances in the bright areas of the image A good way to do this is to use a test pattern consisting mostly of solid white areas such as an 80 IRE window pattern If the white areas contain trace...

Страница 91: ...eases brightness Color Temp Select Color Temp from the Display Color menu to adjust the color temperature Color temperature establishes the color of gray by adjusting the 75 white point to various col...

Страница 92: ...a Use a lower setting for rooms with a lot of ambient light Use a higher setting for more theater like viewing conditions little or no ambient light Input Image The Input Image controls are functional...

Страница 93: ...for 1080i sources Duplicate ISF Night settings for a given source and signal format and save them in the Custom 1 memory preset To use this feature select Copy Paste from the Calibration menu Copy Set...

Страница 94: ...sition Service Use the Service menu to access advanced projector configuration settings This menu should be used by ISF certified technicians only Test Video Select Test Video from the Service Menu to...

Страница 95: ...two digit code between 00 and 31 inclusive Include a leading zero for single digit codes for example enter 9 as 09 3 The LED turns off to confirm the code change If you enter an invalid code the LED...

Страница 96: ...n use Lamp Hours Reset When you replace the projector lamp refer to Lamp Replacement on page 85 you should also reset the lamp hour counter to zero so that the lamp usage information in the Lamp Info...

Страница 97: ...the DHD Controller to use a specific color space Choose one of the following REC709 sets the color space matrix to that defined in ITU R BT 709 REC601 sets the color space matrix to that defined in IT...

Страница 98: ...es from the Miscellaneous menu to and set it to Off Blank Screen Color Select Blank Screen Color from the Miscellaneous menu to select the color that appears when no incoming signal is present The ran...

Страница 99: ...ics cards do recognize or properly interpret this extended EDID information Select HDMI EDID Extension from the Service menu to specify whether or not the EDID extensions from the display device are p...

Страница 100: ...ettings back to their factory defaults choose System Reset from the Service menu A confirmation message appears Select Yes to continue with the reset or select No to cancel This action is not undoable...

Страница 101: ...ment 2 Loosen the two captive screws from the lamp cover 3 Remove the lamp cover 4 Remove the two lamp assembly mounting screws 5 Grasp the lamp assembly handle and pull gently removing the lamp modul...

Страница 102: ...the AC outlet is not active The main power switch at the rear of the DHD Controller see Figure 2 5 is set to the off position Ensure that the DHD Controller is plugged in and that the AC outlet is ac...

Страница 103: ...e versa The Red Pr Green Y or Blue Pb outputs from the source are connected to the wrong inputs on the VX 3000d Ensure that the source outputs are connected to the correct VX 3000d input POWER LED lig...

Страница 104: ...Maintenance and Troubleshooting 88 VX 3000d Series Installation Operation Manual P R E L I M I N A R Y Notes...

Страница 105: ...0 Configure the RS 232 controller or PC serial port as follows no parity 8 data bits 1 stop bit and no flow control Set the baud rate to 19200 to match that of the DHD Controller RS 232 port Serial Co...

Страница 106: ...nores it and returns a minus sign Table 6 1 Serial Commands Command Parameter min max Value Stored Description Power On Off Commands OFF NA NA Turns projector off ON NA NA Turns projector on POWER 0 1...

Страница 107: ...MADELAY 7 7 YES Sets a value for input color chroma delay CHROMADELAY NA NA Returns input color chroma delay setting COLOR 50 50 YES Sets a value for color COLOR NA NA Returns color setting value CONT...

Страница 108: ...input vertical position value IWIDTH 0 50 YES Sets the value for input width IWIDTH NA NA Returns input horizontal width value OVERSCAN 0 20 YES Sets the overscan percentage OVERSCAN NA NA Returns ov...

Страница 109: ...put resolution SERNUM NA NA Returns DHD Controller serial number SWVER NA NA Returns software version number SYSSTATE 0 4 NA Returns current system state 0 Off 1 Initializing 2 On 3 Powering Down 4 Er...

Страница 110: ...ics Each code consists of 14 bits Two 2 start bits always 1 A toggle bit This bit is inverted every time a key is released and pressed again This enables the DHD Controller to distinguish between a bu...

Страница 111: ...cket Data Word Encoded Data Word Modulated Carrier Zoom In of Carrier RC5 Packet Transmission 3tp tp 1 78 ms 27 8 s Table 6 2 RC5 Control Codes for the DHD Controller Remote Control Button Name RC5 Da...

Страница 112: ...FF 0x3460 0x3C60 Sets the sleep timer to Off ST30MIN 0x3461 0x3C61 Sets the sleep timer to 30 minutes ST60MIN 0x3462 0x3C62 Sets the sleep timer to 60 minutes ST90MIN 0x3463 0x3C63 Sets the sleep time...

Страница 113: ...x 1080 16 9 Aspect Ratios Refer to Table 7 2 Video Standards Refer to Table 7 2 Video Compatibility 480i 480p 576i 576p 720p 1080i 50 60 1080p 24 50 60 Picture Size 16 9 Screen Recommended Width 72 in...

Страница 114: ...Light Output 640 ANSI Lumens Contrast Ratio 290 1 VX 3000d 315 1 VX 3000d Ultra These specifications are obtained by calibrating the projector as described above for CSMS measurements Industry Standar...

Страница 115: ...ds via RS 232 Front panel controls RS 232 Communication Parameters 19200 bps no parity 8 data bits 1 stop bit no flow control Trigger Outputs 3 12 VDC each rated at 250 mA and thermal fuse protected B...

Страница 116: ...X 3000d dimensions all dimensions are in inches Figure 7 1 Overall Dimensions VX 3000d CineWide Prismatic Lens 0 9 8 19 7 6 1 18 7 14 9 14 0 5 7 0 5 6 7 3 8 0 2 9 9 9 1 6 0 1 4 3 2 5 5 0 3 0 9 8 19 7...

Страница 117: ...3000d Ultra Figure 7 2 shows the VX 3000d Ultra dimensions all dimensions are in inches Figure 7 2 Overall Dimensions VX 3000d Ultra 0 9 8 18 8 14 9 19 7 0 8 6 3 7 3 7 9 5 5 0 6 8 6 6 9 6 0 2X 1 2 2X...

Страница 118: ...d CineWide with AutoScope dimensions all dimensions are in inches Figure 7 3 Overall Dimensions VX 3000d CineWide with AutoScope 0 9 8 19 7 6 1 18 7 14 9 0 5 6 7 3 8 0 2 9 1 0 6 5 9 12 1 10 2 0 3 0 9...

Страница 119: ...31 469 25 175 66 59 35 892 29 862 72 00 37 861 31 500 75 00 37 500 31 500 85 00 43 269 36 000 800x600 800x600 60 00 37 879 40 000 72 00 48 077 50 000 75 00 46 875 49 500 85 00 53 674 56 250 832x624 8...

Страница 120: ...1280x720 23 98 24 00 17 982 18 000 59 341 59 400 720 25p 1280x720 25 00 18 750 74 250 720 30p 1280x720 29 97 30 00 22 478 22 500 74 175 74 250 720 50p 1280x720 50 00 37 500 75 250 720 60p 1280x720 60...

Страница 121: ...4 60 00 15 734 15 750 3 580 PAL N 50 00 15 625 3 580 SECAM 50 00 15 625 13 500 Table 7 3 Supported Signal Timings by Input continued Format Resolution Refresh Rate Hz Horizontal Frequency kHz PixelFre...

Страница 122: ...Specifications 106 VX 3000d Series Installation Operation Manual P R E L I M I N A R Y Notes...

Страница 123: ......

Страница 124: ...Runco International 800 23RUNCO Fax 503 748 8161 www runco com 020 1006 00 Rev B December 2009...

Отзывы: