


w w w . r u g d o c t o r. c o m . a u
|
1 8 0 0 8 0 4 9 7 3
11
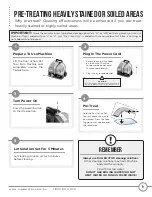
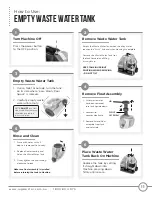
EMPTY waste water tank
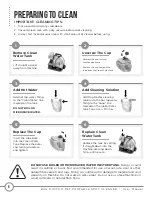
How to Use:
1
2
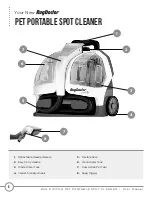
Remove Waste Water Tank
Turn Machine Off
Press the power button
to the OFF position.
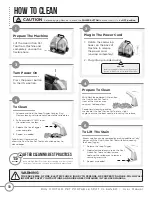
1. After waste water
has been removed,
turn tank upside down.
2. Unscrew lid
counter clockwise.
3. Remove lid and float
assembly from tank
and set aside.
3
4
Remove Float Assembly
Empty Waste Water Tank
Replace the tank by setting
it straight down into
Machine, pressing down
firmly until secure.
5
6
Place Waste Water
Tank Back On Machine
Rinse and Clean
1. Over a toilet or outside, turn the tank
on its side where “Easy Empty Pour
Spout” is marked.
2. Carefully empty waste
water until empty.
Empty the Waste Water Tank when the dirty water
reaches the “FULL” line and when cleaning is complete.
Remove the Waste Water Tank from the unit by pulling
the tank forward and lifting
it straight up.
KEEP TANK IN UPRIGHT
POSITION WHEN REMOVING
– DO NOT TILT
1. Rinse with water until all
debris is removed. Let air dry.
2. Replace float assembly and
lid on the Waste Water Tank.
3. Firmly tighten the cap turning
clockwise to lock.
Make sure float assembly is installed
before returning the tank to Machine.
NOTE:
DO NOT
pour into
sink or tub. Waste water
should be poured into
toilet or outside.
LID
FLOAT
ASSEMBLY


