


- 9 -
GB
GB
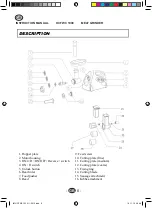
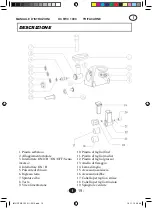
17. Strip cutter
18.Shredded cutter
19. Vegetable pusher
20. Vegetable cutting of tooth sets
21.Bushing for connector of cutter
22.Vegetable cutting head
23.Connector of cutter
24.Slice cutter
IMPORTANT SAFEGUARDS
u
Home use only. Do not use for industrial purpose.
u
Unplug when assembling and disassembling the unit.
u
Close supervision is necessary when any appliance is used near children.
u
When carrying the unit be sure to hold the body with both hands. Do not carry the
unit by the hopper plate or head.
u
Do not fix the cutting blade and cutting plate when using kibbe attachment.
u
Never push products by hand. Use food pusher.
u
Do not grind hard food such as bones, nuts, etc.
u
Do not grind ginger and other materials with hard fiber.
u
Continuous running of meat grinder should be not more than 10 minutes with the
following 10minutes interval for motor cooling.
u
Operate the unit from Ò ONÓ to Ò RÓ or from Ò RÓ to Ò ONÓ after the previous
working condition stops more than 30 seconds, or it may cause some unnormal
case such as moving up and down and easily destroy the unit.
u
To avoid jamming, do not force to operate the unit with excessive pressure.
u
When the circuit breaker activates, do not switch on.
u
Never try to replace the parts and repair the unit by yourself.
u
This appliance is not intended for use by persons(including children) with reduce
physical, sensory or mental capabilities, or lack of experience and knowledge,
unless they have been given supervision or instruction concerning use of the
appliance by a person responsible for their safety.
u
If the supply cord is damaged, it must be replaced by the manufacturer or its
service agent or a similarly qualified person in order to avoid a hazard.
u
Children should be supervised to ensure that they do not play with the appliance.
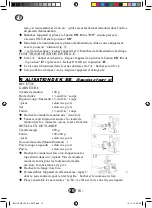
FOR THE FIRST TIME
u
Check that voltage indicated on the rating label corresponds the mains voltage in
your home.
u
Wash all parts (except body) in warm soapy water.
u
Before plug in, ensure the ON/0/R switch is in "
0
" position.
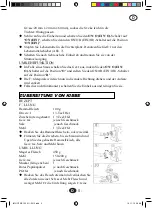
INSTRUCTION FOR USE
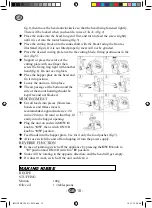
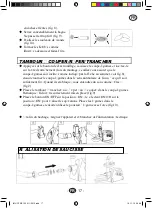
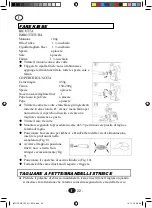
ASSENBLING
u
Press the fasten button
,
hold the head and insert it into the inlet(when inserting pls
pay attention the head must be slanted as per arrow indicated on the top, see
IM HC FWC 1000 11-2012.indd 9
19.11.12 08:58


