background image

3

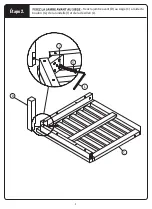
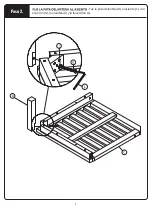
Paso 2.

Fije la pata delantera (D) al asiento (C) con 

el perno (G), la arandela (I) y la llave Allen (L).

Содержание OP-AWCOR-VGHN

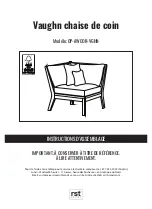
Страница 1: ...IMPORTANT RETAIN FOR FUTURE REFERENCE READ CAREFULLY For assistance with assembly or customer service call 1 877 924 2090 English Monday Friday 8 a m to 5 p m Mountain Time North America Email customerservice rstbrands com or visit our website at www rstbrands com ...

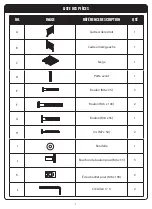
Страница 2: ...ESCRIPTION QTY A Left back frame 1 B Right back frame 1 C Seat 1 D Front leg 1 E Bolt M6 x 35 3 F Bolt M6 x 100 2 G Bolt M8 x 55 1 H Screw M7 x 50 2 I Washer 1 J Bolt cap for M6 x 35 3 K Barrel nut for M6 x 100 2 L Allen wrench 4 2 ...

Страница 3: ...2 Step 1 Connect left back frame A to the right back frame B using bolts E bolt caps J and allen wrenches L ...

Страница 4: ...3 Step 2 Attach front leg D to the seat C using bolt G washer I and allen wrench L ...

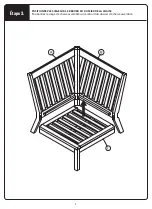
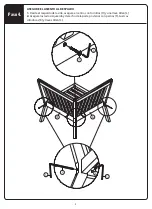
Страница 5: ...4 Step 3 Position the assembled chair seat on top of the ledge of the assembled chair back ...

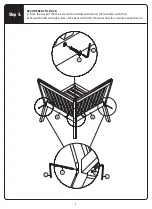
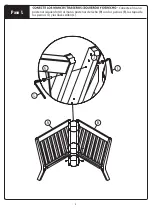
Страница 6: ...5 Step 4 SECURE SEAT TO BACK 1 From the back of the chair secure the middle with screws H and allen wrench L 2 Secure the left and right sides of the back with bolts F barrel nuts K and allen wrenches L ...

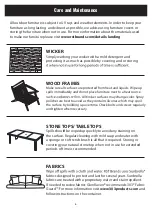
Страница 7: ...eat source All timber surfaces may change color Spray polishes are best to avoid as they contain silicones which may spoil the surface by building up overtime Check bolts and screws regularly and tighten when necessary STONE TOPS TABLE TOPS Spills should be wiped up quickly to avoid any staining on the surface Regular cleaning with mild soap and water with a sponge or soft scrub brush is all that ...

Страница 8: ...7 ...

Страница 9: ...ER À TITRE DE RÉFÉRENCE À LIRE ATTENTIVEMENT Pour de l aide a l assemblage ou le service a la clientèle composez le 1 877 924 2090 Anglais Lundi Vendredi 8 heures 17 heures heure des Rocheuses en Amérique du Nord Émail customerservice rstbrands com ou visitez notre site Web a rstbrands com ...

Страница 10: ...QTÉ A Cadre arrière droit 1 B Cadre arrière gauche 1 C Siège 1 D Patte avant 1 E Boulon M6 x 35 3 F Boulon M6 x 100 2 G Boulon M8 x 55 1 H Vis M7 x 50 2 I Rondelle 1 J Bouchon de boulon pour M6 x 35 3 K Écrou barillet pour M6 x 100 2 L Clé Allen n 4 2 ...

Страница 11: ...2 Étape 1 Connectez le cadre arrière gauche A au cadre arrière droit B à l aide des boulons E des capuchons de boulon J et des clés Allen L ...

Страница 12: ...3 Étape 2 Fixez la jambe avant D au siège C à l aide du boulon G de la rondelle I et de la clé Allen L ...

Страница 13: ...4 Étape 3 POSITIONNEZ LE SIÈGE SUR LE REBORD DU DOSSIER DE LA CHAISE Positionnez le siège de chaise assemblé sur le rebord du dossier de chaise assemblé ...

Страница 14: ...5 Étape 4 SIÈGE SÉCURISÉ À L ARRIÈRE 1 2 Fixez les côtés gauche et droit du dos avec des boulons F des écrous à barillet K et des clés Allen L ...

Страница 15: ...vant avec du savon doux et de l eau Ne laissez jamais de mueble sous l eau SURFACES EN PIERRE DESSUS DE TABLE Les liquides renversés doivent être nettoyés rapidement pour éviter toute tache sur la surface Un lavage régulier avec un savon doux et de l eau en utilisant une éponge ou une brosse souple est l unique chose requise Ranger ou couvrir votre sur face en pierres naturelles lorsqu elle n est ...

Страница 16: ...7 ...

Страница 17: ... CUIDADOSAMENTE Para asistencia con el ensamblaje e instalación de las partes y servicio al cliente llame 1 877 924 2090 Inglés Lunes Viernes 8 a m 5 p m Hora de la Montaña Norte América Póngase en contacto con nosotros por correo electrónico a customerservice www rstbrands com o visite nuestro sitio web en www rstbrands com ...

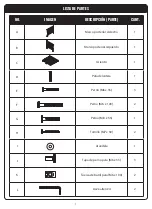
Страница 18: ...rco posterior derecho 1 B Marco posterior izquierdo 1 C Asiento 1 D Pata delantera 1 E Perno M6 x 35 3 F Perno M6 x 100 2 G Perno M8 x 55 1 H Tornillo M7 x 50 2 I Arandela 1 J Tapa de perno para M6 x 35 3 K Tuerca de barril para M6 x 100 2 L Llave allen 4 2 ...

Страница 19: ...2 Paso 1 Conecte el marco posterior izquierdo A al marco posterior derecho B con los pernos E las tapas de los pernos J y las llaves Allen L ...

Страница 20: ...3 Paso 2 Fije la pata delantera D al asiento C con el perno G la arandela I y la llave Allen L ...

Страница 21: ...4 Paso 3 Coloque el asiento de la silla ensamblada en la parte superior de la repisa del respaldo de la silla ensamblada ...

Страница 22: ... ASIENTO AL RESPALDO 1 Desde el respaldo de la silla asegure el centro con tornillos H y una llave Allen L 2 Asegure los lados izquierdo y derecho de la parte posterior con pernos F tuercas cilíndricas K y llaves Allen L ...

Страница 23: ...stán construidos con estructuras re cubiertas con polvo de aluminio diseñados para necesitar man tenimiento mínimo Evite que se acumule demasiada suciedad limpiando con agua y jabón suave Nunca deje muebles sobre el agua SUPERFICIES DE PIEDRA MESA Limpie los derrames rápidamente para evitar manchas en la esponja o cepillo es todo lo que se necesita Se recomienda está en uso durante períodos prolon...

Страница 24: ...7 ...
Отзывы: