background image

6

WIFI CONNECTION

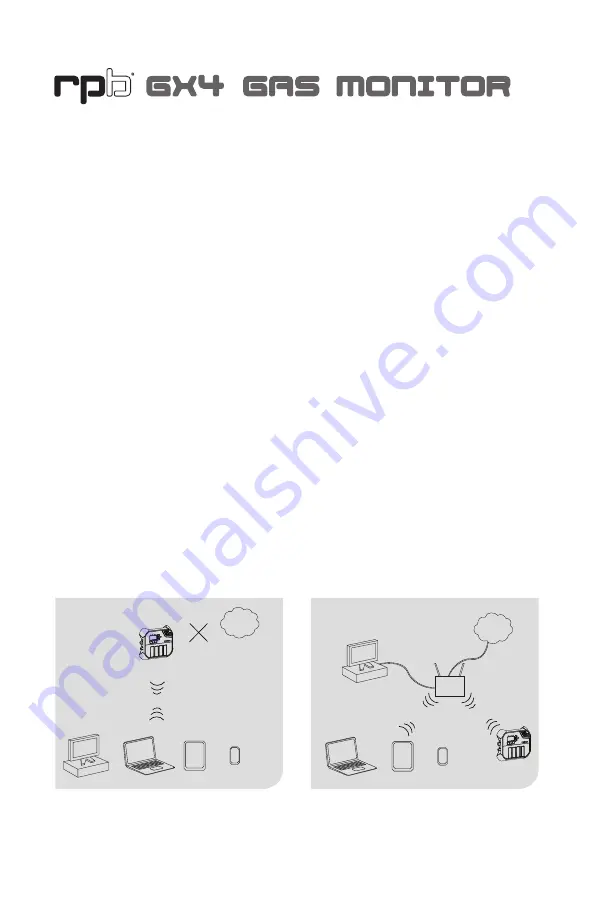
To unleash the full power of the GX4, it is recommended to connect it to the internet 
via the built-in wireless network transceiver. This connection allows easy firmware 
upgrades and the unit hosts a website available to devices on that network. Use the 
website to stream real-time gas levels, search through logs or print reports.

The GX4 can operate in two wireless modes. To select a mode in the Menu go to 
Network and then Mode. Use the arrow keys to switch between modes and press OK 
to select a mode. The unit will restart and resume operation in this network mode.

SETUP 

(CONTINUED)

Client Mode

Wireless 

Router

or

or

PC

Tablet

Smartphone

PC

GX4

Client Mode

Internet

Hotspot Mode

or

or

PC

Tablet

Smartphone

GX4

Hotspot Mode

Internet

*Limited

Connectivity

PC

or

CLIENT MODE:


Use when you have access to a wireless 
network {IEEE 802.11 b/g/n}.
-      The GX4 must be connected to the 

same network as your PC/Tablet/
Smartphone

-      Access the GX4 website through 

your internet browser.

-      Multiple GX4s can be connected in 

Client Mode to the same network 
and each individual GX4 website 
can be viewed on a seperate web 
browser page.

HOTSPOT MODE: 

Use to connect directly to your GX4 
when you do not have access to an 
existing network.
-      The GX4 Hotspot Mode does not 
connect to the internet.
-      Devices can only connect to one 

GX4 in Hotspot Mode at a time.

-      For multiple GX4s, disconnect from 

one before connecting to another.

Note: Although multiple devices can 
connect, the GX4 is not a router. When 
in Hotspot Mode your device can only 
communicate to the host GX4.

To configure your network see page 15.

Содержание GX4 08-400

Страница 1: ...INSTRUCTION MANUAL...

Страница 2: ...rpbsafety com RPB Advancing Your Safety Nova 3 Nova Radex and Zytec are registered trademarks of RPB Safety LLC For technical assistance contact our Customer Service Department on 1 866 494 4599 or e...

Страница 3: ...rates at 12 volts DC and can be used with either the 110 240v AC Adaptor P N 08 430 or the 12v cable with Battery Clips P N 08 431 The unit is designed to operate in temperature ranges of 14 to 120F 1...

Страница 4: ...of incorrect advice or information whether or not due to RPB Safety s negligence or that of it s employees agents or sub contractors WARNINGS 1 When correctly installed and maintained the RPB GX4 mon...

Страница 5: ...test features and maintain compatibility with the latest cartridges Visit http go myrpb com GX4 Update for information on the latest software and how to upgrade your unit SENSOR CHECK Checks should be...

Страница 6: ...ode or or PC Tablet Smartphone GX4 Hotspot Mode Internet Limited Connectivity PC or CLIENT MODE Use when you have access to a wireless network IEEE 802 11 b g n The GX4 must be connected to the same n...

Страница 7: ...address into your internet browser http IP Address Features The internal GX4 website provides the following features Dashboard Page Status of the unit Power Alarm Auxiliary Network Configuration Chang...

Страница 8: ...clicks into place Use the wall bracket P N 08 231 and appropriate screws to secure the wall mounting bracket to a suitable wall MOUNTING TO A RADEX FILTRATION UNIT Figure 1 1 Figure 1 3 Figure 1 2 Po...

Страница 9: ...gure 2 1 When using Battery Clips 08 431 connect Black Negative Red 12V 0 5V 1 2 Connect the power supply by screwing it onto the receptacle on the left side of the unit next to the air inlet fitting...

Страница 10: ...lve or other safety device Figure 4 1 CONNECT THE EXTERNAL ALARM SETUP CONTINUED To configure your own external device use the bare end AUX cable 08 434 It is recommended to use a qualified electricia...

Страница 11: ...y 08 430 has a floating ground so will adjust to suit 1 2 3 4 5 Not OK OK NC NO Recommended Failsafe The following system provides the most fail safe protection Connect the coils of a relay 12 VDC SPD...

Страница 12: ...button until the rpb logo appears on the screen Figure 5 1 POWER ON Tip you can store the AC Adaptor between the tabs on top of the mounting bracket Figure 5 2 OPERATION Press and hold the OK button a...

Страница 13: ...region Visit rpbsafety com for a list of available sensors The cartridge will appear on the screen in the box that correlates to the slot it was placed in The corresponding light above the screen will...

Страница 14: ...electrical contacts and air supply manifold To remove a cartridge press the corresponding release button and the cartridge will pop up Figure 7 5 Figure 8 1 REMOVE CARTRIDGE Lift the edge of the cartr...

Страница 15: ...prompted to enter the network name SSID and the wireless password If you do not know these contact your network administrator or the documentation that came with your wireless router The IP settings a...

Страница 16: ...tion and work in a well ventilated area when working with compressed air and hazardous gases Calibration Gas should be supplied between 1 and 4slpm or via a pressure regulator Using the 08 461 and 08...

Страница 17: ...450 5 Ensure you are wearing proper P P E and are in a well ventilated area 6 Agree to disable the alarms 7 Select Control Gas type 8 Connect gas and open the valve 9 Start the test 10 Test pass or f...

Страница 18: ...ent logs It is recommended that an external alarm system be wired to the Auxiliary outlet CARTRIDGE REMOVAL Upon removal of a cartridge a warning message will appear on the screen If a response to thi...

Страница 19: ...dcaps This needs to be checked regularly to ensure it is clear of oil and debris Note Evidence of oil indicates an air supply issue that needs to be resolved Figure 10 1 Figure 10 2 MAINTENANCE MANIFO...

Страница 20: ...t from all sides to make sure all of the holes are clear and that there is no oil or debris inside of the tube DO NOT DISASSEMBLE THE MANIFOLD If there is oil or debris inside of the manifold a replac...

Страница 21: ...arefully clean with MEK or other paint cleaning agents Be sure not to get MEK or other agents on the cartridge contacts or the cartridge sensors Sensors If the white sensor in the cartridge is dirty r...

Страница 22: ...22 PARTS AND ACCESSORIES 1 2 3 4 5 6 8 7 15 16 14 13 12 11 10 17 9...

Страница 23: ...ower Cord UK 08 430 UK AC Adaptor and Power Cord AU NZ 08 430 AU AC Adaptor and Power Cord EU 08 430 EU 9 Power Cord US 09 021 Power Cord UK 09 021 UK Power Cord AU NZ 09 021 AU Power Cord EU 09 021 E...

Страница 24: ...ir just by the slide of a lever Look no further than the RPB C40 From the searing heat of an Arizona summer to a severe Scandinavian winter the RPB C40 will keep you comfortable 1866 494 4599 www rpbs...

Отзывы: