


Before assembly
•
We recommend that time is taken to read the
instructions before starting assembly, then
follow the easy step by step guide.
The instruction sheet is only a guide to
the assembly. Certain items may not be
shown to scale.
•
Check all components prior to assembly
•
This product should be assembled by no
less than 2 people.
•
Never attempt to erect the assembly in
high winds.
•
Drill components where indicated.
Recommended tools for assembly
•
Cross head screw driver
•
Drill with 4mm diameter drill bit
•
Tape measure
•
Step ladder
x 2
Drill
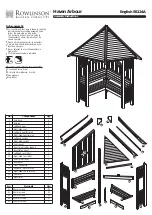
No.
Components
Qty.
1
Seat back
2
2
Seat leg
2
3
Left-hand seat
1
4
Right-hand seat
1
5
Left-hand seat facia rail
1
6
Right-hand seat facia rail
1
7
Left-hand upright
1
8
Right-hand upright
1
9
Centre post
1
10
Centre roof rafter support
1
11
Back lattice panel
2
12
Left-hand roof rafter
1
13
Right-hand roof rafter
1
14
Centre roof rafter
1
15
Roof panel
2
16
Front coverstrip
2
17
Left-hand top coverstrip
2
18
Right-hand top coverstrip
2
19
Left finial
1
20
Right finial
1
No.
Fixing kit
Qty.
21
40mm screws
32
22
60mm screws
20
23
70mm screws
36
24
130mm screws
5
25
150mm screws
2
12
6
8
5
4
7
11
10
9
13
14
15
16
3
2
1
17
18
Haven Arbour
English SS124A
Assembly Instructions
19
20


