

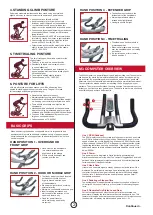


The time trialing position allows cyclists to ride
slightly faster.
• The body is low and in a neutral position.
• Shoulder girdle and cervical spine (neck)
in neutral alignment .
• The hands are positioned in an extended or
narrow position with the elbows raised slightly
off the handlebar.
• The weight is shifted slightly forward.
• Cadence speed of 90 – 100 RPM
• Resistance is moderate to heavy.
• Maintain perfect posture while lifting your
buttocks back off the saddle, rather than straight
up; keeping your center of gravity low and back.
• There should be virtually no weight on the
handlebars.
• Hands should be positioned on the handlebars
where they curve up (extended grip) or a simple
overhand grip. Shoulders stay behind the elbows.
• The nose of the saddle should graze the inner
thighs on each pedal stroke.
• Cadence speed of 70-90 RPM.
Pedal with moderate resistance and then stand using a natural and
slight body sway to create momentum to power each pedal stroke.
4. STANDING CLIMB POSTURE
5. TIME TRIALING POSTURE
6. POSTURE FOR LIFTS
Lifts are advanced postures because you will be alternating from
seated to standing positions at your own pace. The goal is to take
full advantage of body weight and strength.
• Keep each stroke smooth and fluid.
• Keep the center of gravity low so that very
little body weight is placed on the handlebars.
• Your movement should be controlled as your
weight is over the pedals to add torque and power.
• Feel the nose of your saddle grazing your buttocks
on each pedal stroke. The hips remain level and
facing forward.
• Cadence speed of 60-90 RPM’s is recommended
for climbing, varying from heavy to light resistance.
• Heavy climbs require that the weight be shifted
back, with RPM’s from 60-75 RPM.
• Faster climbs require that the weight to be shifted
slightly forward and to the middle of the saddle
with 75 – 90 RPM’s.
When positioning the hands on the handle bars, it is important to find
positions that are most comfortable. Include a variety of grip positions in
combination with the cycling postures to add variety and avoid wrist and
hand discomfort.
• Hands rest on the handlebars
in a natural position with a
slight bend at the elbows
• Wrists should be straight and
thumbs over the bar
• The fleshy part of your hand located
between your thumb and first
finger is placed near the hook
of the handlebars
• Elbows are slightly flexed, avoiding
external rotation
• Maintain a comfortable and secure grip
• Ideal for adding resistance and
well-suited for the isolation of the
upper and lower body
• Good for power transfer
while minimizing upper body
movement
• The hands are extended to the
furthest part of the handlebars
• Arms are parallel and elbows
relaxed and slightly flexed
• Hand grip should be light
• The elbows and hands are held in
a relaxed position
• Elbows and forearms are hovering
over the handle bars and not resting
on the bars
• If a cyclist has poor form, remain
in hand position 3
BASIC GRIPS
HAND POSITION 1 - OVERHAND OR
FRONT GRIP
HAND POSITION 2 - HOOK OR MIDDLE GRIP
HAND POSITION 3 - EXTENDED GRIP
HAND POSITION 4 - TIME TRIALING
The M3 computer is a powerful teaching and programming tool. The computer
can be used for providing immediate feedback as well as tracking on-going
improvement. By experiencing objective cadence, power output, gears and
heart rate, the cyclist benefits from a better overall and more effective workout.
The computer can also be used as a motivating tool to engage you in your
workouts. The more you understand the components of a proper workout, the
further you can fine tune your performance. The goal is to work more effectively
and efficiently, and achieve better results.
M3 COMPUTER OVERVIEW
Line 1 RPM (Cadence)
The RPM display counts the cyclists revolutions per minute on one crank
arm. RPM is known in the cycling world as Cadence and roughly is the
speed at which the cyclist is pedalling. At above 140 RPM the computer
will not read and the word “STOP” will appear to indicate that the cyclist
is pedalling faster than he or she needs to be. If the cyclist is out of the
saddle and wishes to retain sufficient resistance pedalling should not fall
below 60 RPM.
Line 2 Power
The power output is displayed in Watts (currently generating) and
Kilocalories (total value for the ride). The computer toggles back and forth
between Watts (displayed for eight seconds) and Kilocalories (displayed
for two seconds) throughout the ride.
Line 3 Heart Rate
If there is no heart rate signal, a steady heart symbol and a zero will be
displayed. If a participant is wearing a heart rate strap, and once the
computer locks onto the signal, the heart symbol will blink and display
the heart rate. Please note that the heart rate strap must be Polar™
compatible and coded.
Line 4 Pedaling or Elapsed Time
The number shown reports the total time spent cycling and will reset to
zero after 60 seconds of inactivity or if computer is reset using the gear
lever.
Line 5 Odometer/Trip Distance and Gear
For the first eight seconds when the computer is first activated, the
odometer will display the total distance the cycle has been ridden. This
feature is for service and maintenance purposes only. After eight seconds,
the odometer will display trip distance and gears from 1 - 24.
Continued
>
3


