background image

Keeping the World Flowing

7

 Only trained and experienced personnel should 

handle/lift the actuator.

The actuator is supplied packed on pallets suitable for normal 
handling.

 Handle the actuator with care. Never stack pallets.

7.1 

Lifting Recommendations

•  The lifting device and the sling must be suitably rated for 

the actuator weight and dimensions

•  Do not use damaged sling(s)

•  The sling must not be shortened with knots or bolts or 

any other makeshift device

•  For lifting purposes, use only suitable lifting tools

•  Do not drill holes, weld eye bolts or add any other type of 

lifting device on the actuator external surface

•  Do not lift the actuator and valve combination with the 

actuator lifting lugs

•  Every assembly must be estimated separately for a safe 

and correct lifting

•  Avoid pulls or abrupt movements during lifting. Avoid 

pushing the load

•  During lifting operations, do not handle the slings and/or 

the actuator


Do not step underneath suspended load.

7.2  Lifting Instructions

NOTE: Indication of weight, centre of gravity, 
lifting points are reported within specific project 
documentation.

For non-horizontal actuator orientation, please consult 
project specific documentation before lifting.

•  Prior to lifting the actuator, remove electrical power and 

vent all pressure vessels (if present)

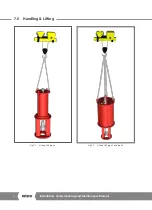
•  In case of actuator equipped with 2 eye bolts, hook the 

chains on them both, as shown in Fig 7.1

•  In case of actuator equipped with 4 eye bolts, hook the 

chains on the 4 of them, as shown in Fig 7.2


The actuator must remain vertical; balance the load.

•  Angle 

β

 must be between 0° and 45° as shown below.

Direction

of Pull

7.0  Handling & Lifting

A4

US

 US

 A4

 US

 A4

A4

US

Содержание LP/S Series

Страница 1: ...LP S Range Pneumatic Actuator Single Acting Configuration Installation Commissioning and Maintenance Manual...

Страница 2: ...1 Allowed Fluid Types 6 6 2 Expected Lifetime 6 6 3 Tightening Torque Chart 6 7 0 Handling Lifting 7 7 1 Lifting Recommendations 7 7 2 Lifting Instructions 7 8 0 Storage 9 9 0 Long Term Storage 9 10 0...

Страница 3: ...member states have been designed built and tested per the Quality Control System in compliance with the EN ISO 9001 2015 standard and with the following regulations directive 2006 42 EC Machinery Dir...

Страница 4: ...oped to motorize linear valves such as gate valves or globe valves Improper use can damage the equipment or cause dangerous situations for health and safety Rotork declines any responsibility for dama...

Страница 5: ...ble only for actuators provided with control panel Avoid maintenance operations with acid basic solutions The following label is applied externally to the actuator L TESTING PRESS PT DESIGN PRESS PS M...

Страница 6: ...h classifies the area with the explosion s risk Dust and debris accumulated on the actuator will slow down its cooling and contribute to the increase of its external temperature 6 1 Allowed Fluid Type...

Страница 7: ...ly must be estimated separately for a safe and correct lifting Avoid pulls or abrupt movements during lifting Avoid pushing the load During lifting operations do not handle the slings and or the actua...

Страница 8: ...8 Installation Commissioning and Maintenance Manual 7 0 Handling Lifting Fig 7 1 Lifting LP S type 0 Fig 7 2 Lifting LP S type 1 and type 2...

Страница 9: ...rm storage is necessary further operations must be carried out to maintain the actuator in a good working condition Replace the plastic plugs with metal plugs Stroke the actuator every 12 months Cycle...

Страница 10: ...by qualified personnel Hands must be kept away from the coupling area To assemble the actuator onto the valve proceed as follows Actuator is supplied in the fail position for single acting Set the val...

Страница 11: ...ition Contact Rotork Customer Service To disassemble the actuator from the valve proceed as follows Cut off electrical power supply Cut off pneumatic supply Release any pressure from the control group...

Страница 12: ...nally to assure perfect dynamic seal corrosion resistance and low friction Carbon steel piston with dynamic O ring seal and guide sliding ring allow for friction reduction which avoid sticking even af...

Страница 13: ...cylinder size and spring code Actuator cylinder size Spring Type 140 all sizes 0 180 D 1 B 0 AB 0 200 D 1 AB 0 235 AB 0 DE 1 E 1 D 1 W15 1 W13 1 W3 1 250 all sizes 1 280 all sizes 1 300 all sizes 1 3...

Страница 14: ...can be fitted with an emergency manual override suitable to operate the actuator in the event of fluid supply failure This device can be of mechanical screw type operated by means of a handwheel or of...

Страница 15: ...inder size 200 Type MH mechanical manual override Fig 12 6 Type MH mechanical override up to actuator cylinder size 385 Fail to close single acting actuator Rotate the handwheel counter clockwise to o...

Страница 16: ...push the handwheel at the same time When the manual override is disengaged the handwheel operation is neutral and the actuator can be operated pneumatically Instructions to engage or disengage the ove...

Страница 17: ...nk during shipment If not replace the plug with the breather Proper oil level is approximately 25 mm 1 below the fill breather port Oil level should be checked with the tank in a vertical position and...

Страница 18: ...y the absence of pressure B Loosen stop nut 1 and remove the O ring 2 C Slowly pressurize the cylinder to detach stop bolt from piston 1 2 3 D With the help of a suitable size wrench rotate the stop b...

Страница 19: ...h rotate the stop bolt 3 counter clockwise to increase the angular stoke F Remove the pressure G Verify the newly obtained angular position with one stroke H Repeat operations E to G until the desired...

Страница 20: ...p bolt 3 from piston D To increase linear stroke rotate stop bolt 3 anti clockwise E Remove pressure F Verify the newly obtained angular position with one stroke G Repeat operations A to F until the d...

Страница 21: ...nnections NOTE For tapered thread fluid connections apply a thin layer of thread sealing product Loctite 577 or equivalent to ensure a good seal Connect the pneumatic power source in accordance to the...

Страница 22: ...esses in the cable entries On the unused entries of the junction box replace the plastic plugs with approved metal plugs to guarantee sealing and comply with explosion safety protection codes Assemble...

Страница 23: ...aluminium alloys as metal scraps Dispose of the rubber PVC resins etc separately in accordance with the existing national and regional regulations Electric components are to be separately disposed of...

Страница 24: ...bolts wrong setting Adjust stop bolt setting following instructions in section 12 7 5 Leakages Stop bolts wrong setting Adjust stop bolt setting following instructions in section 12 7 Worn seals Repla...

Страница 25: ...nections 1 PM LP 004 Check threaded connections bolts studs and nuts with valve If necessary tighten to the recommended torque in accordance with the size and the characteristics of the fastener mater...

Страница 26: ...liminary Operations Description Remove electric and pneumatic supply before proceeding 1 Remove dust from actuator external surface with a dust rag and by blowing air Do not polish rub non metal surfa...

Страница 27: ...ic supply to perform the following test 1 Operate the actuator 2 Perform the stroke several times by local and remote if applicable control Actuator could exhaust medium supply in the atmosphere durin...

Страница 28: ...actuator is in its fail position spring relaxed for single acting actuator 3 Move the mechanical manual override according to instructions reported in MANUAL OVERRIDE page 14 to stroke the actuator 4...

Страница 29: ...pply before working on electrical devices Read and follow the safety precautions reported in the Manufacturer s Maintenance Manual Risk of temporary modification of the component protection Use only a...

Страница 30: ...d hydraulic fluid must be disposed of safely 1 1 5 1 1 1 2 D1 Filling procedure 7 Fill with oil from the fill breather port 1 5 up to 25 mm 1 below the port 8 Close stop valve 1 2 and verify that stop...

Страница 31: ...pply if present before performing any operation Adequate lifting devices and suitable for the weight must be applied by skilled personnel Preliminary actions 1 Remove actuator from valve and remove al...

Страница 32: ...t the operation Do not unscrew the stop bolt completely while the cylinder is pressurized 1 2 3 INSTRUCTION VALID FOR SPRING DOWN ONLY 9 Unscrew blind nuts 4 and nuts 5 10 Remove end flange 6 with O r...

Страница 33: ...erials Spare seals Wrench Lifting tools Project documentation Warnings Preliminary Operations Removal from Valve INSTRUCTION VALID FOR SPRING DOWN ONLY 12 Remove spacer 9 9 INSTRUCTION VALID FOR SPRIN...

Страница 34: ...nings Preliminary Operations Removal from Valve INSTRUCTION VALID FOR SPRING DOWN ONLY 15 Unfasten screws 15 and remove spring cartridge away from piston 11 11 15 10 INSTRUCTION VALID FOR SPRING UP ON...

Страница 35: ...s Removal from Valve INSTRUCTION VALID FOR BOTH SPRING DOWN AND SPRING UP 20 Hold piston 11 and unscrew piston rod 12 21 Remove sliding ring 17 and O ring 18 from the piston 22 Remove O ring 16 When h...

Страница 36: ...rews 20 and remove flange 21 25 Remove O ring 22 and seals 23 and 24 20 23 21 22 24 INSTRUCTION VALID FOR BOTH SPRING DOWN AND SPRING UP 26 Carefully clean the seals grooves 27 All the removed parts m...

Страница 37: ...val from Valve INSTRUCTION VALID FOR BOTH SPRING DOWN AND SPRING UP 32 Position head flange 13 on valve adaption 19 and fasten screws 18 19 18 13 INSTRUCTION VALID FOR BOTH SPRING DOWN AND SPRING UP 3...

Страница 38: ...seals Wrench Lifting tools Project documentation Warnings Preliminary Operations Removal from Valve INSTRUCTION VALID FOR SPRING DOWN ONLY 36 Re install spring cartridge on piston 11 and fasten screw...

Страница 39: ...pment Tools Materials Spare seals Wrench Lifting tools Project documentation Warnings Preliminary Operations Removal from Valve INSTRUCTION VALID FOR SPRING DOWN ONLY 39 Replace spacer 9 9 INSTRUCTION...

Страница 40: ...h the help of a wench screw the stop bolt 3 into the cylinder flange until length W is achieved 45 Insert the O ring 2 and holding the stop bolt 3 with a wrench tighten the stop nut 1 Please refer to...

Страница 41: ...supply if present before performing any operation Adequate lifting devices and suitable for the weight must be applied by skilled personnel Preliminary actions 1 Remove actuator from valve and remove...

Страница 42: ...unscrew pressurise the cylinder and unscrew stop bolt by 3 4 turns Depressurize the cylinder check if the stop bolt turns freely If necessary repeat the operation Do not unscrew the stop bolt complete...

Страница 43: ...ls Project documentation Warnings Preliminary Operations Removal from Valve INSTRUCTION VALID FOR SPRING DOWN ONLY 13 Slide spring cartridge 10 piston 11 and piston rod 12 away from head flange 13 14...

Страница 44: ...n Warnings Preliminary Operations Removal from Valve INSTRUCTION VALID FOR SPRING UP ONLY 17 Unscrew blind nuts 16 and nuts 6 18 Remove end flange 7 with O ring 8 19 Remove cylinder tube 9 using suita...

Страница 45: ...n Warnings Preliminary Operations Removal from Valve INSTRUCTION VALID FOR BOTH SPRING DOWN AND SPRING UP 21 Hold piston 11 and unscrew piston rod 12 22 Remove sliding ring 17 and O ring 18 from the p...

Страница 46: ...OWN AND SPRING UP 25 Unfasten screws 21 and remove flange 22 26 Remove O ring 23 and seals 24 and 25 21 25 22 23 24 INSTRUCTION VALID FOR BOTH SPRING DOWN AND SPRING UP 27 Carefully clean the seals gr...

Страница 47: ...ngs Preliminary Operations Removal from Valve INSTRUCTION VALID FOR BOTH SPRING DOWN AND SPRING UP 33 Position head flange 13 on valve adaption 20 and fasten screws 19 20 19 13 INSTRUCTION VALID FOR B...

Страница 48: ...terials Spare seals Wrench Lifting tools Project documentation Warnings Preliminary Operations Removal from Valve INSTRUCTION VALID FOR SPRING DOWN ONLY 37 Actuator type 1 Re install spring cartridge...

Страница 49: ...Tools Materials Spare seals Wrench Lifting tools Project documentation Warnings Preliminary Operations Removal from Valve INSTRUCTION VALID FOR SPRING DOWN ONLY 39 Replace cylinder tube 9 using suita...

Страница 50: ...stop bolt 3 into the cylinder flange until length W is achieved 45 Insert the O ring 2 and holding the stop bolt 3 with a wrench tighten the stop nut 1 Please refer to page 18 of the present document...

Страница 51: ...power supply if present before performing any operation Preliminary actions 1 Verify Actuator is in the fail position single acting and not pressurized 2 Remove actuator from valve see Removal from Va...

Страница 52: ...Task Hydraulic cylinder for manual override seals replacement Equipment Tools Materials Spare seals Wrench Lifting tools Project documentation Warnings Preliminary Operations Removal from Valve 11 Ho...

Страница 53: ...als Spare seals Wrench Lifting tools Project documentation Warnings Preliminary Operations Removal from Valve 14 Fully unscrew stop bolt 3 and remove seal washer 2 15 Sustain the hydraulic cylinder ad...

Страница 54: ...pment Tools Materials Spare seals Wrench Lifting tools Project documentation Warnings Preliminary Operations Removal from Valve INSTRUCTION VALID FOR SPRING UP ONLY 19 Remove piston 11 and piston rod...

Страница 55: ...ng rings 11 and O ring 12 11 12 11 INSTRUCTION VALID FOR SPRING DOWN ONLY 23 Unfasten screws 15 and remove flange 16 24 Remove O ring 17 15 16 17 INSTRUCTION VALID FOR SPRING DOWN ONLY 25 Remove O rin...

Страница 56: ...aterials Spare seals Wrench Lifting tools Project documentation Warnings Preliminary Operations Removal from Valve INSTRUCTION VALID FOR SPRING UP ONLY 27 Replace sliding ring 11 and O ring 12 11 11 1...

Страница 57: ...seals Wrench Lifting tools Project documentation Warnings Preliminary Operations Removal from Valve INSTRUCTION VALID FOR SPRING DOWN ONLY 31 Replace O ring 17 32 Replace remove flange 16 and fasten...

Страница 58: ...ols Materials Spare seals Wrench Lifting tools Project documentation Warnings Preliminary Operations Removal from Valve INSTRUCTION VALID FOR SPRING DOWN AND SPRING UP 35 Position hydraulic cylinder 9...

Страница 59: ...inder for manual override seals replacement Equipment Tools Materials Spare seals Wrench Lifting tools Project documentation Warnings Preliminary Operations Removal from Valve 39 Hold stop bolt with a...

Страница 60: ...eplacement Equipment Tools Materials Spare seals Wrench Lifting tools Project documentation Warnings Preliminary Operations Removal from Valve 41 Assemble hydraulic pump 3 with its support and tighten...

Страница 61: ...ed Cut off power supply and electric power supply if present before performing any operation Adequate lifting devices and suitable for the weight must be applied by skilled personnel Preliminary actio...

Страница 62: ...anual Handwheel MH and MHD seals replacement LP SD and LP SU actuator cylinder up to size 235 Equipment Tools Materials Spare seals Wrench Lifting tools Project documentation Warnings Preliminary Oper...

Страница 63: ...t LP SD and LP SU actuator cylinder up to size 235 Equipment Tools Materials Spare seals Wrench Lifting tools Project documentation Warnings Preliminary Operations Removal from Valve 10 Remove grub sc...

Страница 64: ...size 235 Equipment Tools Materials Spare seals Wrench Lifting tools Project documentation Warnings Preliminary Operations Removal from Valve 14 Remove nut 13 and O ring 14 13 14 INSTRUCTION VALID FOR...

Страница 65: ...Equipment Tools Materials Spare seals Wrench Lifting tools Project documentation Warnings Preliminary Operations Removal from Valve INSTRUCTION VALID FOR LP SU ONLY 18 Holding stop bolt 12 with a wre...

Страница 66: ...s replacement LP SD and LP SU actuator cylinder up to size 235 Equipment Tools Materials Spare seals Wrench Lifting tools Project documentation Warnings Preliminary Operations Removal from Valve 21 Ho...

Страница 67: ...MH and MHD seals replacement LP SD and LP SU actuator cylinder up to size 235 Equipment Tools Materials Spare seals Wrench Lifting tools Project documentation Warnings Preliminary Operations Removal...

Страница 68: ...H and MHD seals replacement LP SD and LP SU actuator cylinder up to size 235 Equipment Tools Materials Spare seals Wrench Lifting tools Project documentation Warnings Preliminary Operations Removal fr...

Страница 69: ...unless otherwise specified Cut off power supply and electric power supply if present before performing any operation Adequate lifting devices and suitable for the weight must be applied by skilled pe...

Страница 70: ...P SU actuator cylinder from size 235 to 385 Equipment Tools Materials Spare seals Wrench Lifting tools Project documentation Warnings Preliminary Operations Removal from Valve INSTRUCTION VALID FOR MH...

Страница 71: ...LP SD and LP SU actuator cylinder from size 235 to 385 Equipment Tools Materials Spare seals Wrench Lifting tools Project documentation Warnings Preliminary Operations Removal from Valve INSTRUCTION V...

Страница 72: ...ctuator cylinder from size 235 to 385 Equipment Tools Materials Spare seals Wrench Lifting tools Project documentation Warnings Preliminary Operations Removal from Valve INSTRUCTION VALID FOR MHD HAND...

Страница 73: ...s replacement LP SD and LP SU actuator cylinder from size 235 to 385 Equipment Tools Materials Spare seals Wrench Lifting tools Project documentation Warnings Preliminary Operations Removal from Valve...

Страница 74: ...actuator cylinder from size 235 to 385 Equipment Tools Materials Spare seals Wrench Lifting tools Project documentation Warnings Preliminary Operations Removal from Valve 21 Lift the manual override...

Страница 75: ...LP SD and LP SU actuator cylinder from size 235 to 385 Equipment Tools Materials Spare seals Wrench Lifting tools Project documentation Warnings Preliminary Operations Removal from Valve 25 Replace ke...

Страница 76: ...85 Equipment Tools Materials Spare seals Wrench Lifting tools Project documentation Warnings Preliminary Operations Removal from Valve INSTRUCTION VALID FOR MH HANDWHEEL ONLY 27 Replace dust excluder...

Страница 77: ...nt Tools Materials Spare seals Wrench Lifting tools Project documentation Warnings Preliminary Operations Removal from Valve INSTRUCTION VALID FOR MHD HANDWHEEL ONLY 33 Clean the grooves and replace O...

Страница 78: ...d LP SU actuator cylinder from size 235 to 385 Equipment Tools Materials Spare seals Wrench Lifting tools Project documentation Warnings Preliminary Operations Removal from Valve INSTRUCTION VALID FOR...

Страница 79: ...cylinder 1 10 Piston 1 11 Flange 1 12 External thrust tube 1 13 Stem 1 14 Adapter flange 15 Valve coupling 1 16 Stop bolt 2 17 Nut 1 18 Spring package 1 ITEM DESCRIPTION QTY 19 O ring 1 20 O ring 1 21...

Страница 80: ...9 Centring ring 1 10 Flange 1 11 Pneumatic cylinder 1 12 Piston 1 13 Flange 1 14 External thrust tube 1 15 Stem 1 16 Adapter flange 1 17 Valve coupling 1 18 Stop bolt 1 ITEM DESCRIPTION QTY 19 Nuts 1...

Страница 81: ...ng ring 1 21 Piston 1 22 Upper flange 1 23 Flange 1 24 Spring canister 1 25 Cylinder 1 27 Plug 1 28 Stem 1 29 Valve coupling 1 32 Nut 1 33 Blind nut 1 34 Stop bolt 1 ITEM DESCRIPTION QTY 35 Plug 1 36...

Страница 82: ...1 10 Centring ring 1 15 Spring 1 19 Piston 1 20 Top flange 1 21 Bottom flange 1 22 Cylinder 1 23 Spring canister 1 25 Valve coupling 1 27 Stem 1 30 Nut 1 31 Blind nut 1 32 Stop bolt 1 ITEM DESCRIPTION...

Страница 83: ...3 Seal washer O ring 2 4 Washer 1 5 Piston 1 6 Piston rod seal 2 7 Sliding ring 2 8 O ring 1 9 Bushing 1 10 Plug 1 11 Piston seal 1 ITEM DESCRIPTION QTY 12 End flange 1 13 Head flange 1 14 Piston rod...

Страница 84: ...verride MH ITEM DESCRIPTION QTY 1 O ring 1 2 Handwheel 1 3 Setting dowel 1 4 Nut 1 5 Bearing 1 6 Cap 1 7 Back plate 1 8 O ring 1 9 O ring 1 10 Nut 1 ITEM DESCRIPTION QTY 11 Nut 1 12 Screw 1 13 Protect...

Страница 85: ...ITEM DESCRIPTION QTY 1 Dust excluder 1 2 Bearing 1 3 Handwheel 1 4 Protective tube 1 5 Flange 1 6 Flange 1 7 Spindle nut 1 8 Lead screw 1 9 Ring nut 1 11 Plate 1 12 O ring 1 ITEM DESCRIPTION QTY 13 O...

Страница 86: ...ITEM DESCRIPTION QTY 1 Dust excluder 2 2 Bearing 1 3 Wheel hub 1 4 Screw 3 5 Knob 1 6 Handwheel 1 7 Protective tube 1 8 Flange 1 9 Flange 1 10 Spindle nut 1 11 Lead screw 1 13 Ring nut 1 ITEM DESCRIPT...

Страница 87: ...aulic Oil Below is the standard oil specification for Rotork fluid powered actuator hydraulic manual override and hydraulic cylinders working at temperature between 20 C and 100 C for ATEX and non ATE...

Страница 88: ...on ASTM D 130 3 hrs 100 C 1B Pour Point C ASTM D 97 54 Flash Point C ASTM D 92 182 Foam Sequence I II III ASTM D 892 ml 20 0 Dielectric Strength ASTM D877 kV 45 Acute Aquatic Toxicity LC 50 OECD 203 P...

Страница 89: ...Keeping the World Flowing 89...

Страница 90: ...are continually developing our products their design is subject to change without notice The name Rotork is a registered trademark Rotork recognises all registered trademarks Published and produced i...

Отзывы: