background image

10

ENGLISH

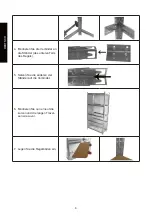
4.  Attach the connectors to the 

stayer (on the lower part of the 
shelf).

5.  Put the other four stayer to the 

connectors.

6.  Attach again the small and the 

long traverses as done before.

7.  Insert the wooden shelves.

8.  The shelf is fully assembled.

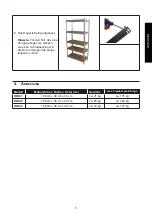
General note:

 In the case a 

tongue is bent place a screwdri-
ver in the groove and bend in 
the opposite direction.

Содержание HLS01

Страница 1: ...srisiko zu senken NOTE Read all warnings and instructions to reduce the risk of injury Keep for later use Schwerlastregal Modelle HLS01 HLS02 HLS04 Original Anleitung Original instruction Abbildungen können vom erworbenen Produkt abweichen Pictures may differ from the purchased product DEUTSCH ...

Страница 2: ... vermieden werden Verwenden Sie stets Schutzhandschuhe bei der Montage und der Demontage Das Regal sollte mit der Wand verankert werden Beachten Sie hierbei dass die Wandbefesti gungen nicht im Lieferumfang enthalten immer an die Bausubstanz der vorhandenen Wände angepasst werden müssen Achten Sie beim Beladen des Regales auf eine gleichmäßige Lastenverteilung Vermeiden Sie unbedingt eine Überladu...

Страница 3: ...ntraverse kurz 10 F Verbinder 4 G Kunststoff Füße ohne Abbildung 8 Abbildungen sind nicht maßstabsgetreu 3 AUFBAU 1 Bringen Sie zunächst die schwarzen Füße an die Stän der an keine Abbildung 2 Montieren Sie danach die kurzen Außentraversen an die Ständer 3 Bringen Sie die langen Traver sen an ...

Страница 4: ... Sie die Verbinder an die Ständer des unteren Teils des Regals 5 Setzen Sie die anderen vier Ständer auf die Verbinder 6 Montieren Sie nun erneut die kurzen und die langen Traver sen wie zuvor 7 Legen Sie die Regalböden ein ...

Страница 5: ... sie einen Schraubenzieher in die Nut und biegen die Zunge langsam zurück 4 ABMESSUNG Modell Maße Höhe x Breite x Tiefe cm Gewicht max Traglast pro Einlage HLS01 180 cm x 90 cm x 40 cm ca 21 kg ca 175 kg HLS02 180 cm x 90 cm x 45 cm ca 25 kg ca 250 kg HLS04 180 cm x 80 cm x 40 cm ca 19 kg ca 175 kg ...

Страница 6: ...6 DEUTSCH ...

Страница 7: ...GLISH NOTE Read all warnings and instructions to reduce the risk of injury Keep for later use Heavy load Shelf Models HLS01 HLS02 HLS04 Original instruction Pictures may differ from the purchased product ...

Страница 8: ...tions 1 SAFEFTY INSTUCTIONS Handle carefully with items during construction and during use to avoid injuries Always use protective gloves when assembling and dismantling The rack should be anchored to the wall Note that the wall brackets not included must always be adapted to the basic fabric of the existing walls When loading the shelf pay attention to an equal distribution of the load Be sure to...

Страница 9: ...utside Traverse long 10 D outside Traverse short 10 E Connector 4 F plastic feet no image 8 Image is not drawn to scale 3 CONSTRUCTION 1 Attach the feet on the uprights no image 2 Next install the short traverses to the uprights 3 Now attach the long traverses ...

Страница 10: ... 5 Put the other four stayer to the connectors 6 Attach again the small and the long traverses as done before 7 Insert the wooden shelves 8 The shelf is fully assembled General note In the case a tongue is bent place a screwdri ver in the groove and bend in the opposite direction ...

Страница 11: ...Dimensions height x width x depth cm weight max limit of load per shelf HLS01 180 cm x 90 cm x 40 cm about 21 kg up to 175 kg HLS02 180 cm x 90 cm x 45 cm about 25 kg up to 250 kg HLS04 180 cm x 80 cm x 40 cm about 19 kg up to 175 kg ...

Страница 12: ...ieb durch PrimoPet GmbH Georgenhäuser Str 1 D 64409 Messel Service eMail service primopet de Produced for PrimoPet GmbH Georgenhäuser Str 1 D 64409 Messel Distributed by PrimoPet GmbH Georgenhäuser Str 1 D 64409 Messel Service eMail service primopet de 141110141110110127 ...

Отзывы: