Ross TC700M Скачать руководство пользователя страница 35

After the head height has been set correctly, the clearance between the tops of the 

blade assemblies,


(p5-3, item 6), and the 

reset pad,

 (p5-2, item 2), should be checked. To do this, run the head assembly 

to the top of the stroke. Open the 

pivoting guard,

 (p5-1, item 1), and look for a space between the blade 

assembles tops and the bottom of the reset pad. Hold onto each 

retainer bar,

 (p5-3, item 3), in turn and 

try to move the head assembly 

magnet carrier

 within its’ mounting slot. The head should move around 

easily without the blade assemblies touching the 

reset pad.

 There should be no greater clearance than 

approximately .06 inches, (1.5 mm), between the tops of the blades and the reset pads. 
 
To correct clearance add or delete shim washers between the top of the 

reset plate studs,

 (p5-2, item 

16) and the reset plate. Shim washer numbers are: 

  11451009 ................................................. Washer, flat 3/4 id x .032 thk 

  11450116 ................................................. Washer, flat 3/4 id x .092 thk 

 
There may already be washers on top of the reset posts to adjust the height of the reset plate. The 700M 
is carefully adjusted at the factory. If, for any reason, the reset plate, head frame or guide frame is 
removed from the machine, be sure to keep track where each shim washer goes. During reassemble, 
make sure that the washers go back in exactly the same position. 
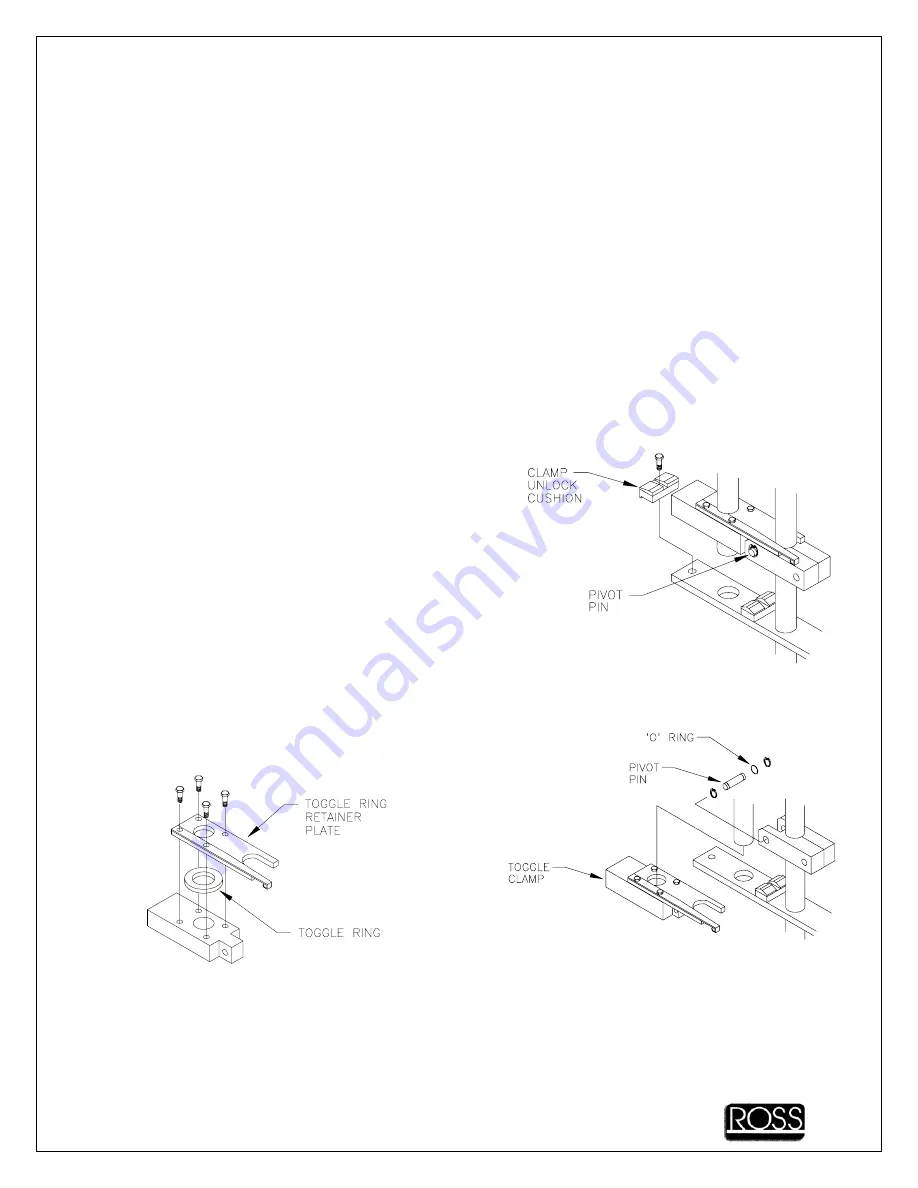


7.3.5 TOGGLE 

RING 

REPLACEMENT 


A

. Disconnect the machine power cord. Remove the side 

cover panel. 

B

. Rotate motor coupling (in direction of arrow)  until head 

assembly is in full down position. 

C

. Remove unlock cushion  

D

. Remove pivot pin, turn toggle clamp and  remove from 

shaft  

E

. Remove toggle ring retainer plate and toggle  ring 

F

. Install new toggle ring; replace toggle ring  

retainer 

plate. 
 

NOTE 

- Always install new toggle rings on both sides. 


G

.

 Replace toggle clamp. Install pivot pin  


Make sure snap rings are in position


H

. Check the snap ring position on the guide uprights. There should be one snap ring above and one 

below the clamp pivot, the snap rings go in the lower two grooves on the guide   uprights 


MN700-MC0010  


7-5

Содержание TC700M

Страница 1: ...MN700 MC0010 MODEL TC700MC TENDERIZER MADE IN USA Ross Industries Inc Midland Virginia 22728 Phone 540 439 3271 800 336 6010 Fax 540 439 2740 ...

Страница 2: ...MN700 MC0010 ...

Страница 3: ... that each blade is actually driven through the meat by magnetic force These head plates consist of a sophisticated array of rare earth magnets and special electrical steel pole pieces The magnets provide just enough force to drive the blades through the toughest meat but no more When a ROSS blade hits anything tougher than meat the magnetic force is overcome and the individual blade simply stops ...

Страница 4: ...gerous moving parts The entire tenderizing head is enclosed by stainless steel safety guards that incorporate an electronic interlock switch The machine will not operate unless the guards are properly closed NEVER operate the Tenderizer if the safety guards have been removed or if the electronic interlock switch is not working properly NEVER reach under safety guards while machine is running If yo...

Страница 5: ...Assemblies and machine with clean hot water or steam All traces of detergent must be removed 6 Sanitize entire machine using only neutral pH sanitizers 7 Rinse machine and Blade Assemblies with clean hot water 8 Liberally spray the Magnetic Head Plates Blades Guide Uprights Main Uprights and Seals with ROSS 601 Oil 9 Replace Blade Assemblies in machine CAUTION NEVER USE CAUSTIC CLEANING SOLUTIONS ...

Страница 6: ...OR ASSEMBLY 5 5 5 6 MOTOR REDUCER ASSEMBLY 5 6 5 7 CAM DRIVE ASSEMBLY 5 7 5 8 CAM ASSEMBLY 5 8 5 9 RETURN SPRING CAM ASSEMBLY 5 9 5 10 TOGGLE CLAMP RETURN SPRING ASSEMBLY 5 10 5 11 MAIN FRAME ROCKER BAR CAM FOLLOWER 5 11 6 OPERATION 6 1 6 1 MACHINE OPERATION 6 1 6 2 CLEANING AND BLADE REPLACEMENT 6 2 6 3 HEAD ASSEMBLY INSTALLATION 6 4 7 MAINTENANCE 7 1 7 1 INSPECTION 7 1 7 2 LUBRICATION 7 1 7 3 AD...

Страница 7: ...ved plug cap Machines ordered for operation on low voltages 208 240 volts are supplied with a plug cap conforming to NEMA L15 20P Machines for 440 480 volts are supplied with a plug cap conforming to NEMA L16 20P Machines for 575 volts are supplied with a plug cap conforming to NEMA L17 20P Machines for 380 415 service at 50Hz are supplied with the appropriate pin and sleeve type plug cap conformi...

Страница 8: ...rames descend until the guide frame contacts the meat At this point the guide frame stops while the head frame continues downward to the bottom of the stroke The guide frame is locked on the stationary toggle rods by the toggle assembly This holds the meat down on the conveyor belt as the head frame travels upward withdrawing the blades As the main uprights and the guide raisers reach the clamp pi...

Страница 9: ...des still inserted in the product To prevent this from happening a phase sensor A1 is incorporated in the electrical system to keep the motor starter from being energized unless the incoming power is correctly phased Terminals 3 4 and 5 of the phase sensor are connected to the incoming power allowing the phase sequence to be sensed If they are in the correct sequence an internal solid state relay ...

Страница 10: ...zer can easily be rolled from the skid Use the 2 x 4 end brace that was removed as a step ramp at the end of the skid and roll the Tenderizer slowly from the skid to the floor being careful not to damage the casters 3 2 INSTALLATION The 700MC Tenderizer does not need any installation as such since it is considered a portable electrically operated appliance and need simply be rolled into position h...

Страница 11: ...nd line cord The chart on page 3 4 illustrates the various items required for different line supplies The numbers after MAIN MOTOR refers to the part number of the motor required for the selected supply The MOTOR WIRING refers to the connections in the motor junction box for the selected supply The actual connections are given on the motor s nameplate The numbers after the HEATERS PHASE SENSOR LIN...

Страница 12: ...to the receptacle provided and pull the main power switch out to the ON position With the guard completely closed press the START button If the machine starts and continues to operate the phasing of the incoming power is correct and no further changes are necessary However if when pressing the START button nothing happens the phasing of the incoming power may be incorrect To correct the phasing tw...

Страница 13: ...3 5 INSTALLATION CHART MN700 MC0010 3 4 ...

Страница 14: ...F3 14140132 200 480 PHASE MONITOR A1 14160527 575 PHASE SENSOR ASSEMBLY A1 09019180 200 240 HEATERS FOR K1 7A 3 EA 14050070 380 480 HEATERS FOR K1 3 7A 3 EA 14050074 575 HEATERS FOR K1 3 3A 3 EA 14050067 ALL DISCONNECT SWITCH S1 14120367 ALL RELAY K2 14050005 ALL TRANSFORMER T1 14080025 ALL START SWITCH S3 09078501 ALL POWER SWITCH S2 09093610 ALL MOTOR STARTER K1 14050066 ALL HEAD ADJUSTING SWITC...

Страница 15: ...SPARES LIST VOLTAGE DEPENDENT COMPONENTS IDENTIFIED WITH AN VOLTAGE DESCRIPTION PART NO ALL LIMIT SWITCH S5 S6 14120080 ALL ROD END 13070013 ALL BLADE LONG ANGLE POINT 01019876 MN700 MC0010 4 2 ...

Страница 16: ...OUNT 11018506 9 14 13 1 2 GUARD SAFETY SWITCH NUT LOCK 1 4 20 2 11040011 GUARD INLET 04177332 10 11 9 1 5 7 8 6 3 4 2 P N DESCRIPTION QTY ITEM 11018508 11450609 SCREW SPRDR 1 4 20X5 8 WASHER LOCK 1 4 2 14 1 17 18 13 15 16 14 12 SPREADER INLET GUARD 04177320 1 SPREADER OUTLET GUARD 02170340 SPACER SPREADER 01177840 1 01173751 01220491 01448130 NAMEPLATE CHECK LIST NAMEPLATE CAUTION NAMEPLATE OIL HE...

Страница 17: ...5 2 HEAD CARRIER ASSEMBLY MN700 MC0010 5 2 ...

Страница 18: ...5 3 HEAD ASSEMBLY MN700 MC0010 5 3 ...

Страница 19: ...MN700 MC0010 5 4 5 4 CONVEYOR DRIVE ASSEMBLY ...

Страница 20: ...MN700 MC0010 5 5 5 5 CONVEYOR ASSEMBLY ...

Страница 21: ...5 6 MOTOR REDUCER ASSEMBLY MN700 MC0010 5 6 ...

Страница 22: ...5 7 CAM DRIVE ASSEMBLY MN700 MC0010 5 7 ...

Страница 23: ...MN700 MC0010 5 8 5 8 CAM ASSEMBLY ...

Страница 24: ...CREW HHC 1 4 20x1 7 8 LG RETURN SPRING MOUNT OUTER NUT HEX LOCKING 3 8 16 RETURN SPRING MOUNT INNER BAR RETURN SPRING MOUNT SCREW HHC 3 8 16x1 3 4 LG 9 11 10 WASHER LOCK Ø1 4 CAM PLATE MOTOR GEAR 4 6 8 7 5 SPRING 2 3 1 02219020 11018520 11040074 11017718 11450609 11018519 02219010 01219030 05178000 01219300 14100094 ...

Страница 25: ...5 10 TOGGLE CLAMP RETURN SPRING ASSEMBLY MN700 MC0010 5 10 ...

Страница 26: ...5 11 MAIN FRAME ROCKER BAR CAM FOLLOWER MN700 MC0010 5 11 ...

Страница 27: ...adjusting motor to reach its destination and stop before changing the switch position E Place the meat centrally on the conveyor CAUTION ATTEMPTING TO PROCESS MEAT THICKER THAN MACHINE CAPACITY OR FORCING MEAT UNDER THE HEAD WILL SERIOUSLY DAMAGE THE MACHINE NEVER CHANGE THE HEAD ADJUST SWITCH FROM THE HIGH TO THE LOW POSITION WHILE PROCESSING PRODUCT THAT IS OVER 7 1 2 HIGH OR WHILE SUCH PRODUCT ...

Страница 28: ...ate using a 1 1 8 wrench 5 The blade assembly can now be taken to a separate cleaning station and immersed in a mild detergent solution 100 immersed The use of a plastic tub is recommended so as not to damage the sharp edge of the blades DO NOT SET BLADE ASSEMBLY WITH BLADE TIPS DOWN ON ANY METAL SURFACE The following is the recommended cleaning process A Soak blade assembly for a minimum of 15 mi...

Страница 29: ...lide the lower blade guide into position on the guide frame and install the lower outer guide bar To accomplish this sometimes it is necessary to slightly lift the lower blade guide USE CAUTION NOT TO PUSH HANDS INTO THE BLADES AT THE BOTTOM OF THE LOWER BLADE GUIDES 11 Check that the installed head assembly moves freely in its installed position It should slide within the slots on the guide bar a...

Страница 30: ...6 3 HEAD ASSEMBLY INSTALLATION MN700 MC0010 6 4 ...

Страница 31: ...ECHANISM MOVING ON ITS OWN WEIGHT WHEN THE MACHINE IS STOPPED WITH THE HEAD IN THE UP POSITION The cam plate and cam roller should be lubricated with a high quality water resistant grease such as Chevron SR1 Grease 2 NOTE The two grease fittings on the cam plate for the Dual Height Range Option Kit must be lubricated every month One or two pumps from a grease gun containing Chevron SR1 2 or equiva...

Страница 32: ...o not allow the chain drive for the height adjusting mechanism to become too loose If the chain gets loose enough to skip a tooth on the sprocket a complete readjustment of the height mechanism would be necessary See Head Height Adjustment on next page 7 3 1 CONVEYOR BOX This is how the conveyor box should appear when the conveyor is at rest and not advancing The index arm and pawl has pivoted bac...

Страница 33: ... to the back of the gear box drive motor Turn the electric motor until the cam roller p5 7 item 9 is located directly below the gear box output shaft The height of the head frame is controlled by the adjustment of the roller switches p5 10 item 29 They are mounted on a switch bracket p5 10 item 36 By slightly loosening the two securing screws p5 10 item 16 the whole bracket can be carefully shifte...

Страница 34: ...worked and will eventually fail This will only happen if the chain has slipped on one of the lift sprockets To check for level of the main uprights remove the head frame and check across the tops of the main uprights with a straight edge Disconnect the chain and turn one of the lift sprockets to even main uprights Reconnect chain and tension 2 If the high low mechanism is not used on a regular bas...

Страница 35: ...d x 092 thk There may already be washers on top of the reset posts to adjust the height of the reset plate The 700M is carefully adjusted at the factory If for any reason the reset plate head frame or guide frame is removed from the machine be sure to keep track where each shim washer goes During reassemble make sure that the washers go back in exactly the same position 7 3 5 TOGGLE RING REPLACEME...

Страница 36: ...on the stabilizer bars and spacers page 5 11 items 29 30 K Make sure toggle assembly is centered on toggle rod L Check mechanism for free movement Toggle assembly should pivot up and down approximately 1 8 M Turn motor coupling in direction of arrow so machine makes two complete cycles Check for proper clamp and guide operation throughout cycle ...

Страница 37: ...l panel attached to the front of the machine with the plate hook temporarily connect terminal 7 of relay K2 to ground Turn the machine on and press the START button If it starts then one or both of the guard switches were not operating Remove the temporary connection and open the main access panel Disconnect one guard switch at a time and connect together the ends of the wires to which the guard s...

Страница 38: ...ed on and the START switch pressed this should be 120 VAC Relay K2 faulty Check by measuring voltage between terminals 2 and 7 of the relay while attempting to start the machine this should be 120 VAC 2 Machine plugged in guards closed main power switch pulled out only a small click is heard when the START switch is pressed Relay is operating Incoming power out of phase Phase Monitor faulty Exchan...

Страница 39: ...er faulty Check by measuring the voltage from the NC terminal on the starter to ground this should be 0 volts if not the overload section of the starter should be replaced 3 Machine plugged in guards closed main power switch pulled out a large click or thump is heard when pressing the START switch but the machine does not start Motor starter is pulled in Motor may hum and draw excessive line curre...

Страница 40: ...pivot freely on the clamp pivot and both assemblies should be centered on the uprights and toggle rod Inspect for any signs of wear or damage to the toggle and guide raiser assemblies Check condition of unlock cushions Replace any worn or damaged parts Both toggles must unlock at the same time Check position of snap rings on main and guide uprights See section 7 3 for proper position NOTE Severe v...

Страница 41: ... follower so that the index pawl in the conveyor box just contacts a tooth on the index wheel Tighten the lock nut on the top of the cam follower Index pawl broken Replace as required Rocker bar spring broken Replace as required Pin holding index wheel to drive shaft broken Replace as required 9 Conveyor advances further than normal Belt too loose Tighten belt tensioning screws until overshoot sto...

Страница 42: ...ning and maintenance of machine Blade assemblies must be removed for daily cleaning and any BENT OR DAMAGED BLADES REMOVED See Maintenance Section Reset pads worn Replace as required 12 Meat lifts off of conveyor Meat too thin to be held down by guide frame Stack thin cuts of meat so they will be held down by the guide frame See Operating Procedures Section TC700MC TENDERIZER ...

Страница 43: ...MN700 MC0010 9 1 9 WIRING SCHEMATIC ...

Страница 44: ...MN700 MC0010 9 2 ...

Отзывы: