background image

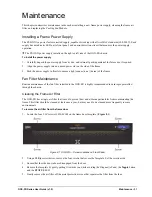
18 • Physical Installation

OGX-FR Series User Guide (v1.0)

conditions, there is no requirement for extra vertical spacing between the frames. The OGX-FR frames can be 
stacked one on top of the other, a feature that is highly desirable in densely crowded rack frame environments. 

Airflow Requirements

Under some conditions, the ambient air temperature inside rack-mount cabinets can be greater that the ambient 
temperature within a room. For safe long term reliability, ensure the ambient air temperatures at the OGX-FR frame 
front intake area are within the product’s specified operating temperature range. Adequate ventilation within a rack 
frame must also be maintained. Ensure to adhere to the following clearance recommendations:

• Minimum 2” (5.08cm) clearance both right and left-hand side of the chassis sides with unrestricted vertical 

airflow.

• Minimum 5” (12.7cm) clearance at the chassis rear with unrestricted vertical airflow.

Installation Requirements

Keep the following in mind when installing your OGX-FR frame:

• Install the frame for maximum stability during operation and in such a way as to allow adequate ventilation.
• The frame cannot be sealed in a closed container and must be installed in free air space where the ambient 

temperature is monitored and controlled to not exceed 40°C (104°F) at the frame front door airflow intake.

• Ensure that adequate space exists in front and behind the frame and on both sides of the frame for airflow 

exhaust.

• The location of the frame should be accessible, dry, and dust-free.

Installing the Rear Support Bars and Brackets

Under normal conditions, mounting the OGX-FR frame to the front of the rack with four rack screws should be 
sufficient to carry the load, including the weight of accompanying cables.

To help reduce mechanical stress due to cable weight, the FSB-OGX rear support brackets are available for the 
OGX-FR frame. The FSB-OGX are specifically engineered to compensate for extra load stress associated with 
certain applications, such as mobile truck installations, to also support the rear of the OGX-FR frame.

Installing the FSB-OGX

This section describes how to attach the FSB-OGX rear support bars to a OGX-FR frame.

The FSB-OGX cannot be installed on the DFR-8321 or DFR-8310 frames.

To install the FSB-OGX

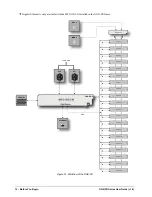
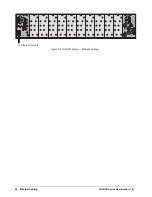
1. Attach the Rack Mount Arms of the FSB-OGX to the OGX-FR frame.

Caution

 — The two sides of the OGX-FR frame have perforations that are needed to ventilate the 

power supplies and must not be blocked.

Rack Mount Arm

Unlocked

Locked

PS2

ETHERNET

100-240V~50-60Hz 600W

CAUTION

RISK OF SHOCK

DO NOT OPEN

REF 1

LOOP
REF 2

LOOP

PS1

100-2

40V~

50-60

Hz 60

0W

CAUTION: RISK OF SHOCK

DO NOT OPEN

!

OGX-FR

!

!

Содержание OG3-FR Series

Страница 1: ...OGX FR Series User Guide...

Страница 2: ...eople that make things happen At Ross our employees are a special group Our employees truly care about doing a great job and delivering a high quality customer experience every day This code of ethics...

Страница 3: ...manual is furnished for informational use only It is subject to change without notice and should not be construed as commitment by Ross Video Limited Ross Video Limited assumes no responsibility or l...

Страница 4: ...intended for use in areas outside home International This equipment has been tested under the requirements of CISPR 22 2008 or CISPR 32 2015 and found to comply with the limits for a Class A Digital...

Страница 5: ...vironmentally friendly and health conscious manner The crossed out wheeled bin symbol invites you to use these systems If you need more information on the collection reuse and recycling systems please...

Страница 6: ......

Страница 7: ...OGX FR Rear Module 16 Rear Module Types 16 Physical Installation 17 Before You Begin 17 Static Discharge 17 Ventilation and Cooling 17 Ventilation 17 Cooling Fan Module 17 Airflow Requirements 18 Inst...

Страница 8: ...o Discovery 28 Using DashBoard to Access openGear Cards in the OGX FR Frame 28 Maintenance 31 Installing a Frame Power Supply 31 Fan Filter Maintenance 31 Cleaning the Frame Air Filter 31 Replacing th...

Страница 9: ...des information on the warranty and repair policy for your OGX FR Glossary provides a list of terms used throughout this guide Related Publications It is recommended to consult the following Ross docu...

Страница 10: ...ures you have access to technical expertise around the clock After sales service and technical support is provided directly by Ross Video personnel During business hours Eastern Time technical support...

Страница 11: ...is hot swappable for 24 7 operation Power switch is accessible from front of the rack frame Power supplies are replaceable from the front of the frame without requiring rear frame access Separate pow...

Страница 12: ...n the OGX FR frame Figure 2 1 Workflow of the OGX FR PS2 PS1 ETHERNET SLOT 20 SLOT 17 SLOT 13 SLOT 9 SLOT 5 SLOT 4 SLOT 1 FAN CTRL REF 1 REF 2 12V 7 5V REF 1 REF 1 REF 2 1 F EF RE R 2 2 F EF RE R GFC...

Страница 13: ...gnostic Panel organizes the messages starting with the most recent at the top of the list Refer to the user guide for your openGear card to learn more about the types of error conditions that your car...

Страница 14: ...r to the section GFC 8322 Overview on page 23 for more information 3 Card Slots There are a total of 20 card slots in the OGX FR chassis and are used to install openGear cards into the chassis Dependi...

Страница 15: ...provide Power over Ethernet PoE 4 REF Connectors Two sets of looping BNC inputs are provided to accept two independent reference signals supporting the following reference signal types Analog black Tr...

Страница 16: ...accommodates one card Ensure the openGear card is installed in the correct slot in the OGX FR frame Up to 10 cards can be installed in a frame when using these modules Split Rear Modules Much like th...

Страница 17: ...the following cautionary note Ventilation and Cooling Your OGX FR frame was specially engineered to minimize internal heat buildup and thus improve card reliability For More Information on the power d...

Страница 18: ...nt temperature is monitored and controlled to not exceed 40 C 104 F at the frame front door airflow intake Ensure that adequate space exists in front and behind the frame and on both sides of the fram...

Страница 19: ...of one power supply failure the frame load is seamlessly transferred to the other redundant power supply Although the power supply is hot swappable turning the power supply off before inserting or re...

Страница 20: ...ption is installed plug the second IEC connector into PS 2 Each AC connector includes a PowerLock which is designed to retain the power cable connector 3 Clip the PowerLock over the shoulder of the in...

Страница 21: ...OGX FR to take advantage of the Gigabit ethernet connectivity available for cards in the OGX FR frame Required Pinouts The Ethernet port has its RJ45 connector wired as a Network Interface Card NIC Ta...

Страница 22: ...User Guide v1 0 Figure 5 1 OGX FR Frame Ethernet Cabling PS1 100 240V 50 60Hz 600W CAUTION RISK OF SHOCK DO NOT OPEN REF 1 LOOP REF 2 LOOP PS2 ETHERNET 100 240V 50 60Hz 450W CAUTION RISK OF SHOCK DO N...

Страница 23: ...uction in reference cabling requirements Connecting to a Reference Source If only one reference type is required for the OGX FR frame connect it to the REF 1 BNC Two reference types enables you to use...

Страница 24: ...ted to its REF 2 IN BNC Troubleshooting During normal operation the GFC 8322 must never be removed from the OGX FR frame To ensure this the metal retaining latch located on the front of the GFC 8322 m...

Страница 25: ...d installing the DashBoard client software refer to the DashBoard User Manual To launch DashBoard 1 Ensure that DashBoard is installed on a PC connected to the same network as your OGX FR frame 2 Ensu...

Страница 26: ...5 Click Finish to display the OGX FR frame in the Tree View OGX FR frames added to the Tree View are also displayed in the Advanced Tree View 6 Repeat the procedure for each OGX FR frame that you wish...

Страница 27: ...tor or control the affected devices If communication with a frame is disconnected via the Disconnect option the status indicator is light gray until the frame is re connected If the status indicator i...

Страница 28: ...frame by toggling the Automatic Discovery option off Using DashBoard to Access openGear Cards in the OGX FR Frame The OGX FR frame displays in DashBoard as a main node in the Tree View with a series...

Страница 29: ...Board 29 4 If your openGear card has multiple interfaces a Expand the openGear card node b Double click a sub node to display that interface in the DashBoard window In the example below the Configurat...

Страница 30: ...30 Using DashBoard OGX FR Series User Guide v1 0...

Страница 31: ...ear of the frame Fan Filter Maintenance Routine maintenance of the fan filter installed in the OGX FR is highly recommended to ensure proper airflow through the chassis Cleaning the Frame Air Filter T...

Страница 32: ...openGear sales representative before replacing the frame air filter in your OGX FR frame To remove the old air filter from the frame door 1 Using a Phillips screwdriver remove the four 3 16 screws 850...

Страница 33: ...me 1 Gently pull the side door tabs towards the center of the door releasing the door from the frame The door extender arms retain the door to the chassis 2 Using both hands pull the door towards you...

Страница 34: ...34 Maintenance OGX FR Series User Guide v1 0...

Страница 35: ...both outputs not to exceed 500W Table 9 3 Technical Specifications Card Slots Item Specifications Number of Slots 20 Total Power Available 450W Maximum Card Power High density Split Rear Modulea a Ac...

Страница 36: ...8322 Item Specifications Max Power 12V Rail 0 2A 2 4W Max Power 7 5V Rail 0 2A 1 5W Total 3 9W maximum Table 9 6 Technical Specifications Reference Inputs Item Specifications Number of Inputs 2 loopin...

Страница 37: ...his warranty period Ross Video Limited reserves the right to repair or replace this piece of equipment with a unit of equal or superior performance characteristics Should you find that this OGX FR fra...

Страница 38: ...38 Service Information OGX FR Series User Guide v1 0...

Страница 39: ...Network Controller Card the MFC OG3 N and any available options unless otherwise noted NTSC captions the CEA 608 D Line 21 Data Services captions openGear frame refers to the OGX FR frames unless othe...

Страница 40: ...40 Glossary OGX FR Series User Guide v1 0...

Отзывы: